Guide to Fix Videos Struggling to Render YouTube
Have you ever posted a video to YouTube only to have it get stuck in processing, slow during playback, or refuse to render properly? Isn't this frustrating? You are not alone! Many creators encounter this problem, whether due to file formats, internet difficulties, or YouTube's oddities. The good news is that these issues have solutions.
In this page i will discuss why your videos may be difficult to render and will provide you easy fixes to get your content up and running properly.
Part 1. Why Videos Struggling to Render YouTube?
Is there anything more frustrating than uploading a video to YouTube, only to have it get stuck in processing or refuse to play properly? Don't worry, you're not alone! These rendering errors can affect anyone, but the good news is that they are frequently caused by a few simple and fixable flaws. Let's examine them so you can identify the problem and get back to producing.
1. Unsupported file format
YouTube is not compatible with every video format. While popular formats such as MP4, MOV, and AVI function well, uploading an unsupported format may get your video stuck. Make sure your file type is compatible.
2. Poor Internet connection
Uploading videos needs an uninterrupted and fast internet connection. A slow or unstable connection can disrupt the upload or processing, resulting in delays or incomplete rendering.
3. Outdated software
Using outdated video editing or encoding tools may result in compatibility issues with YouTube's requirements. This may result in issues during processing or playback.
4. Corrupted video file
If your video file becomes corrupted due to transfer issues or editing errors, YouTube may fail to process or render it appropriately.
5. Incorrect settings
Improper export settings, such as selecting the incorrect resolution, bitrate, or frame rate, can disrupt YouTube's algorithm, resulting in rendering issues.
Part 2. 5 Solutions to Fix Videos Struggling to Render YouTube
Uploading videos to YouTube is supposed to be a simple process however complications sometimes develop that prevent the video from appearing properly. If you are experiencing these issues, don't worry. Here are five solutions to ensure that your videos render properly and are ready for your audience.
1. Convert to the supported format
YouTube has specific formatting requirements for uploaded videos. One of the most dependable formats is MP4 with H.264 codec. Using incompatible formats can result in rendering difficulties or upload failures.
Steps for Conversion:
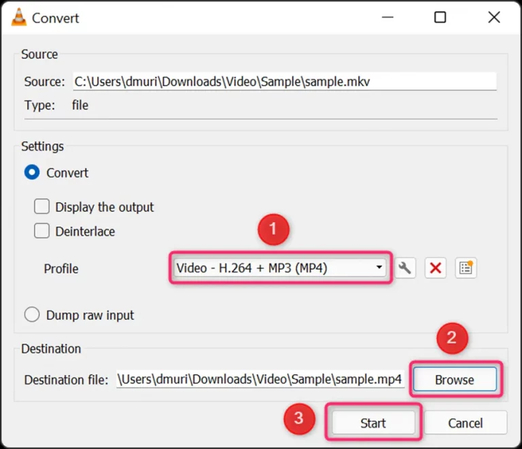
- 1.Launch your video editing software or a specific converting application, such as HandBrake or VLC Media Player.
- 2.Import your video file into the software, select Browse and then Start.
- 3.Choose MP4 as the output format and set the codec to H.264. This assures compliance with YouTube's requirements.
- 4.Save the converted video to your preferred location and then re-upload it to YouTube.
2. Improve Internet connection
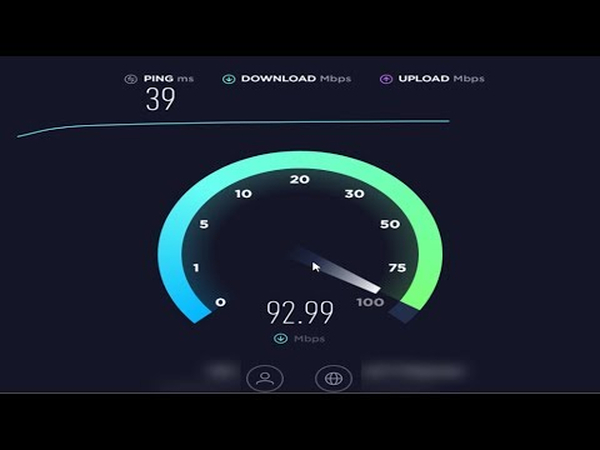
A bad internet connection could affect the upload process, resulting in incomplete or failed renders. A stable and fast connection allows for smooth video uploading.
Steps for Improvement:
- 1.Use online tools such as Speedtest to examine both download and upload speeds.
- 2.Use a connected Ethernet connection rather than Wi-Fi to ensure smooth speed.
- 3.Restart your router or modem to refresh the connection.
- 4.To lessen the risk of network congestion, schedule uploads during non-peak hours such as late at night or early in the morning.
3. Update software
Outdated browsers and video editing software might cause compatibility issues, resulting in rendering problems on YouTube.
Steps To Update:
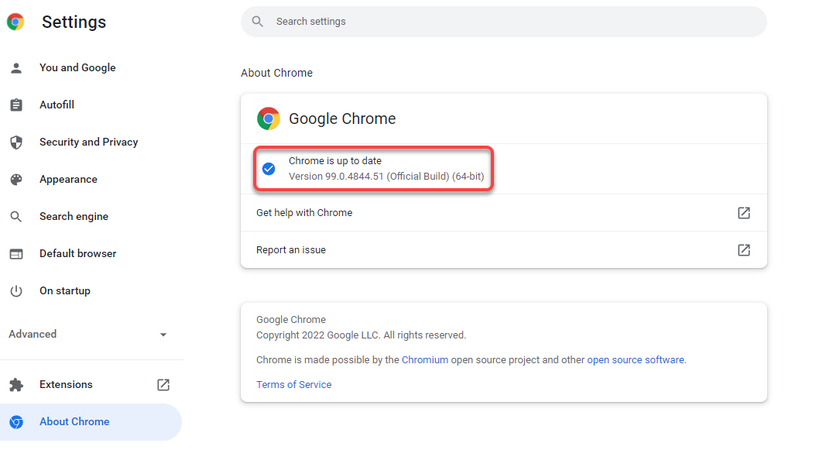
- 1.Open your video editing software and look in the "Help" or "About" area for updates.
- 2.Update your web browser to the most recent version by going to the options menu or downloading it from the official website.
- 3.Check that any plugins or extensions you use are compatible with the current browser version.
- 4.Restart your computer to install all updates and ensure optimal performance.
4. Repair corrupted files
Corrupted video files might cause upload issues and inadequate rendering. Repairing these files before uploading assures a smooth operation.
Steps for Repair:
- 1.Identify the corrupted file by playing it locally and observing any playback abnormalities, such as freezing or missing frames.
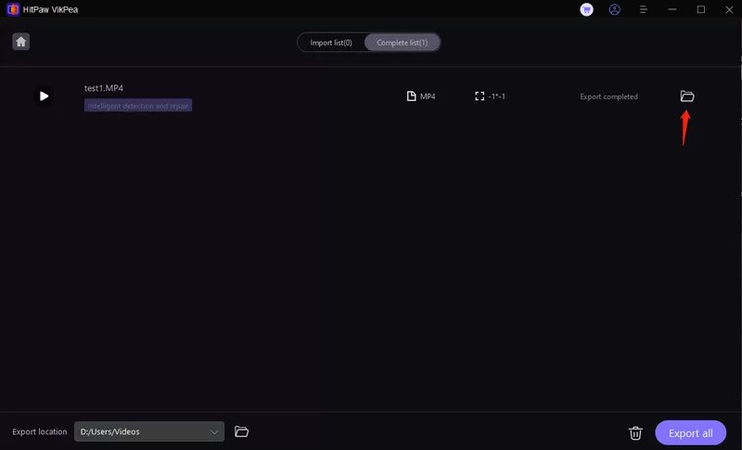
- 2.To repair the video, use software such as HitPaw VikPea. Import the corrupted video into the tool and restore it using the on-screen directions.
- 3.Save the corrected file in a new directory and preview it to confirm that it plays properly and without mistakes.
- 4.Upload the restored video file to YouTube and make sure it works properly.
5. Check and adjust settings
Incorrect video settings, such as resolution, bitrate, and frame rate, might cause rendering issues. Optimizing these parameters guarantees that they meet YouTube's criteria.
Steps to adjust:
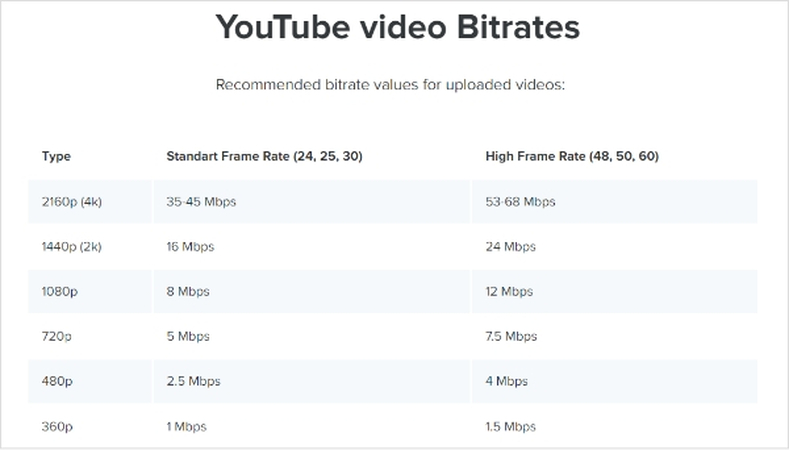
1.Check YouTube's recommended settings for your video's resolution and format. For example, 1080p videos usually demand a bitrate of 8 Mbps.
2.Open your video editing software and go to the export or render options.
3.Adjust the resolution to meet YouTube's specifications (e.g., 720p, 1080p, 4K).
4.Set the bitrate based on the resolution and content type. To retain quality in fast-moving content, use higher bitrates.

5.Ensure that the frame rate is consistent (e.g., 30fps or 60fps) and corresponds to the source video.
6.Export the video with the updated settings and re-upload it to YouTube.
Part 3. Pro-Tips. Best AI Video Enhancer Free Try
After resolving rendering issues, upgrading your video's quality can make a big difference. Consider using HitPaw VikPea (formerly HitPaw Video Enhancer), a powerful video enhancing software that optimizes videos with HDR effects and more. It's an excellent solution for creators seeking professional-quality outcomes without breaking their budgets.
Features of HitPaw VikPea
- Automatically increases brightness, contrast and color depth for a more vibrant viewing experience.
- Removes unnecessary noise while maintaining video quality.
- AI Upscaling increases resolution to make low-quality films appear sharper and more detailed.
- Adjust tone and saturation to produce accurate and visually attractive colors.
- Easily supports a variety of video formats to providesmooth editing and exporting.
Steps to Enhance Video
1.Go to the official website of HitPaw VikPea and download it on your computer.
2.Launch the app and click the Upload icon. Select the rendered video file you want to improve and add it to the workspace. You can do it by simply dragging or dropping the file.

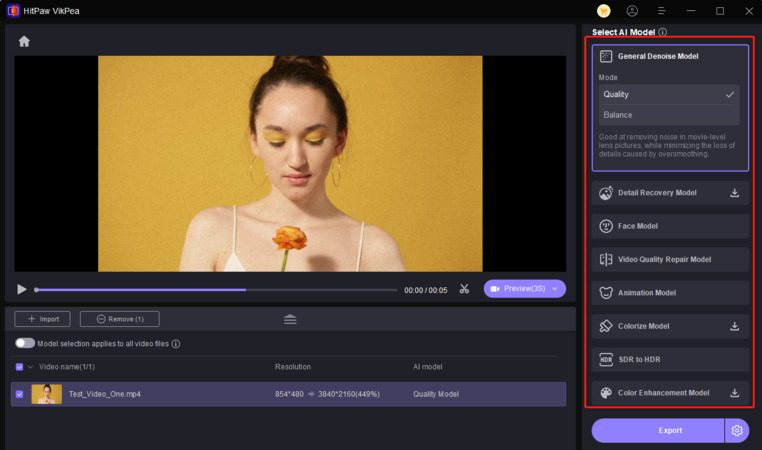
3.Select AI Upscaling options for better resolution or HDR Enhancement to improve brightness, contrast, and dynamic range.

4.Use the 'preview' option to compare the original video to the upgraded one. Make any necessary modifications for best results. Once you are satisfied with the enhancements, select the 'export' to save the enhanced video in the desired location on your computer.

Learn More about HitPaw VikPea
Conclusion
Resolving video rendering issues on YouTube necessitates proper optimization and the use of the appropriate tools. The instructions given in this article will ensure smooth rendering and high-quality uploads. We recommend HitPaw Vikpea, a flexible tool designed to enhance and optimize your videos with ease.





 HitPaw Univd (Video Converter)
 HitPaw VoicePea
  HitPaw FotorPea


Share this article:
Select the product rating:
Daniel Walker
Editor-in-Chief
My passion lies in bridging the gap between cutting-edge technology and everyday creativity. With years of hands-on experience, I create content that not only informs but inspires our audience to embrace digital tools confidently.
View all ArticlesLeave a Comment
Create your review for HitPaw articles