How to Block YouTube on Mac
Are you tired of getting sucked into YouTube videos when you should be working or studying? Don't worry, there are several easy ways to block YouTube on Mac. In this post, we'll look at 4 simple methods to help you stay focused and avoid distractions. Whether you want to block YouTube for yourself or your kids, these tips will help you take control. We'll cover using built-in Mac tools like Screen Time and Terminal, as well as third-party options. By the end, you'll know exactly how to block YouTube on Mac computer or how to block YouTube on Safari. Let's dive in and explore the best ways to keep YouTube from stealing your time and attention!
Part 1. How to Block Access to YouTube on Mac with Screen Time
Screen Time is a powerful and user-friendly tool that comes pre-installed on newer Mac computers. It's designed to help users manage their digital habits, including the ability to set limits on apps and websites like YouTube.
What is Mac Screen Time?
Screen Time is a feature Apple introduced in macOS Catalina (and later versions) to help users understand and control their computer usage. It provides detailed insights into how you spend time on your Mac, allowing you to see which apps and websites consume most of your attention.
But Screen Time isn't just about tracking - it also gives you the power to set limits. You can restrict access to specific apps or entire categories of apps, schedule downtime when only certain apps are available, and even set up content restrictions. This makes it an ideal tool for both self-regulation and parental control.
Step By Step Guide to Block YouTube Access on Mac
Here's a detailed walkthrough on how to block YouTube on safari through Screen Time:
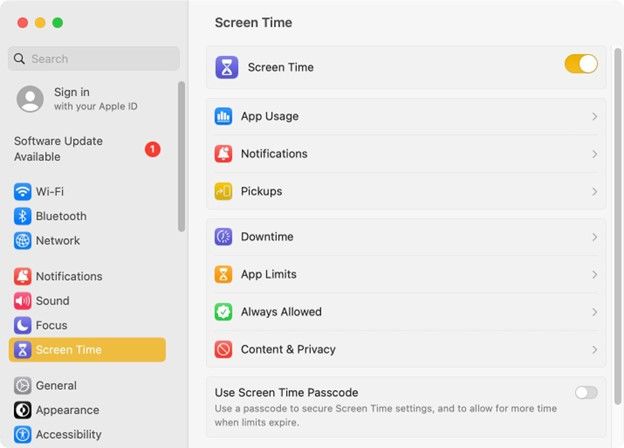
- On your Mac, navigate to System Settings > Screen Time.
- Enable Screen Time, then turn on Use Screen Time Passcode at the bottom and set a passcode.

- In the Screen Time window, select Content & Privacy and enable it.
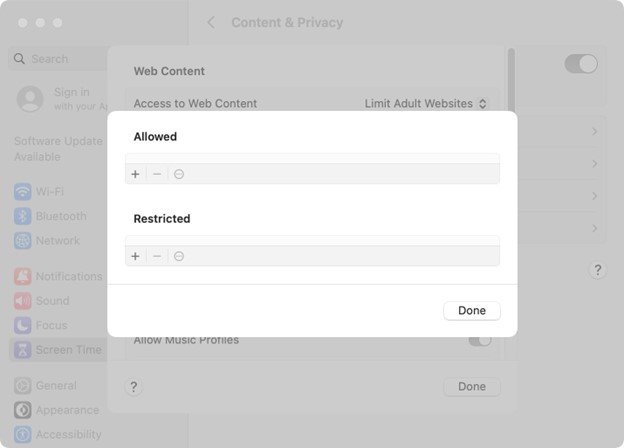
- Click on Content Restrictions.
- Under Web Content, choose Limit Adult Websites from the drop-down menu.
- Under Restricted, click the plus icon (+) to add YouTube to the Restricted list, then click Done.

That's it! YouTube will now be blocked on your Mac when using Safari and other browsers that respect macOS's content restrictions. This method is particularly effective because it works across all user accounts on the Mac and is relatively difficult for children to circumvent.
Remember, you can always return to these settings to adjust them or turn off the restriction when needed. This flexibility makes Screen Time an excellent choice for temporary productivity boosts or scheduled focus times.
Part 2. How to Block Access to YouTube on Mac with Terminal
For those who are comfortable with a more technical approach, Terminal offers another way to block YouTube across your entire Mac system. This method is more robust and affects all browsers and apps on your Mac.
What is Terminal on Mac?
Terminal is a command-line interface for macOS. It provides text-based access to the operating system, allowing users to navigate, modify, and control their Mac using typed commands. While it might seem intimidating at first, Terminal is an incredibly powerful tool that can perform actions not possible through the regular graphical user interface.
In this case, we'll use Terminal to edit the "hosts" file on your Mac. The host file is a system file that maps host names to IP addresses. By adding YouTube to this file and mapping it to your local machine, we can effectively block access to the site.
Step By Step Guide to Block Access on Mac
Follow these steps carefully to block YouTube using Terminal:
- Open Terminal (find it in Applications > Utilities)
- Type: sudo nano /etc/hosts
- Enter your password when asked
- Go to the bottom of the file
- Add these two lines: 127.0.0.1 youtube.com 127.0.0.1 www.youtube.com
- Use the Ctrl-O shortcut and then press the Return key
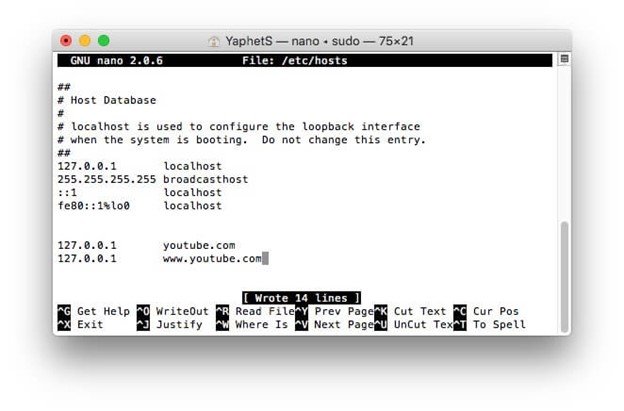
YouTube is now blocked, but it will still open in your web browser until you clear the cache. You can verify the blocking using your browser's incognito mode (which is cache-free).
To unblock websites on Mac Terminal, simply delete the websites you have added.
Part 3. How to Block YouTube on Mac with BlockSite
If you're looking for a more user-friendly option that doesn't require system-level changes, a browser extension like BlockSite can be an excellent choice.
What is BlockSite?
BlockSite is a popular, free browser extension available for multiple browsers including Chrome, Firefox, and Safari. It allows users to easily block access to specific websites or even set up scheduled blocking times.
One of the key advantages of BlockSite is its simplicity - you don't need any technical knowledge to set it up and use it. It also offers additional features like a work mode, which can block a preset list of distracting sites during your working hours.
Step By Step Guide to Block Access on Mac
Here's a detailed guide on how to use BlockSite to block YouTube:
- Go to the Chrome Web Store or Firefox Add-ons page.
- Search for BlockSite and add it to Chrome or Firefox on your Mac.
- Click the Extensions icon to the right of your browser's address bar and select BlockSite.
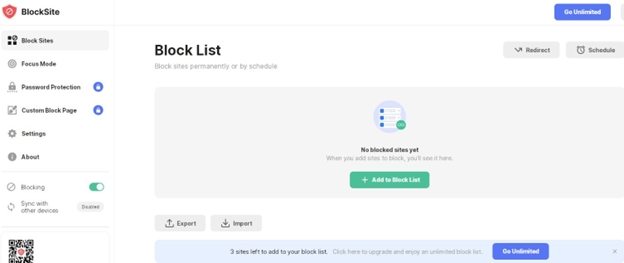
- Click the Edit block list or the Settings button in the upper right corner.
- Click Add to Block List in the middle of the window.

- Enter youtube.com in the top web address field and click the plus icon next to the YouTube site.
- Click Done.
Whenever you try to access YouTube, you'll see a BlockSite page instead. This method is easy to set up and customize, making it great for those who want a simple solution or need to block YouTube only at certain times.
Part 4. How to Block YouTube on Mac through Web Filtering on a Router
For a more comprehensive solution that affects all devices on your home network, consider blocking YouTube at the router level. This method is particularly useful for parents who want to control access to all family devices.
What is Web Filtering on a Router?
Web filtering on a router is a feature that allows you to control access to specific websites or categories of websites for all devices connected to your home network. Instead of setting up blocks on each device, you can create a single set of rules that applies to everything - computers, smartphones, tablets, and even smart TVs.
Many modern routers come with built-in parental controls or web filtering options. These features allow you to create blacklists (sites to block) or whitelists (only allowed sites), often with the ability to set up schedules or different rules for different devices.
Step By Step Guide to Block Access on Mac
The exact steps depend on your router, but here's the general idea:
- Open your browser and log into the router's web interface.
- Go to Access Control and click Target.
- In the Target Settings window, tap Add New.
- Select URL Address as the Mode type.
- Enter a short description for this setting, such as "Block YouTube."
- Add the domain name of YouTube or just the keyword in the Add URL Address box, then click Add.
- Click Save.
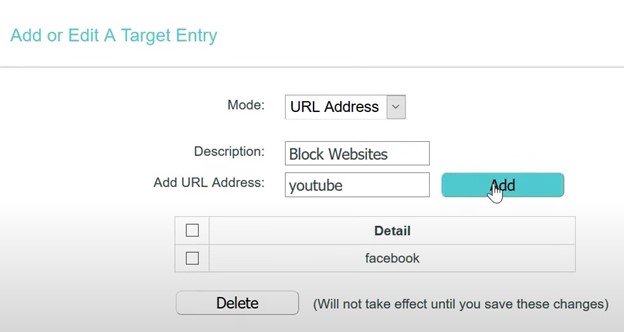
This method blocks YouTube for all devices on your network, which is great for families or when you want a complete "no YouTube" environment. It's harder to circumvent than browser-based solutions, especially for less tech-savvy users.
However, keep in mind that this won't block YouTube when devices are using cellular data or connected to other Wi-Fi networks. For mobile devices, you might want to combine this with device-specific controls.
Part 5. Pro Tip: Download YouTube Videos Instead of Blocking
While blocking YouTube can be an effective way to boost productivity, sometimes you might want to watch specific videos without getting sucked into the endless recommendations. In these cases, downloading YouTube videos for offline viewing can be a great solution. One excellent tool for this is the HitPaw Univd (HitPaw Video Converter) for Mac.
What is HitPaw Univd for Mac?
HitPaw Univd for Mac is a versatile software that allows you to download and convert videos from YouTube and thousands of other sites. It's more than just a downloader - it's a comprehensive video tool that can help you manage your media consumption more effectively.
With HitPaw, you can download the videos you need and watch them later, without the risk of getting distracted by other content. This approach allows you to enjoy YouTube content on your terms, fitting it into your schedule when it's appropriate.
Features of HitPaw Univd for Mac
HitPaw Univd - All-in-one Video Solutions for Win & Mac
Secure Verified. 254,145 people have downloaded it.
- Download videos from 10,000+ sites: Not just YouTube, but also platforms like Vimeo, Dailymotion, and social media sites.
- HD quality: Download videos up to 8K resolution
- Convert videos to 1000+ formats: Perfect for ensuring compatibility with all your devices.
- Edit videos with built-in tools: Trim, crop, add subtitles, and more without needing separate editing software.
- Fast downloads with no quality loss: Get high-quality videos quickly and efficiently.
- Easy to use with a simple interface: No technical expertise required.
- Batch processing: Download multiple videos at once to save time.
Secure Verified. 254,145 people have downloaded it.
Step-by-Step Guide to Download YouTube Videos
Here's a detailed guide on how to use HitPaw Univd to download YouTube videos:
Step 1: Install & Launch HitPaw Univd on Mac
After installing the HitPaw Univd, open the application on your Mac. You'll see a clean, user-friendly interface with several options at the top.
Step 2: Copy the Video URL
Go to YouTube and find the video you want to download. Click in the address bar of your browser and copy the entire URL.
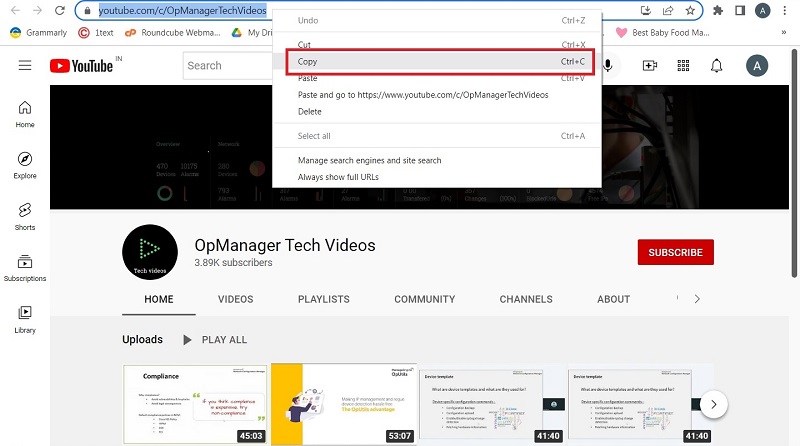
Step 3: Paste the URL and Analyze
Back in the HitPaw Univd, click on the "Paste URL" button. The software will automatically detect the video. You'll see options for different quality levels and formats. Choose MP4 for a video file or MP3 if you just want the audio.

Step 4: Download YouTube to MP4 8K
After analysis, you can select an output format. The best quality can be up to 8K resolution. You can also download YouTube to MP3.

Step 5: Start Downloading YouTube Video
Once you've selected your preferred format and quality, click the "Download" button. You'll see a progress bar indicating the download status. You can pause and resume saving whenever you want.

Step 6: Save and Edit
After the download is complete, you'll find your video in the "Converted" tab. From here, you can play the video directly in HitPaw Univd's built-in player.

By using the HitPaw Univd for Mac, you can enjoy YouTube content without the risk of getting sidetracked by recommendations or autoplay. It's a great middle-ground solution between completely blocking YouTube and allowing unrestricted access.
Conclusion
Now you know how to block YouTube on Mac using 4 easy methods. Screen Time is great for built-in control, Terminal works system-wide, BlockSite is simple for browsers, and router filtering helps the whole family. Pick the method that works best for you. And remember, if you still want to watch YouTube videos without getting distracted, try using HitPaw Univd for Mac to download them for later. With these tools, you can take charge of your YouTube habits and boost your focus. Say goodbye to YouTube distractions on your Mac!



 HitPaw VoicePea
  HitPaw VikPea (Video Enhancer)
 HitPaw FotorPea


Share this article:
Select the product rating:
Daniel Walker
Editor-in-Chief
My passion lies in bridging the gap between cutting-edge technology and everyday creativity. With years of hands-on experience, I create content that not only informs but inspires our audience to embrace digital tools confidently.
View all ArticlesLeave a Comment
Create your review for HitPaw articles