How to Put Watermark on Photos Without Photoshop
Have you ever wondered how to protect your digital photos without using expensive software like Photoshop? Adding a watermark is an important way to safeguard your images and claim your rights. In this blog post, we'll explore three proven methods to put a watermark on a photo without Photoshop.
Way 1: Batch Watermark Photos with HitPaw Univd (HitPaw Video Converter)
If you're looking for a tool that's quick, easy, and efficient, HitPaw Univd is one of the best options available. Though it's primarily known as a video converter, it also comes with a powerful feature for adding watermarks to both photos and videos.
Features of HitPaw Univd
HitPaw Univd - All-in-one Video Solutions for Win & Mac
Secure Verified. 254,145 people have downloaded it.
- Supports batching adding watermarks to images and videos
- Add signature to photos without photoshop.
- Supports both text watermark and image watermark
- Supports all image & video formats: JPG, JPEG, PNG, WEBP, TIFF, MP4, MOV, AVI…
- Fine-tune watermark parameters such as font, transparency, color, etc.
- No technical skills are required to get started.
Secure Verified. 254,145 people have downloaded it.
How to Put a Watermark on a Photo Without Photoshop
Protect your photos and reinforce your brand identity by adding watermarks using HitPaw Univd. Follow these easy steps to get started:
Step 1: Access the Image Editor Feature
Open HitPaw Univd and select the Image Editor feature from the Toolbox. Import the photos that you'd like to watermark.

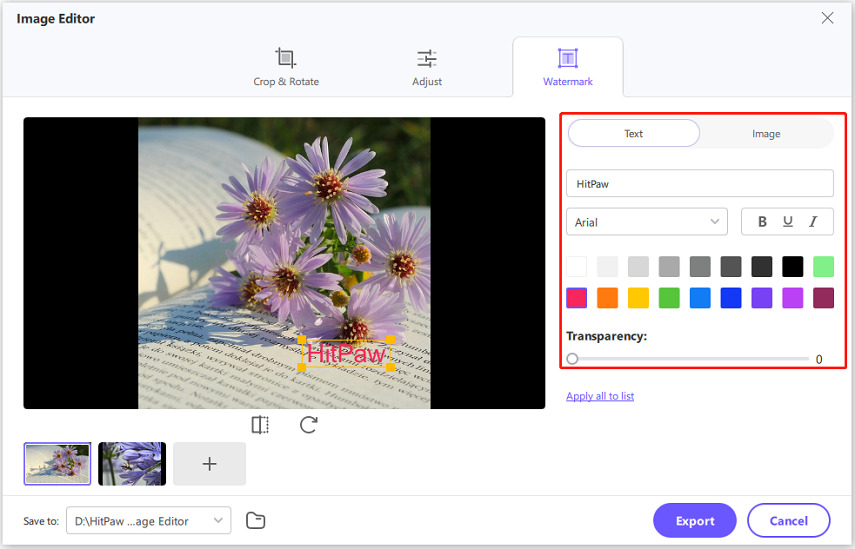
Step 2: Add a Text Watermark
Select the Text option to add a watermark in text form. Enter the text you want to use, such as your name, a brand, or a copyright notice. You can customize the text by adjusting its Font style, Size, Color, Opacity and Text style (bold, italics, etc.). Position the text by dragging it in the preview window.

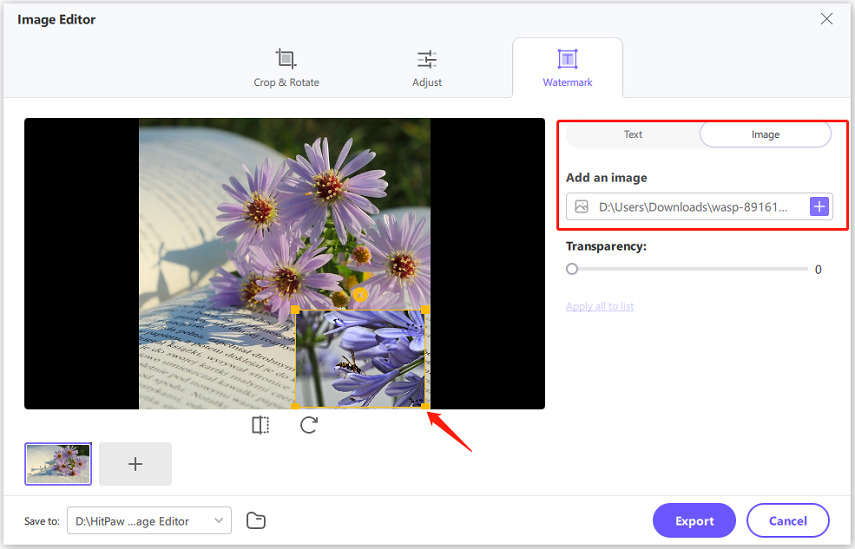
Step 3: Add an Image Watermark
To add an image watermark, like a logo, click the Image option. Upload the image you want to use as a watermark. Resize, adjust the transparency, and position the watermark by dragging it on the preview screen.

Step 4: Apply the Watermark to All Images
Once you're satisfied with your text adjustments, click "Apply all to list" to apply the watermark to all the selected images at once.
Step 5: Export the Images with Watermark
Once you've made all the necessary adjustments to the image watermark, click the Export button to save the edited photos to your desired location.
Way 2: Put a Watermark on a Photo Using Microsoft Paint 3D
For those who don't want to download extra software, Microsoft Paint 3D is an excellent built-in tool for watermarking photos on Windows without Photoshop. While it may not have the advanced features of Photoshop, it's a straightforward and easy-to-use tool for simple watermarking.
With Paint 3D, you can easily add both text and image watermarks. It's perfect for occasional users who want to protect their photos without the hassle of learning complex software.
How to Put a Watermark on a Photo Using Paint 3D
Paint 3D is a built-in Windows application that offers simple tools for adding watermarks to your photos. Follow this guide to learn how to add text or image watermarks easily using the Paint 3D editor.
Step 1: Launch Paint 3D
Search for "Paint 3D" in the Start menu and open the app.
Step 2: Open Your Image
Click "Open" and select the photo you want to watermark.

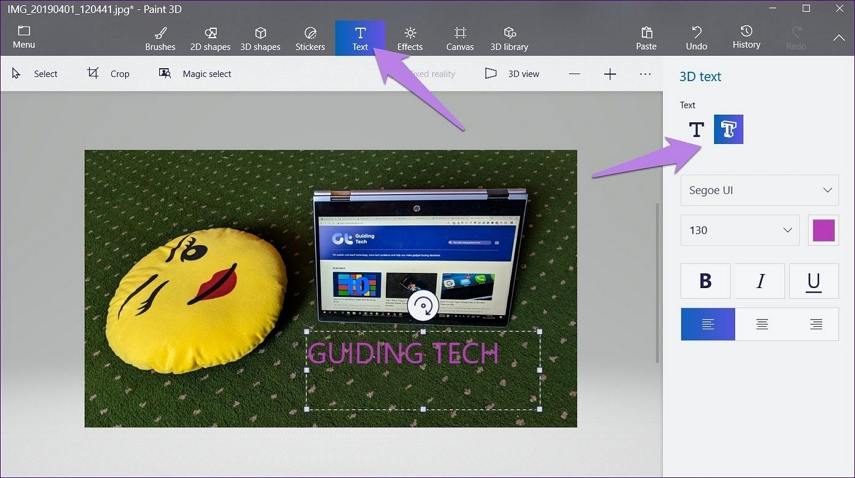
Step 3: Add a Text Watermark
Click on the "Text" tool in the top menu. Type the text you want to use as a watermark (your name, signature, or copyright symbol). Adjust the font, size, and position of the text on the image.

Step 4: Add an Image Watermark
If you want to add a logo, click on "Menu" > "Insert" > "3D Objects" to add your image. Resize and adjust the position of the logo or image to the desired spot on the photo.

Step 5: Save Your Image
Once the watermark is added, save the photo by clicking on "Menu" > "Save As."
Way 3: Use Online Tool to Put Watermark on a Photo without Photoshop
If you prefer using online tools for watermarking your images, watermark.ws is an excellent choice. This open-source, free platform lets you easily add text, logos, or signatures to your photos.
The best part is that it doesn't require you to install any software or pay for a subscription. Watermark.ws supports various file formats, making it a versatile solution for users who want quick and easy watermarking.
How to Put a Watermark on a Photo Using watermark.ws
Watermark.ws is a free online tool that lets you quickly add watermarks to your photos without the need for any software installation. In this guide, we'll walk you through how to upload, customize, and apply text or image watermarks to your pictures.
Step 1: Visit watermark.ws
Open your browser and go to the watermark.ws website.
Step 2: Upload Your Image
Click "Get Started" and upload the photo you want to watermark.
Step 3: Choose Watermark Option
To add text, select the "Text" option, type your text, and customize the font, size, and position.
To add an image watermark (like your logo), select the "Image" option and upload the logo or image.
Step 4: Adjust the Watermark
Position your watermark where you want it to appear on the photo. You can also adjust the transparency for a more subtle effect.
Step 5: Download the Watermarked Image
Once satisfied, click "Download" to save the watermarked photo to your device.

Conclusion
Watermarking your photos is an essential step in protecting your creative work, especially in the digital age. We introduce three ways to put a watermark on a photo without Photoshop. Whether you choose HitPaw Univd to batch add watermarks to photos, or using Microsoft Paint 3D and online tool like watermark.ws, they provide simple and effective ways to put a watermark on a photo effectively.


 HitPaw VoicePea
  HitPaw VikPea (Video Enhancer)
 HitPaw FotorPea


Share this article:
Select the product rating:
Daniel Walker
Editor-in-Chief
My passion lies in bridging the gap between cutting-edge technology and everyday creativity. With years of hands-on experience, I create content that not only informs but inspires our audience to embrace digital tools confidently.
View all ArticlesLeave a Comment
Create your review for HitPaw articles