Effortlessly Add Watermarks in Word Documents: Step-by-Step
Watermarks are a subtle yet impactful way to enhance the appearance of your Word documents. They help convey important messages such as confidentiality, draft status, or branding while maintaining a professional look. By adding a personal or corporate watermark, you can leave a lasting impression and secure your content effectively.
In this guide, we will show you how to add watermark in Word document effectively, step by step.

Part 1. How to Add a Simple Watermark in Word Document
Adding a simple watermark in Word is straightforward, thanks to its predefined templates. These templates include options like "Confidential," "Do Not Copy," and "Draft," making it easy to label your documents. Follow these steps to insert watermark in Word document using a predefined style:
Step 1: Open Microsoft Word and the document you want to edit.
Step 2: Go to the Design tab in the top navigation menu.
Step 3: Under the "Page Background" section, select Watermark.
Step 4: Choose a predefined watermark template, such as "Confidential" or "Draft."

Step 5: Save your document to apply the watermark.
Using predefined templates is a quick way to apply watermark in Word documents, ensuring consistency and professionalism.
Part 2. How to Add a Custom Watermark in Word Document
1. Adding an Image Watermark on Word
To make your Word document unique, you can add a custom image watermark. This is especially useful for branding, such as inserting your company logo. Here's how to add watermark in Word document using an image:
Step 1: Open Word and navigate to the Design tab.
Step 2: Select Watermark and then click on Custom Watermark.

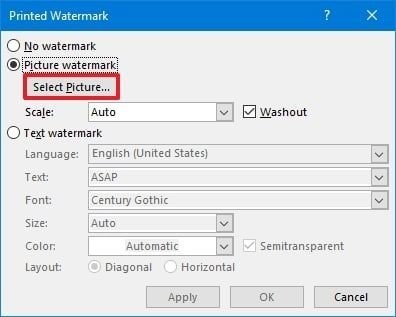
Step 3: Choose the Picture Watermark option and click Select Picture.
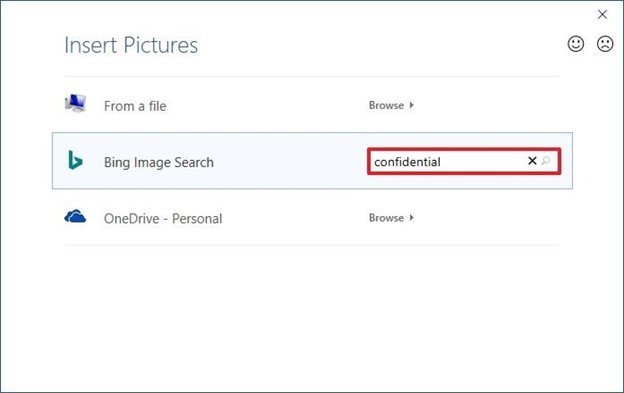
Step 4: Upload an image from your computer, OneDrive, or search Bing Images.
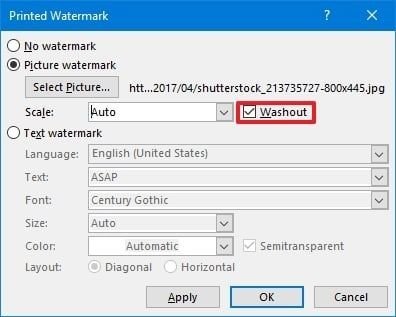
Step 5: Adjust the transparency by enabling the Washout effect for a subtle look.
Step 6: Click the Apply button to preview the watermark.
Step 7: Click the OK button.
Step 8: Click the Close button.
Step 9: Open the File menu.
Step 10: Select the Save option.
2. Adding a Text Watermark on Word
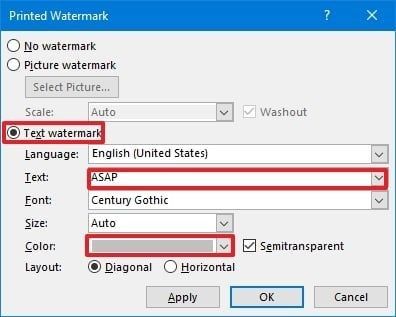
Text watermarks are perfect for adding labels like "Draft" or "Confidential." Here's how to add a watermark on Word using text:
- Open the document and go to the Design
- Click Watermarkand select Custom Watermark.
- Choose Text Watermarkand enter your desired text.

- Open the Font drop-down menu to choose a font style for the watermark.
- Use the Size drop-down menu to set the font size for the watermark.The default size usually works well for most cases.
- Select the Color drop-down menu to pick a color for the watermark.
- Check the Semitransparent option if you want the watermark to appear faint.
- Choose the layout for the watermark either Diagonal or Horizontal.
- Click the Apply button to preview the watermark.
- Click the OK button to confirm.
- Click the Close button to exit the watermark settings.
- Open the File menu and select the Save option to save your changes.
By using these custom options, you can create professional and personalized watermarks.
Part 3. How to Edit a Watermark in Word
Editing an existing watermark allows you to adjust its size, position, and design. Follow these steps to modify your watermark in Word:
Step 1: Open the document containing the watermark.
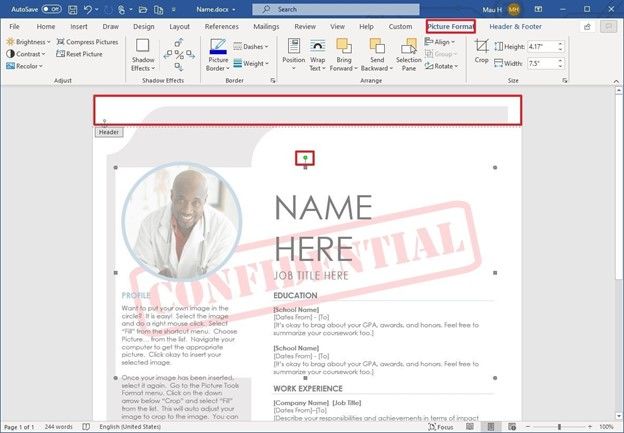
Step 2: Double-click the header or footer to activate the watermark editing mode.
Step 3: Click on the watermark to select it.
Step 4: Use the formatting tools under the Picture Format or WordArt tabs to make changes.
- Adjust brightness, contrast, and shadow effects.
- Resize the watermark using the corner dots.
- Rotate the watermark using the green dot.
Step 5: Save the document to finalize your edits.
Part 4. How to Remove a Watermark in Word Document
If a watermark is no longer needed, you can remove it in just a few steps. Here's how to remove a watermark in Word:
Step 1: Open the document and go to the Design tab.
Step 2: Click on Watermark in the "Page Background" section.
Step 3: Select Remove Watermark from the dropdown menu.

Step 4: Save the document to finalize the changes.
Removing watermarks ensures your document is clean and ready for new content.
Part 5. Pro-Tip: Add Watermarks to Photo in Bulk Free
For advanced photo editing needs, such as adding watermarks, cropping, or rotating images, consider using HitPaw Univd (HitPaw Video Converter). It offers a user-friendly interface with powerful features that make editing easy.
Features of HitPaw Univd
HitPaw Univd - All-in-one Video Solutions for Win & Mac
Secure Verified. 254,145 people have downloaded it.
- Add text and image watermarksto photos for free
- Supports all photo and image formats
- Batch processing for editing multiple images simultaneously.
- Additional image editing options for cropping, rotating, and flipping images.
- Customizable transparency and font options for watermarks.
- Many other multi media tools: image converter, image compressor, AI art generator, etc.
Secure Verified. 254,145 people have downloaded it.
How to Edit Images in HitPaw Univd
Follow the steps to crop & rotate images or add effects/watermarks to images using HitPaw Univd. This versatile tool offers a range of editing features to enhance your images with precision and ease.
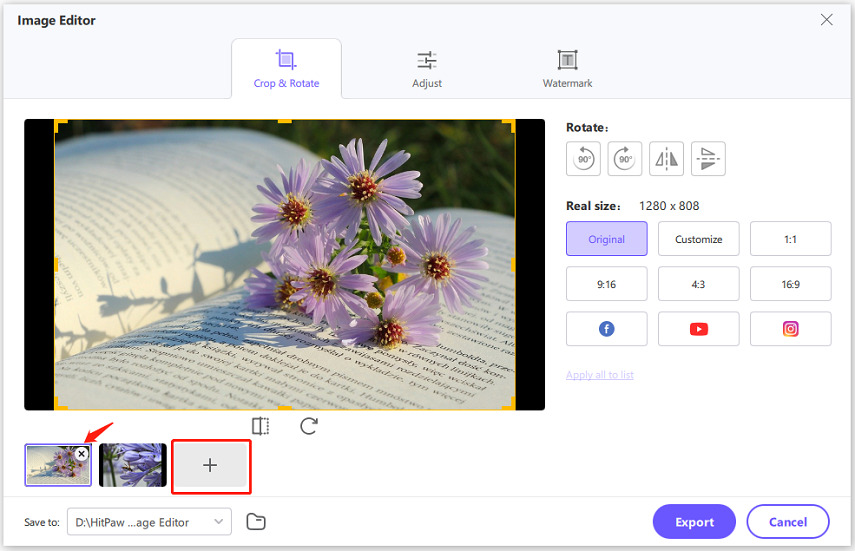
First, install and open the HitPaw Univd on your computer. Then, select the "Image Editor" feature from the Toolbox. You can import multiple images simultaneously, which will be displayed in a list. Click the + icon to add more images or use the x icon on each file to remove them from the list.

Crop & Rotate:
Choose from several fixed scales or customize the aspect ratio. Note that original and customized ratios cannot be applied d to all files simultaneously, but fixed scales can.
How to Adjust Image Effects
With HitPaw Univd, you can fine-tune your images by adjusting brightness, contrast, saturation, and hue.
Select an image to begin adjusting its effects. Use the sliders to make precise changes to each parameter.
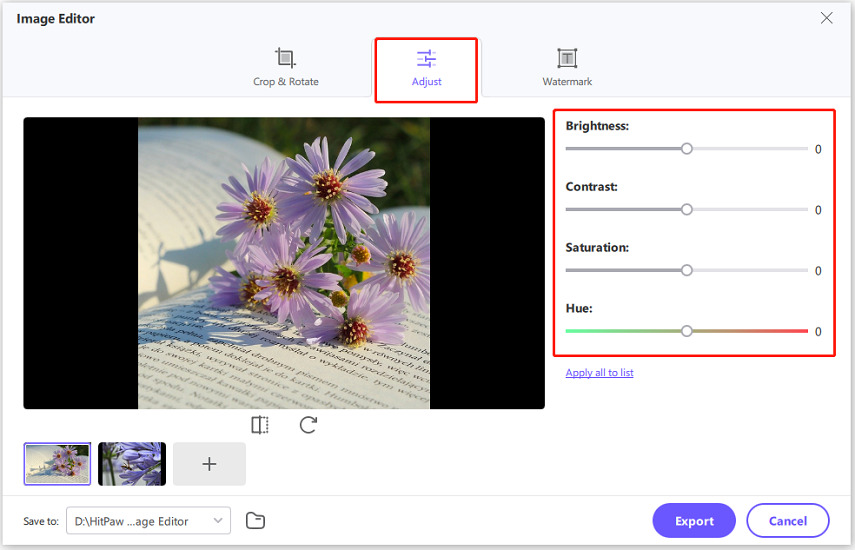
Click the Apply all to list button to batch apply these effects to multiple images simultaneously.
Add Watermark to Images
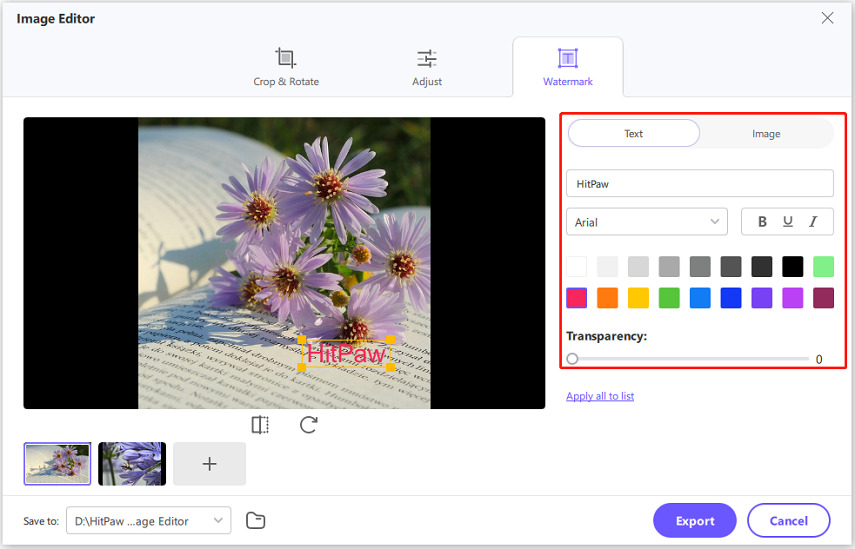
Watermarking protects your images while giving them a professional look. HitPaw Univd supports both text and image watermarks.
Enter your desired text, then customize its font, color, size, transparency, and style. Drag the text in the preview window to adjust its size and position. Use the Apply all to list option to add the text watermark to all images in the list.
Upload an image to use as a watermark. Adjust its transparency, size, and position by dragging it within the preview window. Use the Apply all to list button to batch apply the watermark across all selected images.
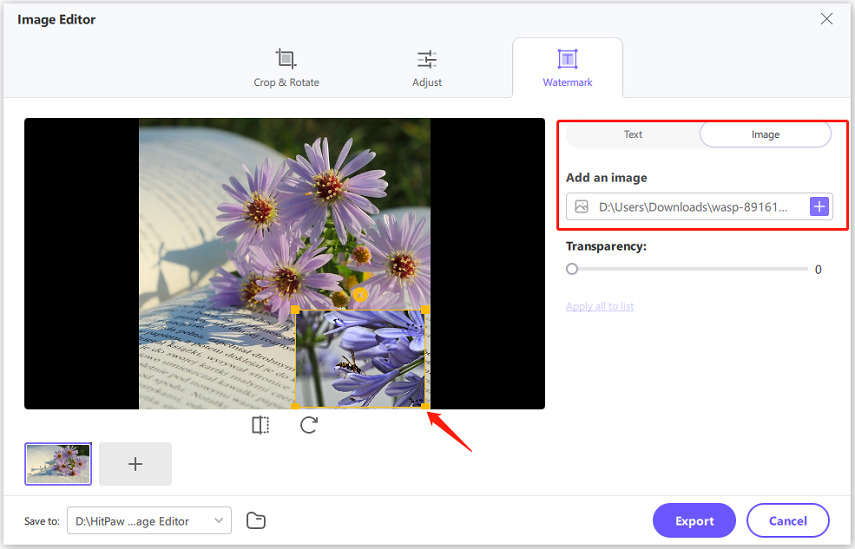
HitPaw Univd ensures a seamless editing experience, allowing users to produce high-quality, professional-looking images with ease.
Conclusion
Adding watermarks to Word documents enhances their professionalism and security. Whether you're using predefined templates or customizing watermarks, mastering these steps will make your documents stand out. Tools like Microsoft Word offer flexibility, while advanced software like HitPaw Univd enables precision editing. Knowing how to add watermark in Word documents is an essential skill for any professional. Start creating impressive, branded documents today!



 HitPaw VoicePea
  HitPaw VikPea (Video Enhancer)
 HitPaw FotorPea
Share this article:
Select the product rating:
Daniel Walker
Editor-in-Chief
My passion lies in bridging the gap between cutting-edge technology and everyday creativity. With years of hands-on experience, I create content that not only informs but inspires our audience to embrace digital tools confidently.
View all ArticlesLeave a Comment
Create your review for HitPaw articles