How to Dictate on Mac With No Effort in 2025
Since efficiency is the key in this fast-paced world, what's a better way to boost productivity than using the powerful dictation feature on your Mac? Gone are the days of relentless typing; now, you can use your voice to dictate text.
This guide will walk you through the effortless process of using dictation on your Mac and introduce you to an exciting tool, the HitPaw VoicePea, for an enhanced experience.
Stop Typing and use Your Voice to Dictate on the Mac
The dictation on Mac is a game-changer for everyone. By converting your spoken words into text, this function has become an essential feature in today's digital world. Here are some significant benefits:
- Save time and increase efficiency
- Eliminate the need for manual typing
- A blessing for individuals with typing difficulties or disabilities
- Accurate, fast, and incredibly user-friendly
Get Dictation on Mac Fast & Easily (Step by Step)
After learning about the dictation function on Mac, you need to learn how to get dictation on Mac quickly:
Step 1. Enable Dictation on Mac
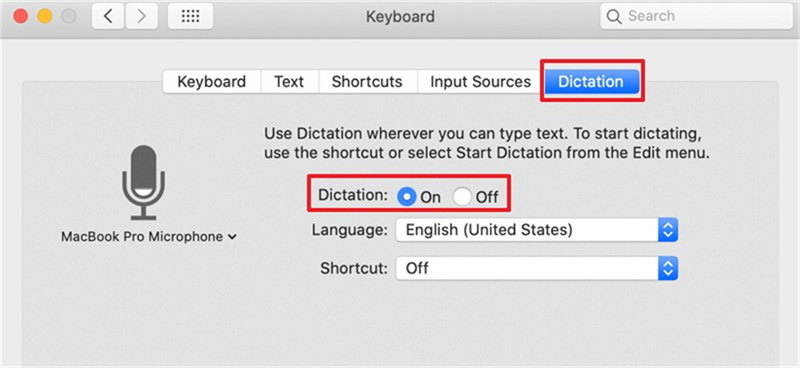
The first step to using dictation on your Mac, open the "Apple" menu, opt for "System Preferences," and tap "Keyboard." From the "Dictation" option, checkmark the “On” box and select “Language.”
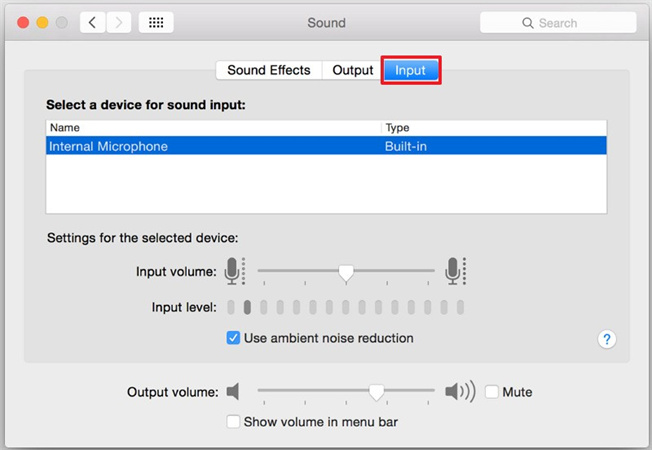
Step 2. Select Your Microphone
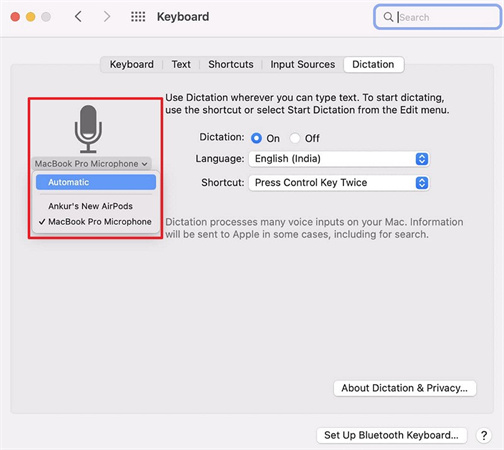
It's time to ensure your Mac's internal microphone or an external microphone is selected as the input source. To complete this task, expand the microphone drop-down menu and choose the desired source.
Step 3. Start Dictating
You must open any application or text field where you want to input text. Press the "Fn" (Function) key twice or use a custom shortcut if you already set one. Start speaking moderately and clearly into the microphone.

Step 4. Edit and Format Your Text
Review the text for better accuracy once you have finished dictating and the text is on your screen. Like any other text, you can quickly edit and change the format. You are all done!
Extra Tips: Easily Recognize & Change Your Voice within Blinks!
For those looking to add a bit of fun or professionalism to their dictation on Mac, HitPaw VoicePea is an excellent choice. This versatile and user-friendly software lets you modulate and change your voice in various ways, thus enhancing the dictation experience.
Because of its compatibility with Windows and macOS operating systems, you can effortlessly integrate with voice dictation on Mac. It provides an extensive library of voice effects and presets, offering users diverse options. Whether you want to sound like a robot, a celebrity, or a cartoon character or experiment with entirely new voices, this tool has got you covered.
Features- Offer voice modulation feature in real-time
- Integrate easily to work seamlessly with Mac
- Provide multiple voice effects to suit your needs
- Let you change voice aspects to create a unique tone
- A valuable asset for content creators, gamers, podcasters, etc.
Step 1. Downloading and Installation
After downloading HitPaw VoicePea from its official website, install it on your Mac through on-screen instructions. Now, launch it to get started.Step 2. Select Input and Output Sources
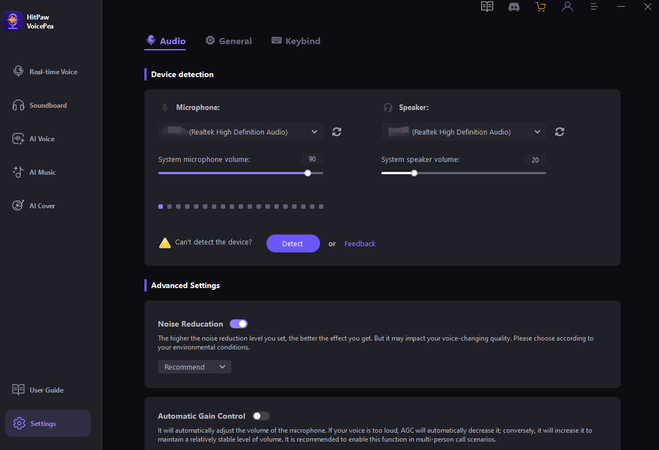
Now, go to the software "Settings" and tap the refresh button before expanding the drop-down menu for the input and output sources. Select the desired one, along with adjusting the volume level.
You must press the "Detect" button if the connected source is not displaying. Choose the microphone and speaker, but if the problem persists, hit "Feedback."

Step 3. Integration with Mac Dictation
From the "Sound" preferences on your Mac, go to the "Input" section and configure the HitPaw VoicePea as your input source. You may change different aspects according to your preferences.
Step 4. Choose Your Voice Effect
Explore various categories of voice effects or filters from the software interface to find the one that suits your purpose. Press to apply it.
Step 5. Change Global Settings
It's time to adjust the global settings from the bottom of the app's window, such as enabling voice changer, noise reduction level, and hearing yourself option.
Step 6. Adjust Voice Parameters
After making the voice effect selection and previewing, you may need to change the voice aspects. The available options include "Pitch," "Timbre," and "Volume." Now Start dictating using the dictation feature on your Mac. Your voice will be automatically modulated according to the selected effect in real-time. You are all done!
FAQs on Dictation on Mac
Q1. Why does the Mac dictation feature keep stopping?
A1. Multiple reasons exist behind the non-functionality of the Mac dictation feature. Firstly, it might be the low input volume level set for the microphone. Other reasons include wrong dictation settings, Bluetooth device connection, the noisy environment, etc.
Q2. Can I use dictation on Mac offline?
A2. Mac offers two ways of dictation on Mac, i.e., keyboard dictation and voice control. You can use the voice control function offline. However, keyboard dictation demands you to have a stable internet connection.
Conclusion
The dictation feature on Mac can significantly enhance your productivity and add a creative twist to your digital interactions. Follow the given guide to get the best results.
However, you can pair this voice dictation with voice changing tools for professional or personal use to make this function efficient and enjoyable. HitPaw VoicePea is a highly recommended software to elevate your dictation experience on Mac to the next level. It offers a variety of voice effects and filters with customization options.





 HitPaw Edimakor
 HitPaw VikPea (Video Enhancer)


Share this article:
Select the product rating:
Daniel Walker
Editor-in-Chief
My passion lies in bridging the gap between cutting-edge technology and everyday creativity. With years of hands-on experience, I create content that not only informs but inspires our audience to embrace digital tools confidently.
View all ArticlesLeave a Comment
Create your review for HitPaw articles