Why is My MacBook Camera So Grainy? Fixed!
A clear webcam feed is crucial for virtual meetings and online communication, yet many MacBook users wonder, "Why is my Mac camera so grainy?" This guide will show how tools like HitPaw Video Enhancer can clean up grainy videos, transforming your MacBook camera into an HD visual tool to ensure you look your best in every virtual interaction.
Remove Grain From Videos in Seconds: Easy Tutorial
Part 1. Why is My Mac Camera So Grainy| Reasons & Fixes?
Don't worry if the built-in camera on your Mac is blurry or difficult to view. It's probably not broken, but it may use some adjustments. In this blog post, we'll discuss the most typical causes of blurry camera issues on Macs and how to rapidly fix them.
This answers your question, "why is my mac camera so grainy?" For all the information you need, keep reading.
Reasons & Solutions of Why Is My Video Camera Grainy
Low Light
Reason: Insufficient lighting reduces image clarity and causes graininess.
Solution: Position yourself in front of a strong, natural light source, like a window, or use an additional light to brighten the area around you.
Software Settings
Reason: Poor camera settings can lead to grainy images.
Solution: Adjust camera settings in Zoom or other apps, and ensure macOS is updated for the latest camera optimizations.
Dirt or Fingerprints on the Lens
Reason: Older MacBooks may have limited camera hardware.
Solution: For clearer video, consider using an external HD webcam if your MacBook is an older model.
Low Light
Reason: Dust or fingerprints on the lens can cause blurriness.
Solution: Clean the camera lens with a soft, lint-free cloth to remove any buildup that may affect image clarity.
External Webcam Goes On and Off
Reason: The external webcam may intermittently disconnect due to loose connections, USB port issues, or driver conflicts.
Solution: Ensure the webcam is securely plugged into a stable USB port, try a different port, and update or reinstall the webcam drivers for smoother operation.
Part 2. Software Fix for a Grainy MacBook Camera
The HitPaw VikPea (formerly HitPaw Video Enhancer) emerges as a game-changer in the pursuit of faultless video quality, establishing a new benchmark for video enhancement. It is the best option for people looking to elevate their video material easily and is available for Windows and Mac. This amazing tool surpasses conventional approaches and provides a fluid and intuitive experience because it is powered by cutting-edge AI algorithms.
Features Of HitPaw VikPea as Alternative Fix to Adjust Mac Camera Settings
- High-quality processing of grainy videos, restoring perfect denoise enhancement.
- Fast output without the need for long waits.
- AI intelligent recognition, no need for complex operation skills.
- 100% immersive enhancement, no watermarks, no ads.
- User-friendly interface, online guide throughout the process.
- Frame Interpolation: Converts low frame rate video to a higher frame rate, ensuring smoother motion and clearer details.
- Fix Videos: Repair corrupted or unplayable videos efficiently.
Steps To Use HitPaw VikPea
Step 1. Download and Install: To obtain the real HitPaw VikPea bundle, visit the software's official website or click the download button below.
Step 2. Upload the original video:You must import the video into the app after installing it in order for it to AI upscale it. Drag and drop the original video to it, or just click the Choose File button.

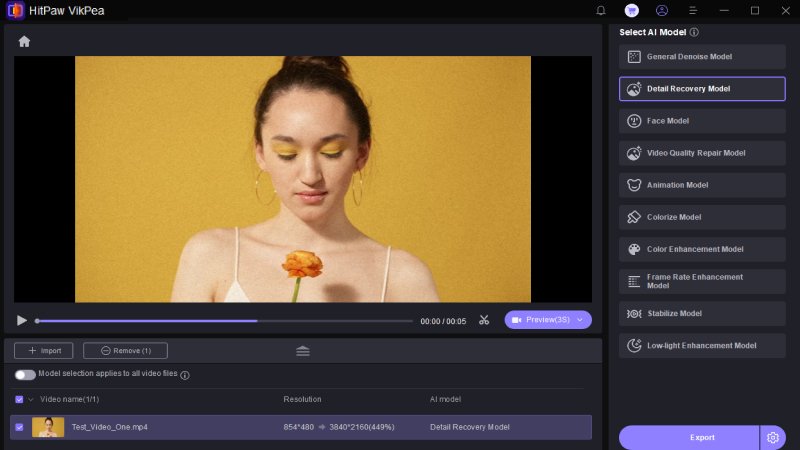
Step 3. Choose AI Model:According to your need, choose an AI model to enhance your blurry video quality. You can simply choose “ General Denoise Model” to upscale video quality.

Step 4. Export the Effect and Preview it:Click the Preview option to process the video after it has been uploaded. You might have to wait a short while for this. Once you're happy with the upgraded video, click the Export option to save it.

Please avoid using HitPaw VikPea crack and protect your security 100% by opting for the official version.
Part 3. How to Fix Grainy Video in Premiere Pro?
Adobe Premiere Pro, a leading video editing software, offers a powerful solution for tackling grainy footage directly. If you're experiencing graininess in videos captured by your Mac camera, Premiere Pro can be a highly effective alternative to AI video enhancers. Follow these steps to enhance your video quality using Premiere Pro.
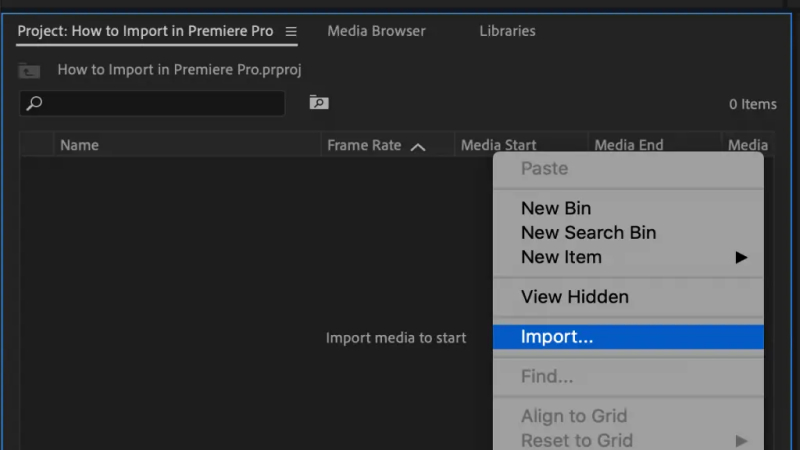
Step 1: Import the Grainy VideoLaunch Premiere Pro and import the grainy video by clicking on the "File" menu and selecting "Import". Locate and select the video file you wish to enhance.
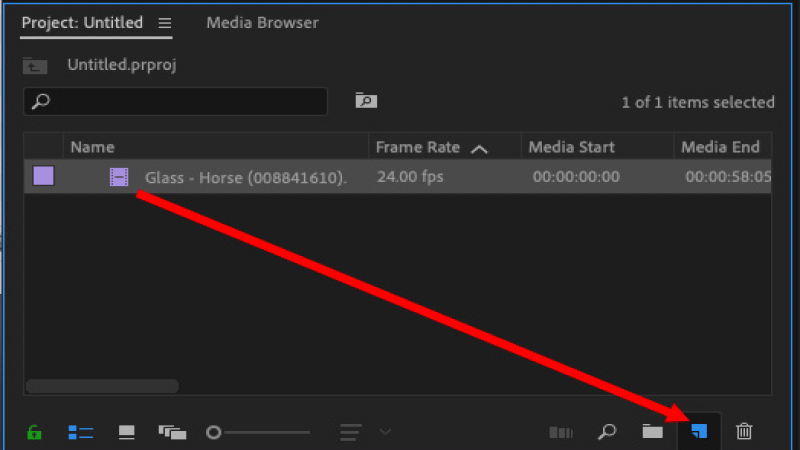
Right-click on the imported video in the Project panel, then choose "New Sequence from Clip". This will create a new sequence with the same settings as your video.
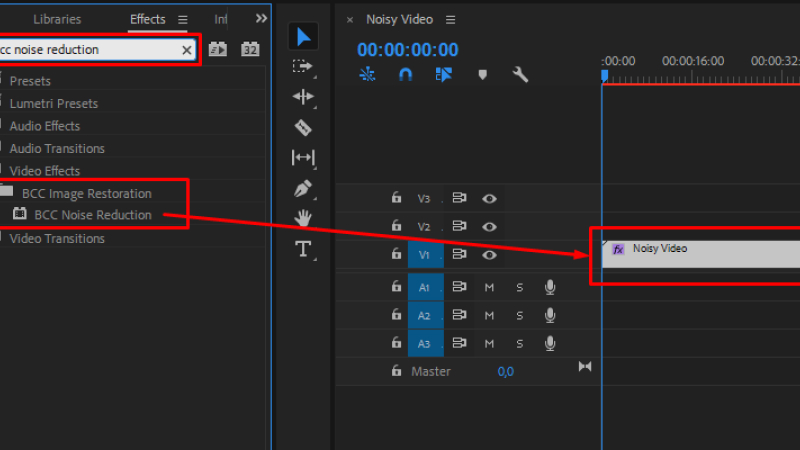
In the Effects panel, you can explore options such as "Sharpen" and "Noise Reduction" to improve video quality. Experiment with different settings to achieve the desired result.
Once you're satisfied with the adjustments, click on "File" > "Export" > "Media" to export the enhanced video.
Tips: If Premiere Pro is complex to upscale your video quality, Try AI video enhancer, one-click enhancement in fast.
By following these steps, you can effectively enhance video pixels to upscale vide quality directly in Adobe Premiere Pro, providing a comprehensive solution for enhancing video quality. For more information and to explore additional features, visit Adobe Premiere Pro.
Part 4: FAQs of why is my Mac camera so grainy
Q1. 1.Why is my Mac camera not working?
A1. Your Mac camera may not be working due to issues like outdated software, incorrect app permissions, hardware malfunctions, or obstructions like dirt on the lens. But if your video not working on Mac, try to repair video with AI.
Q2. 2.How to clean up grainy video on Mac?
A2. You can refer to the above article solution, you can also use a more advanced method unblur video, that is HitPaw VikPea. This AI tool can clear the video with one click.
Wrap Up!
Above, this guide provides the reasons and basic solutions for the "why is my mac camera go grainy". At the same time, for video blur upscale, this guide also provides a detailed introduction of the clear up grainy video steps of HitPaw VikPea and how to fix grainy video in Premiere Pro. Hopefully, users can experience Macbook camera at a higher level.




 HitPaw Photo Object Remover
 HitPaw Video Object Remover
 HitPaw VikPea (Video Enhancer)


Share this article:
Select the product rating:
Daniel Walker
Editor-in-Chief
My passion lies in bridging the gap between cutting-edge technology and everyday creativity. With years of hands-on experience, I create content that not only informs but inspires our audience to embrace digital tools confidently.
View all ArticlesLeave a Comment
Create your review for HitPaw articles