A Comprehensive Guide on VLC Visualizations
Are you aware of the mesmerizing visual delights that lie within VLC Media Player? Many users might have overlooked this feature, but beneath the surface of the familiar traffic cone icon lies a realm of captivating visualizations waiting to accompany your favorite tunes. In this guide, we'll delve into how to enable, disable and change visualizations in VLC, transforming your music-listening experience into a vibrant spectacle.
Part 1: What Is VLC Visualizations?
VLC Media Player includes a built-in feature called Visualizations, which generates real-time graphical displays synchronized with audio playback. These dynamic animations or patterns respond to music or sound, transforming audio signals into captivating visual art. Designed to enhance the listening experience, they offer a blend of aesthetic appeal and technical feedback, making audio more immersive.
VLC Visualization Styles and Effects
- Spectrum Analyzer: Displays frequency ranges as vertical bars.
- Oscilloscope (Scope): Visualizes waveform amplitudes in real time.
- ProjectM: Renders intricate, algorithm-driven abstract patterns.
- GOOM: Colorful, psychedelic effects with morphing shapes.
- VuMeter: Classic volume unit meter for stereo channels.
- Waveform: Horizontal wave representation of audio signals.
Uses of VLC Media Player Visualizations
- Enhancing music playback with synchronized visuals.
- Creating ambient backgrounds for parties or events.
- Analyzing audio properties (e.g., frequency ranges).
- Providing visual feedback for sound engineering tests.
- Serving as an educational tool for audio waveform visualization.
- Adding artistic flair to multimedia projects or streams.
Tips: Auido/video not playing in VLC? Try HitPaw Univd to convert audio/videos for smooth playback in VLC.
Part 2: How to Enable or Disable VLC Audio Visualizations?
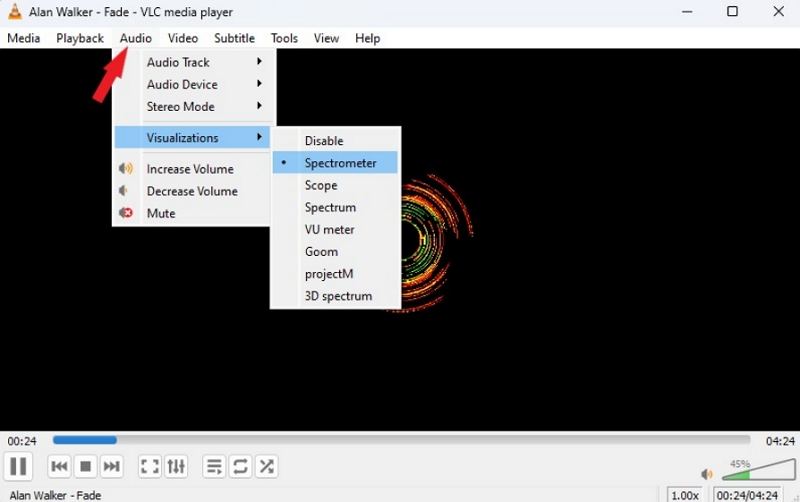
In addition to its video playback capabilities, VLC Media Player doubles as an audio player. For a richer audio experience, you can enable Audio Visualizations. VLC offers seven distinct audio visualization animations: Spectrometer, Scope, Spectrum, Vu Meter, Goom, ProjectM, and 3D Spectrum. Follow these steps to enable them:
Enable Audio Visualizations in VLC Media Player:
To access VLC Visualizations, you need to have the VLC media player installed on your computer. Once opened, you can navigate to the "View" menu and select the "Visualizations" option. This will bring up a list of available visualizations, which you can choose from and enable.
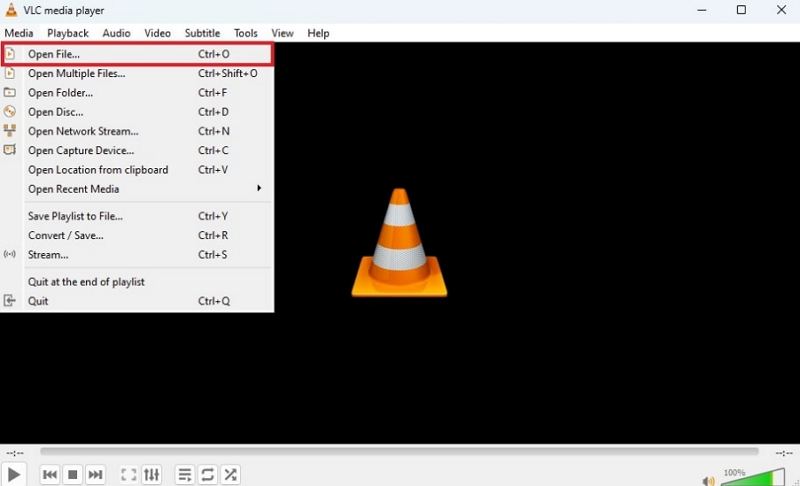
Step 1:Accessing Your Music in VLC : Begin by launching VLC and navigating to the "Media" menu. From there, open your desired music file or playlist. Alternatively, you can simply drag and drop the audio file directly into VLC's interface.

Step 2:Enable VLC Visualizations: While your music plays, click on the "Audio" menu and select "Visualizations." Here, you'll find an array of options, including Spectrometer, Scope, Spectrum, VU meter, projectM, and 3D spectrum. Experiment with each to find your preferred visual accompaniment. Additionally, you can right-click on a blank area, go to "Audio" > "Visualizations", and choose your desired visualization.

Step 3:Disable VLC Visualizations, head to the "Audio" tab and choose the "Disable" option from the menu.
Keep in mind, this adjustment will only affect the current audio session; if you close VLC and reopen it, the settings will revert.
Optional: Saving Your Visualization Filter
By default, VLC resets visualizations to "Disable" upon closing the program. To retain your preferred visualization.
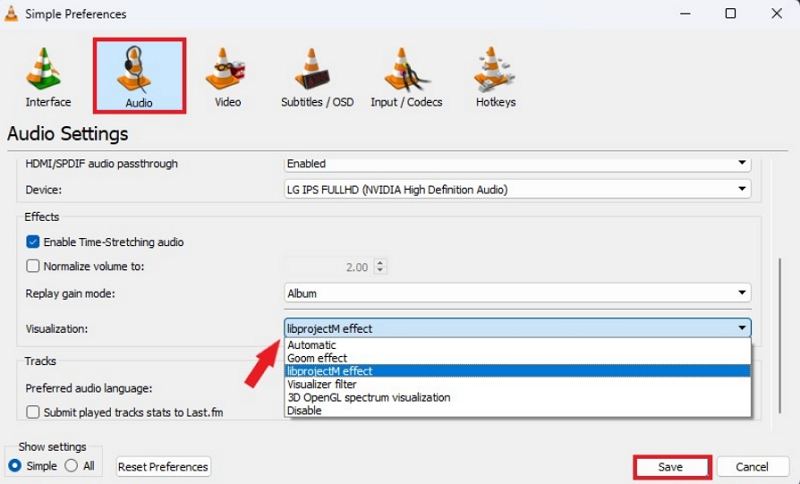
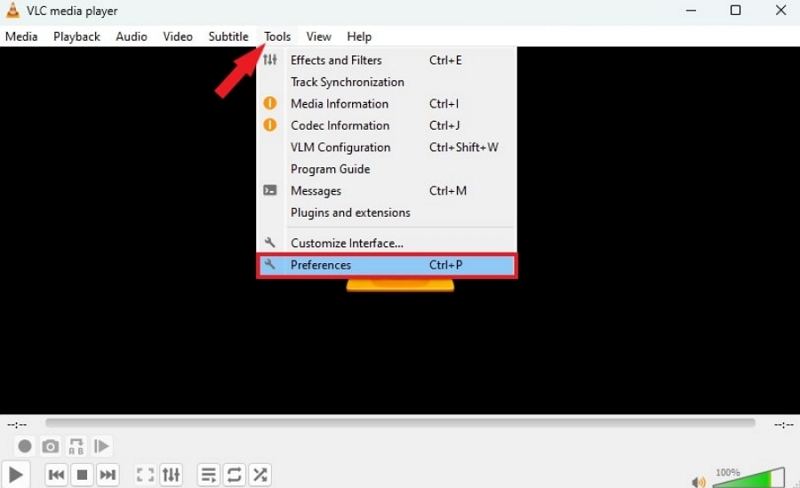
Step 1:Navigate to the "Tools" menu and select "Preferences."
Step 2:Under the "Audio" tab, choose your desired visualization option, such as "Goom effect", "libprojectM effect", "Visualizer filter", or "3D OpenGL spectrum visualization."

Step 3:Save your settings to enjoy your chosen visualization every time you play an audio file.
It will permanently enable the audio visualization setting in VLC unless you disable it from the preferences settings.
Part 3: How to Install New Audio Visualizations in VLC Media Player
VLC Media Player comes equipped with a range of integrated audio visualizations, elevating your music-listening journey to new heights of excitement. Yet, if you're eager to incorporate fresh audio visualizations into VLC, simply adhere to these steps to download visualizations for VLC and install it:
Steps to Download and Install New Audio Visualizations in VLC
Step 1:Visit the provided link to download VLC Visualizations, available in .tar.gz format. Extract the files from the archive to access the proper files.

Step 2:Upon downloading the audio visualization file, extract its contents using software like WinRAR or WinZip. Following successful extraction, locate the files within the "projectM-complete-2.1.0-named Source" folder.

Step 3:Open the "projectM-complete-2.1.0-Source" folder and ensure it contains the following subfolders:
- presets_milkdrop
- presets_milkdrop_104
- presets_milkdrop_200
- presets_projectM
- presets
- presets_yin

Step 4:Enable projectM Visualization: Now, when playing an audio file in VLC, you can select "Audio" > "Visualizations" > "projectM" to enjoy a randomized visualization. Alternatively, save your preferences to always display projectM visualizations by selecting "libprojectM effect" in the preferences window.
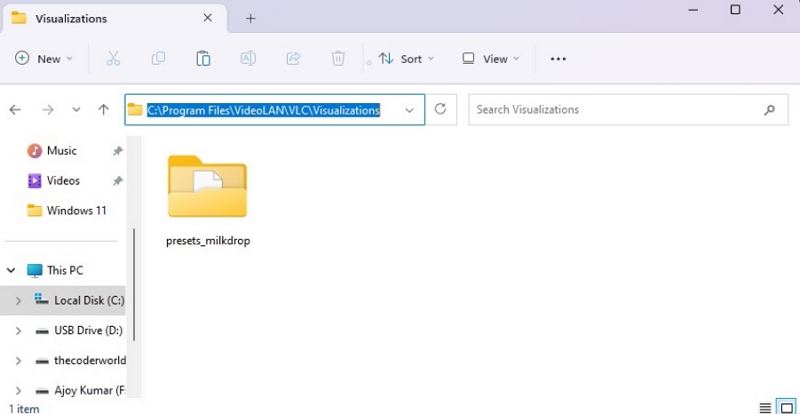
Step 5:Copy the "presets_milkdrop" subfolder to the following location: C:\Program Files\VideoLAN\VLC\Visualizations. If the "Visualizations" folder is not present within the VLC directory, create a new folder and name it "Visualizations".

Step 6:Launch VLC Media Player on your computer. If not already installed, refer to our guide to download the latest version of VLC. Then, click on the "Tools" option in the top menu bar and select "Preferences". Alternatively, use the keyboard shortcut Ctrl + P to open the preferences window.

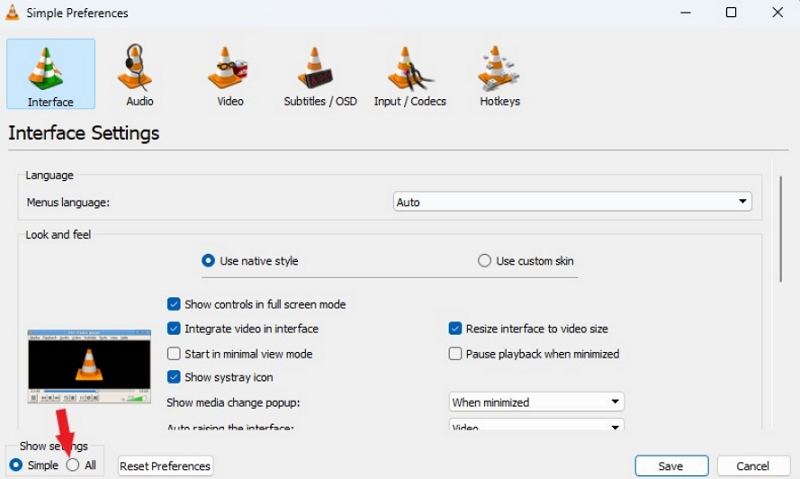
Step 7:The "Preferences" window will appear. Click on the "All" radio button at the bottom to access the "Advanced Settings" menu.

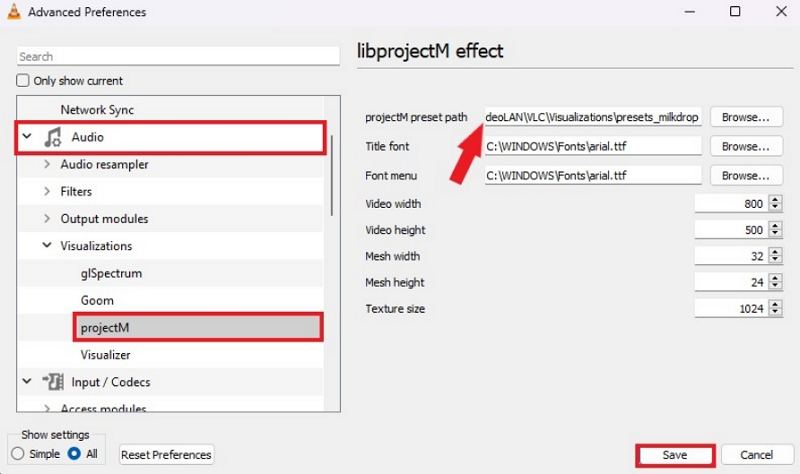
Step 8:Navigate to Audio > projectM and set the "projectM present path" option to point to C:\Program Files\VideoLAN\VLC\Visualizations/presets_milkdrop. Click on the "Save" button to confirm the changes.

That's it! You can now play any audio file with the projectM visualization effect. Simply select Audio > Visualizations > projectM, and it will play a random projectM visualization synchronized with the waveform.
Bonus Tip: Best VLC Alternative to Convert or Enhance Videos/Audios Effortlessly
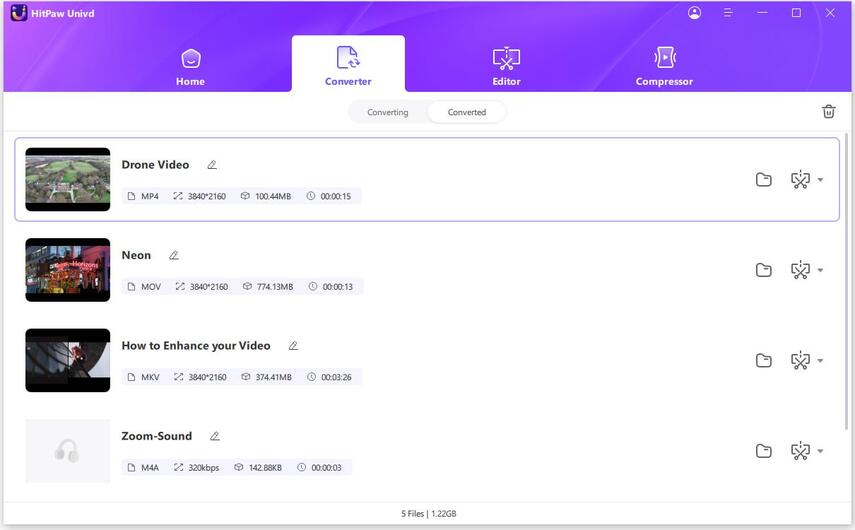
Encountering unsupported video or audio formats is a common occurrence. To address this issue effectively, having a reliable video converter on hand is essential. HitPaw Univd proves to be an invaluable tool for users of all levels, offering seamless editing, and conversion of videos and audio with utmost ease. Embark on your initial trial today to experience its convenience firsthand.
- Convert audio files to MP3, WAV, FLAC, AAC and 1000+ formats
- Convert video files to popular MP4, AVI, MOV, and more
- Convert audio/video into formats optimized for various devices and platforms
- Maintain the original audio/video quality during conversion
- Edit your video/audio files with features like trimming, merging, noise removal, and more
Step 1:Install HitPaw Univd on your computer. Then, click on "Add Video" to import the video you want to convert.

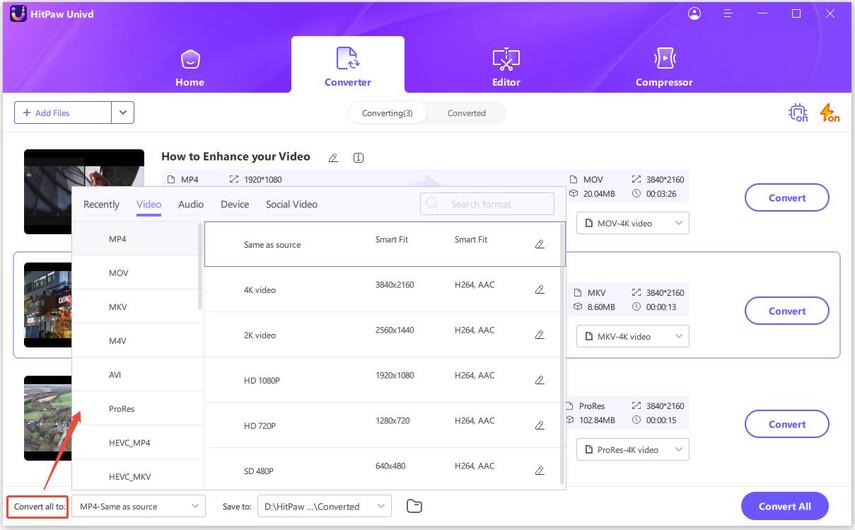
Step 2:Select "Convert all" from the bottom menu. In the video section, choose your preferred resolution and format, such as MKV or MP4.

Step 3:Click on "Convert" to start the video conversion process.

Final Thoughts
In the vast sea of visualization presets, it can be overwhelming to find the perfect match for your music. Sometimes, simplicity is key. Nonetheless, with these steps, you can download VLC visualizations, unlock the visual potential of VLC Media Player, transforming your listening sessions into immersive journeys through sound and light. BTW, try the novice-oriented FREE utility for video/music enhancing, and converting software - HitPaw Univd.







 HitPaw VikPea
 HitPaw Watermark Remover
Share this article:
Select the product rating:
Daniel Walker
Editor-in-Chief
My passion lies in bridging the gap between cutting-edge technology and everyday creativity. With years of hands-on experience, I create content that not only informs but inspires our audience to embrace digital tools confidently.
View all ArticlesLeave a Comment
Create your review for HitPaw articles