Learn How to Reverse Videos in Premiere Pro Easily
Knowing how to reverse video in Premiere Pro can transform your content by adding an element of surprise or fun. Whether you are working on sports highlights, creative storytelling, or cinematic effects, reversing video footage is a skill that can set your work apart. In this guide, we will take you step-by-step guide on how to reverse video in Premiere.
Part 1. What is Reversing a Video?
Reversing a video is the process of taking your recorded footage and playing it backward. This effect can make your content look more unique and eye-catching. For example, instead of watching someone throw a ball, reversing the video will show the ball flying back into their hand.
You can even combine reversing with other effects, like speeding up or slowing down, to create a more dramatic or comedic impact. Reversing video is simple, yet it has the potential to completely transform your footage into something memorable.
Part 2. Why Do We Need to Reverse Video in Premiere Pro?
Reversing video footage serves several purposes, whether practical or artistic. Below are some reasons why this effect can be useful:
- Capture Attention: Reversed footage instantly stands out and grabs viewers’ attention.
- Highlight Key Moments: For sports clips or stunts, reversing can draw focus to specific actions.
- Enhance Creativity: The effect adds a unique, fun, or even mysterious touch to your videos.
- Create Unique Storytelling: Reversed sequences often make viewers curious, encouraging them to watch longer.
By learning how to reverse in Premiere Pro, you can elevate your video projects and impress your audience.
Part 3. How to Reverse a Video in Premiere Pro
Reversing a video in Adobe Premiere Pro is surprisingly easy. Follow these simple steps to achieve the effect:
Step 1: Locate Your Clip
Open your project in Adobe Premiere Pro and navigate to the timeline where your video clip is placed. Drag the desired video onto the timeline if it's not already there.
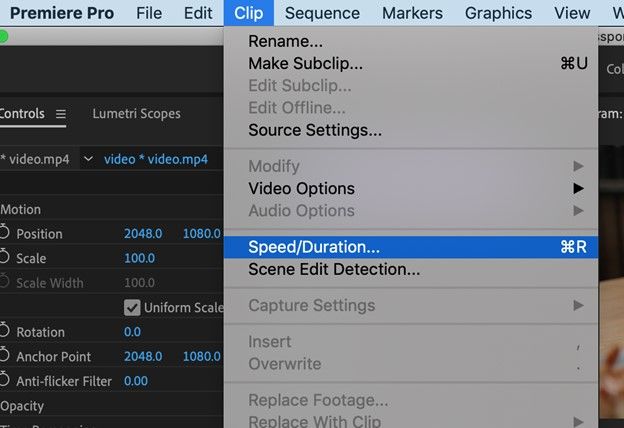
Step 2: Access Speed/Duration Settings
Right-click on the video clip and select "Speed/Duration" from the dropdown menu.
Step 3: Enable Reverse Speed
In the "Speed/Duration" window, check the box labeled "Reverse Speed."
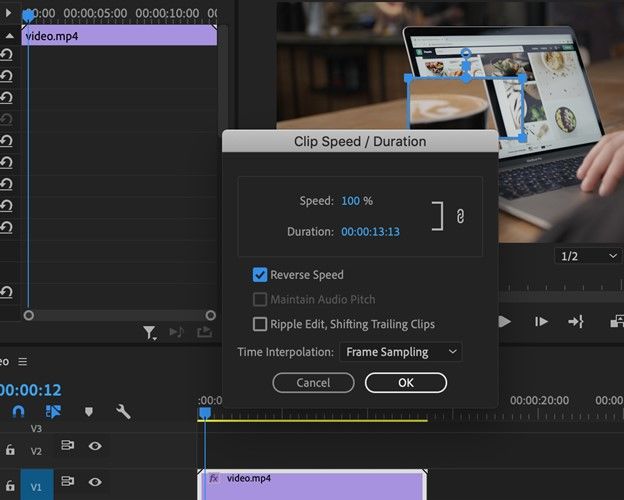
Step 4: Preview the Clip
Hit "OK," and your video will now play backward. You can preview it in the timeline to ensure the effect is applied correctly.
That's it! Your video is now reversed. Whether you're working on creative projects or experimenting, this feature is a must-have tool.
Part 4. Pro Tip: Use HitPaw Univd (HitPaw Video Converter) for Advanced Editing
While Premiere Pro is an excellent tool, some features can be complex for beginners. That's where HitPaw Univd comes in. This software offers a more user-friendly interface for various editing options, including rotating, cropping, merging, and cutting clips. If you're new to video editing or want to save time, HitPaw Univd is an excellent choice for streamlining your workflow.
Features of HitPaw Univd
HitPaw Univd - All-in-one Video Solutions for Win & Mac
Secure Verified. 254,145 people have downloaded it.
- Supports batch edit videos: rotate, mirror, merge, cut, change speed, etc.
- Supports over 1000 video and audio formats
- Convert videos to/from different formats
- AI-powered tools to crop video for social media, generate AI artwork, remove vocals, etc.
- Works on both Windows and Mac systems
Secure Verified. 254,145 people have downloaded it.
Step-by-Step Guide to Rotate and Crop Videos
With HitPaw Univd, you can easily crop or rotate your videos using its intuitive features. Follow these simple steps to get started:
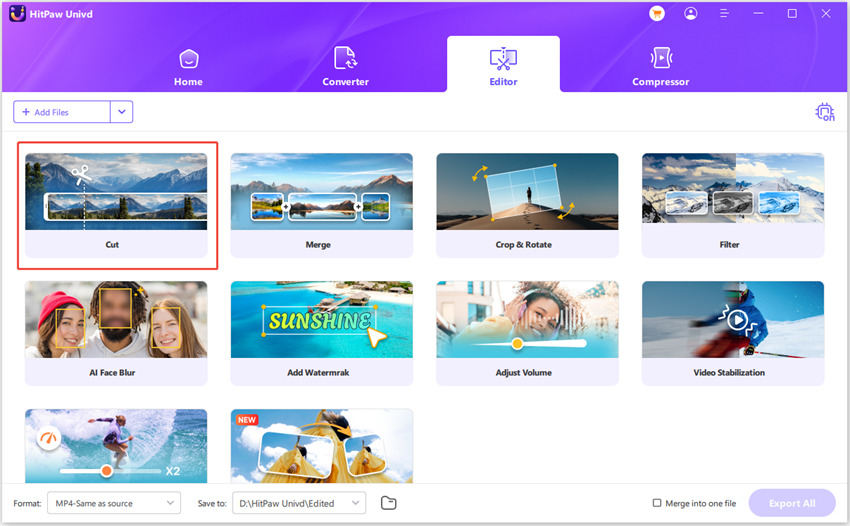
Step 1: Access Video Editor Feature
First, install and open the HitPaw Univd on your computer. Navigate to the Edit tab and select the "Crop & Rotate" feature.
Step 2: Import Video to Rotate
You can add multiple images by clicking the "+" icon or remove them using the "x" icon displayed on each file.
Under the preview window, you can rotate the video clockwise or counterclockwise, or flip it horizontally or vertically as needed.
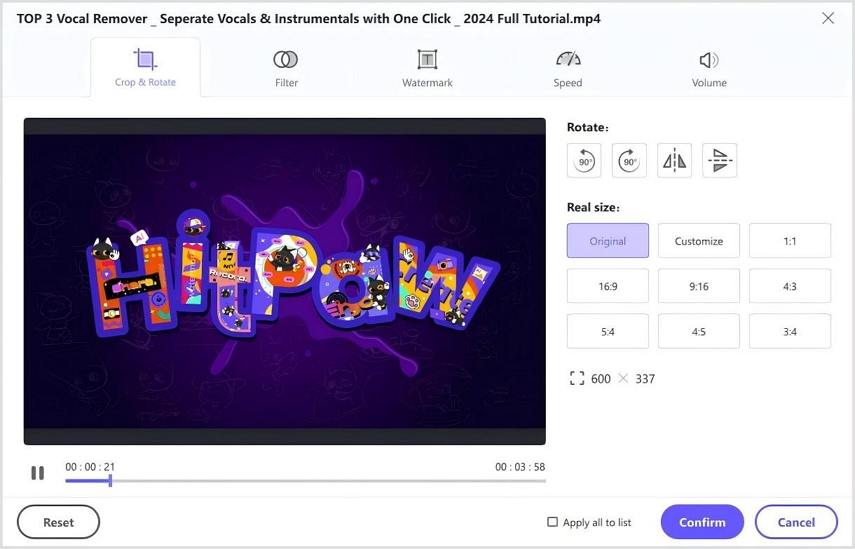
Step 3: Preview and Export
You can check the "Apply all to list" option to apply the rotate settings to all videos. After confirming your adjustments, click "Confirm" to save the rotated videos.
Conclusion
Reversing video clip in Adobe Premiere Pro is a simple yet powerful way to enhance your projects. Whether you want to learn how to reverse footage in Premiere or explore advanced techniques like speeding up and combining effects, this guide covers it all.
For those seeking additional editing tools, consider using software like HitPaw Univd, which provides a user-friendly alternative with advanced capabilities. By mastering these techniques, you can create videos that captivate and inspire your audience.


 HitPaw VoicePea
  HitPaw VikPea (Video Enhancer)
 HitPaw FotorPea

Share this article:
Select the product rating:
Daniel Walker
Editor-in-Chief
My passion lies in bridging the gap between cutting-edge technology and everyday creativity. With years of hands-on experience, I create content that not only informs but inspires our audience to embrace digital tools confidently.
View all ArticlesLeave a Comment
Create your review for HitPaw articles