How to Speed Ramp in Premiere Pro (Full Guide)
Suppose you're wondering about the ways to speed ramp Premiere. In that case, we assure you it's not difficult to implement. Instead, speed ramping on Premiere is pretty easy; many people opt for Premiere to speed ramp the video. However, speed ramping requires you to do something unique to make things look creative for you. We'll walk you through the easy guide to speed ramp on Premiere Pro and give you pretty valuable tips that might be useful for you going forward.
Part 1: What Is Speed Ramping?
Before knowing how to speed ramp Premiere, you'll need to know about it. You can assume a speed as a way to accelerate or decelerate a video clip. Unlike abrupt shifting in speed, a speed ramp tends to establish a clean transition between two completely different speeds. We'll implement speed ramping, and then you'll be able to understand it more appropriately.
Part 2: How to Make A Speed Ramping in Premiere Pro?
Suppose you're looking to speed ramp Premiere 2021. In that case, you don't need to feel confused about it, as Premiere Pro has made everything pretty easy. You'll only need to follow a couple of simple steps to serve your purpose. Here's how to speed ramp Premiere Pro.
- Step 01First, you'll need to launch Premiere and create a new project. Next, you'll need to upload the video you'd like to speed ramp. You can click and drag your video into the project window.
- Step 02After dragging the video to Premiere Pro's timeline, you'll need to select a moment where you intend to implement the speed ramp. The movement will be essential if you're looking for a satisfying speed ramp. Hence, it would help if you were looking to opt for a highly dynamic moment.
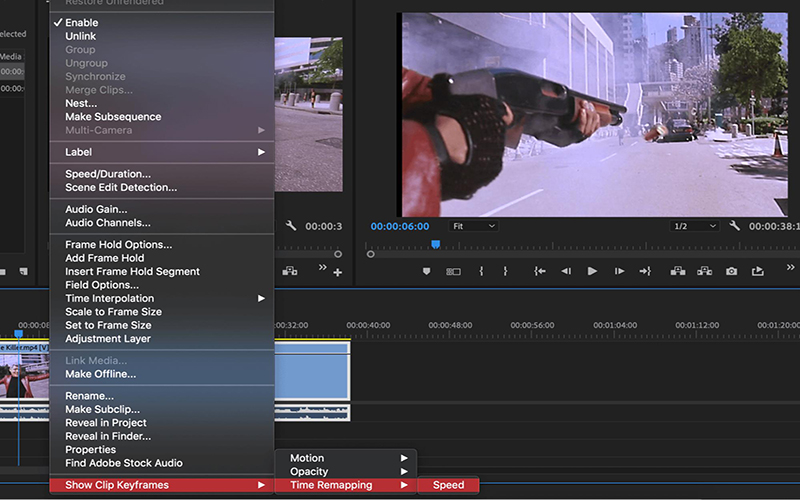
- Step 03Now, we'll create keyframes. But, you'll need to ensure that the keyframes you're creating are visible. To begin, you'll need to right-click on your clip and select Show Clip Keyframes. Next, you'll only need to select speed after hitting "Time Remapping".
- Step 04After creating the keyframes, you'll need to start adjusting the speed of your video. Premiere Pro makes it extremely easy to ramp the video.
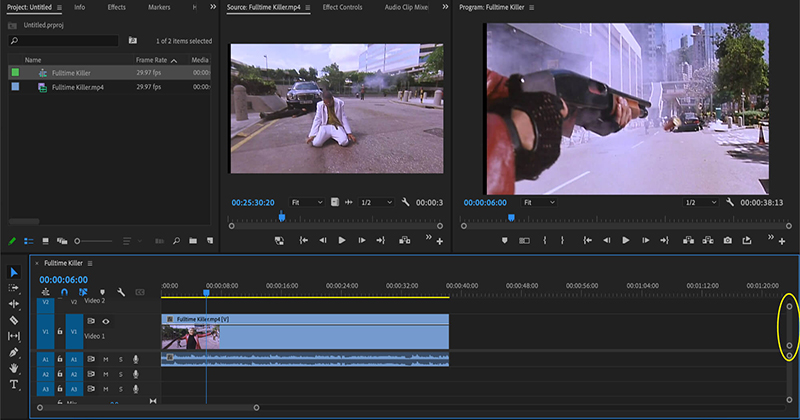
You can isolate the videos in numerous ways in Premiere Pro. Now, you'll need to use Command+K or Razor blade tool to cut or split the video clip into pieces.However, if you're up to speed ramp more than once, you don't split the video. You can do it with keyframes.
You can select the pen or simply press the P key and tap the white line running on your video to create a keyframe. For creating a speed ramp, you'll need to maintain at least two keyframes. The first keyframe will help you begin the speed ramp; the other is crucial for ending the ramp. You can also use additional keyframes to make more complicated speed ramps. After putting the keyframes where you intend, you'll navigate to the selection tool. You can use the hotkey "V" to do it.
You'll find you only need to tap white line icons between the keyframes you've had. You can push the white line up to increase the speed of your video and move them down to decrease the speed of the video.
That's all you need to do to adjust the speed of your video. However, you'll still need to do more to make the speed ramp more smooth and efficient.
You'll need to tap and drag the keyframe marker's one side using the selection tool. This process will help you spread out the frame number that the video's speed transition occurs over. The more you space out a couple of halves of the keyframe, the longer your speed ramp will be. After doing the same thing to other keyframes, your speed ramp will be completed.
There are multiple ways to speed ramp Premiere Pro, and you can experiment with many things to create a creative speed ramp using Keyframes.

Part 3: Best Alternative to Premiere Pro to Make Speed Ramp in Videos
Adobe Premiere Pro offers multiple solutions for video editing natively; however, it has its drawbacks when it comes to pricing and utility. As a result, people look for better options that provide similar results but under a cost-effective, user-friendly system. This is where HitPaw Edimakor fills in the chart of offering features similar to the Premiere Pro speed ramp.
This AI video editor provides a comprehensive system of adjusting the video clip's speed with speed ramping features. Using different preset ramps available in the Speed Ramping section, you can easily fill in the requirements for creating proper action sequences or improving the pace of the entire video.
Key Features of HitPaw Edimakor:
- AI Speech-to-Text:
- AI Noise Remover:
- Pan & Zoom:
HitPaw Edimakor provides a complete system to transcribe spoken words into the video in the form of captions. This helps you in subtitling the entire video without any manual edits.
This feature is expressively important for content creators who have to make professional content. The AI noise remover automatically removes all unwanted noises from videos to make them smooth.
To emphasize a particular element, you can use the pan & zoom feature on HitPaw Edimakor. By defining a starting and ending frame, get consistent flow by zooming in or out of the video.
Part 4. How to Use Speed Ramp in Premiere Pro Alternative
To make the best use of this speed-ramping Premiere Pro alternative, follow the simplified steps offered below:
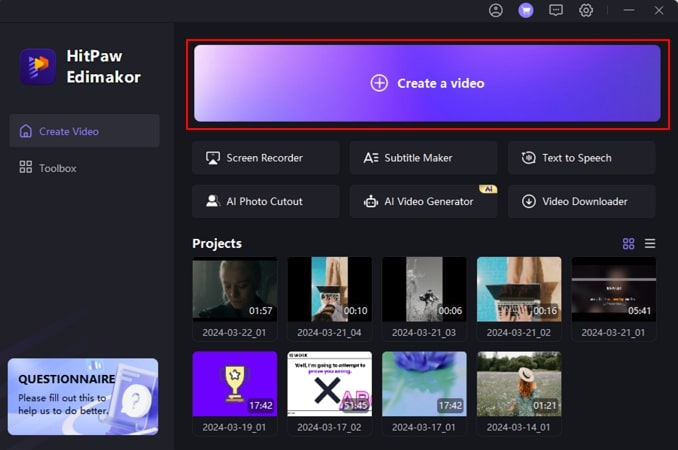
Step 1. Create a Video Project on Edimakor
After launching HitPaw Edimakor, click the Create a video button to start a new video project.
Step 2. Add Files To Timeline For Editing
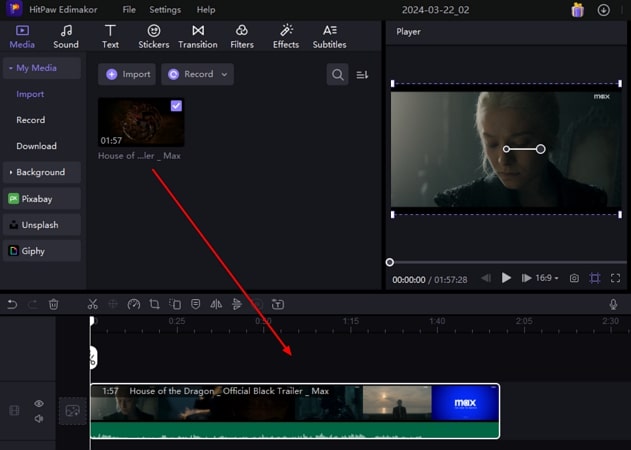
As you lead into the editing window, continue to select the Import Files button to add your video. Drag it to the timeline for speed ramping.
Step 3. Access Speed Ramping Section
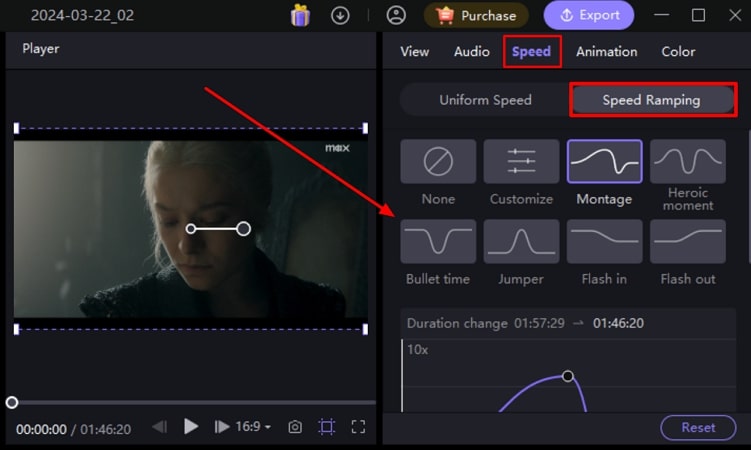
Continue to the Speed section from the top-right section of the window. Continue to select Speed Ramping and tap any preset that you want to set for your video’s speed.
Step 4. Export Final Adjusted Video
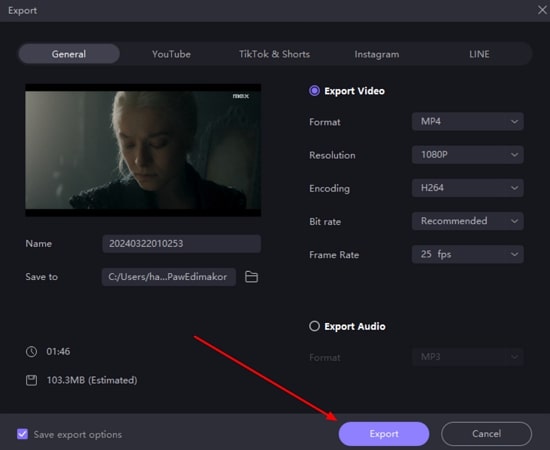
Upon setting its speed, continue to the Export button to save the speed-ramped video to your computer.
Part 5. FAQs About Speed Ramping in Premiere Pro
Q1. What is the shortcut for the speed ramp in Premiere Pro?
A1. While there is no direct shortcut key for speed ramping in Premiere Pro, you can perform quick edits from the fx key in the timeline section. Upon selecting the Speed in Time Remapping section, you can use the pen tool to adjust the speed graph, hence speed ramping.
Q2. How do you gradually speed up a video in Premiere Pro?
A2. To gradually speed up a video in Premiere Pro, try to make a quick vertical rise in the speed graph of your video within a frame. Keep performing the vertical rise after a few frames for a gradual speed-up.
Q3. How do you gradually reduce speed in Premiere Pro?
A3. To gradually reduce speed in Premiere Pro, take your speed graph vertically down after every few frames.
Final Thought
Although speed ramping on Premiere isn't difficult, you still need to gather valuable tips and knowledge to make the speed ramp Premiere Pro effective and breathtaking. Apart from using Premiere Pro, you can also opt for HitPaw Edimakor to speed ramp in Premiere Pro. It is a fascinating video editor that helps you quickly perform multiple video activities on your video clip.


 HitPaw Univd (Video Converter)
  HitPaw Screen Recorder
 HitPaw VikPea (Video Enhancer)


Share this article:
Select the product rating:
Daniel Walker
Editor-in-Chief
My passion lies in bridging the gap between cutting-edge technology and everyday creativity. With years of hands-on experience, I create content that not only informs but inspires our audience to embrace digital tools confidently.
View all ArticlesLeave a Comment
Create your review for HitPaw articles