How to Rotate Video in Davinci Resolve
DaVinci Resolve allows you to rotate clips seamlessly, whether it's a slight adjustment or a full 180-degree flip. In this guide, we'll walk you through how to rotate a video in DaVinci Resolve using step-by-step instructions.
Whether you're a beginner or a seasoned editor, these tips will make your editing process efficient and precise.
Part 1. What is DaVinci Resolve Rotate Video?
DaVinci Resolve is a top-tier video editing software widely recognized for its professional-grade tools and user-friendly interface. From colour grading to visual effects, it offers everything you need to create stunning videos. One of its most straightforward yet essential features is the ability to rotate video clips, ensuring your footage looks polished and professional.
Part 2. How to Rotate a Video in DaVinci Resolve
Rotating videos in DaVinci Resolve is straightforward. There are two simple methods to adjust your video's orientation: using the Inspector Panel and the Transform Tool.
1. Use the Inspector Panel to Rotate Videos in DaVinci Resolve
The Inspector Panel is your go-to tool for precise video adjustments. Here's how you can rotate your clips:
Step 1: Import the Video
Launch DaVinci Resolve and upload the video you want to rotate. Drag and drop your clip onto the timeline. This simple step initiates the editing process, preparing your footage for adjustments.
Step 2: Open the Inspector Panel
Select the video on your timeline, then navigate to the Inspector Panel on the right side of your screen. This panel contains various editing options. It provides detailed control over adjustments, ensuring you can refine your video exactly as needed.
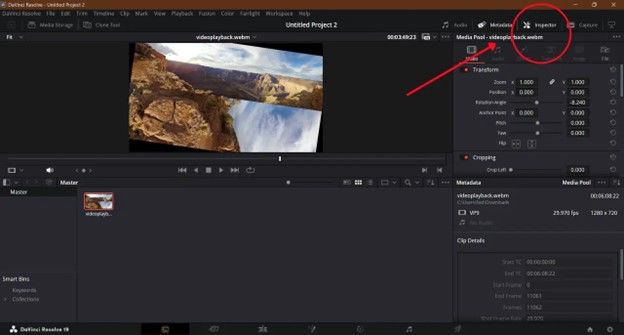
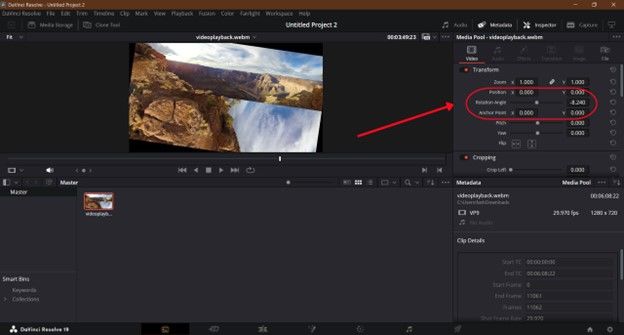
Step 3: Adjust the Rotation Angle
Locate the "Rotation Angle" slider within the Inspector Panel. Enter the desired angle (e.g., 90, 180, or any custom value) or use the slider to make adjustments. Watch your video rotate in real-time as you tweak the settings. This process allows for precise control to achieve your preferred orientation.
2. Use the Transform Tool to Rotate Videos in DaVinci Resolve
The Transform Tool provides a more visual approach to rotating videos. Follow these steps to rotate your footage:
Step 1: Import the Video
Start by importing your video into DaVinci Resolve and placing it on the timeline. This ensures that your clip is ready for detailed editing.
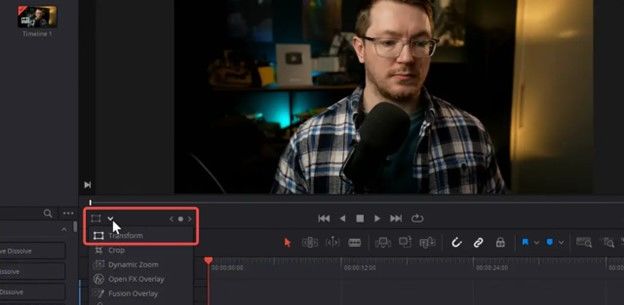
Step 2: Access the Transform Tool
Click the rectangular icon above the timeline and select Transform from the drop-down menu. This will activate the Transform options in the preview window. The visual layout makes it easier to interact with your footage directly.
Step 3: Rotate the Video
In the Transform menu, find the rotate option. Adjust the angle using arrow buttons or input a specific value like 90 degrees for a precise rotation. When you're done, click Apply to save your changes. This tool's design allows you to preview adjustments before committing to them.
Part 3. Expert Tips for Rotating Videos in DaVinci Resolve
Rotating videos isn't just about correcting orientation; it can also add creative flair. Here are some tips to elevate your edits:
1. Snap to Grid
Enable the Snap to Grid option to ensure perfect alignment. This feature helps maintain symmetry and precision in your edits. It's particularly useful for achieving consistent results across multiple clips.
2. Experiment with Multiple Rotations
Layer multiple rotations using keyframes to create unique transitions or visual effects. Combining rotations with other transformations can add depth and interest to your project.
3. Check for Image Distortion
Excessive rotation can sometimes distort your video. Use the Inspector Panel to monitor and correct any inconsistencies. Regular checks help maintain the integrity of your visuals.
4. Combine Rotations with Other Effects
Try blending rotations with scaling or cropping for a more dynamic visual. This approach allows you to craft intricate effects that stand out.
5. Save Rotation Presets
If you frequently use specific rotation settings, save them as presets to save time on future projects. Presets streamline the editing process, especially for recurring tasks.
Part 4. Best Alternative to Rotate Videos in DaVinci Resolve
While DaVinci Resolve is excellent, some users may find it confusing for quick edits. In such cases, the HitPaw Univd (HitPaw Video Converter) offers a simpler, faster alternative for rotating videos without compromising quality. Its straightforward interface makes it ideal for users seeking efficiency.
Features of HitPaw Univd
HitPaw Univd - All-in-one Video Solutions for Win & Mac
Secure Verified. 254,145 people have downloaded it.
- Supports over 1000 video formats including MP4, MOV, AVI, TS, etc.
- Rotatesvideos 90 degrees clockwise, counterclockwise, and upside down.
- Batch rotates multiple videos in a time.
- Converts videos to any other video and audio format.
- 120x faster video conversion speed.
- Provides other editing options: cut, trim, merge, add filters, add watermark, stabilization, etc.
- Integrates different media tools such as video compression, image converter, image compression, image editor, AI tools, etc.
Secure Verified. 254,145 people have downloaded it.
Step-by-Step Guide to Rotate Video Clips in Bulk
Cropping and rotating videos in batch is a simple process in HitPaw Univd. Follow these step-by-step instructions to make precise edits to your videos:
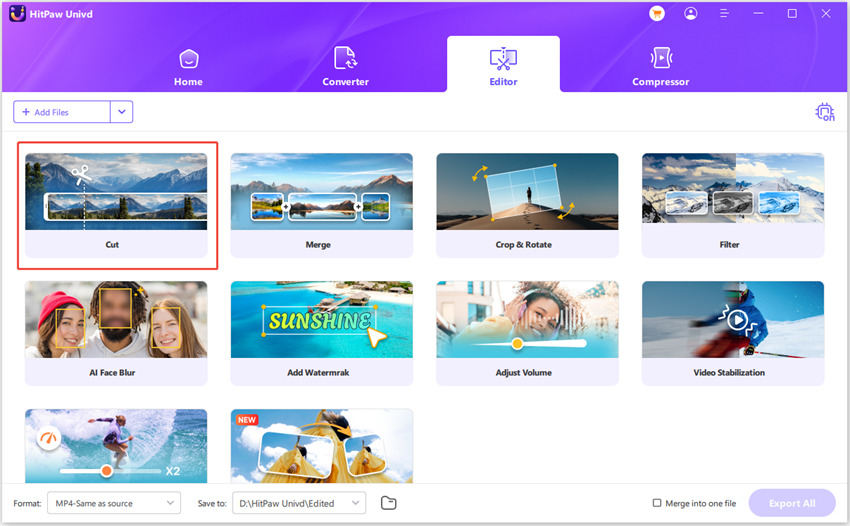
Step 1: Enter Edit Tab and Import Videos
Start by launching the HitPaw Univd tool. Navigate to the Edit section and select the 'Crop & Rotate' function. Import the video(s) you need to rotate.
Step 2: Rotate the Video
You can rotate your video to adjust its orientation as needed. The rotation options include 90 degrees clockwise, 90 degrees counterclockwise, and flipping the video upside down. This is particularly helpful for correcting videos taken in the wrong orientation or creating stylistic effects.
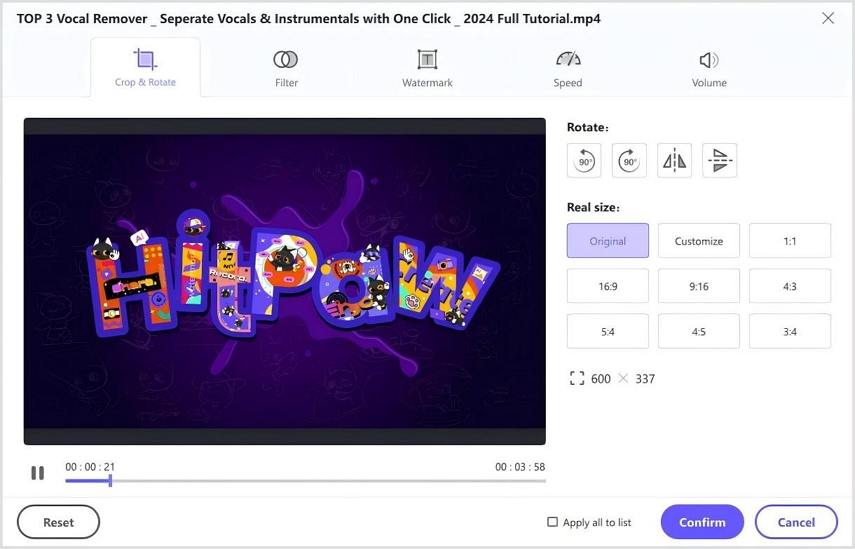
Step 3: Adjust the Crop Frame
In the playback window, drag the four sides of the cropping matrix to determine the area of the video you want to keep. Alternatively, you can select a predefined aspect ratio from the scale options provided on the right. This feature allows you to crop with precision and ensure that your video fits the desired frame size.
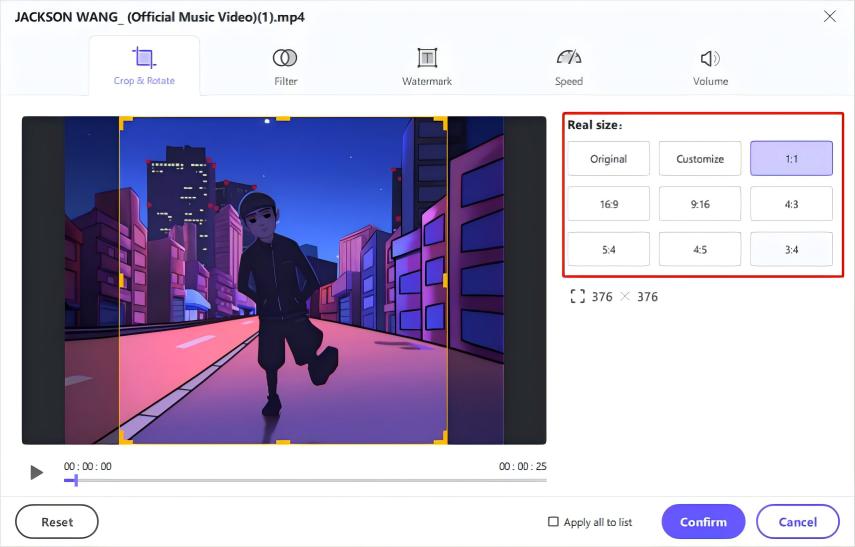
Step 4: Apply Settings to Multiple Videos (Optional)
If you have imported multiple videos and want to apply the same rotate settings to all, tick the option "Apply all to all".
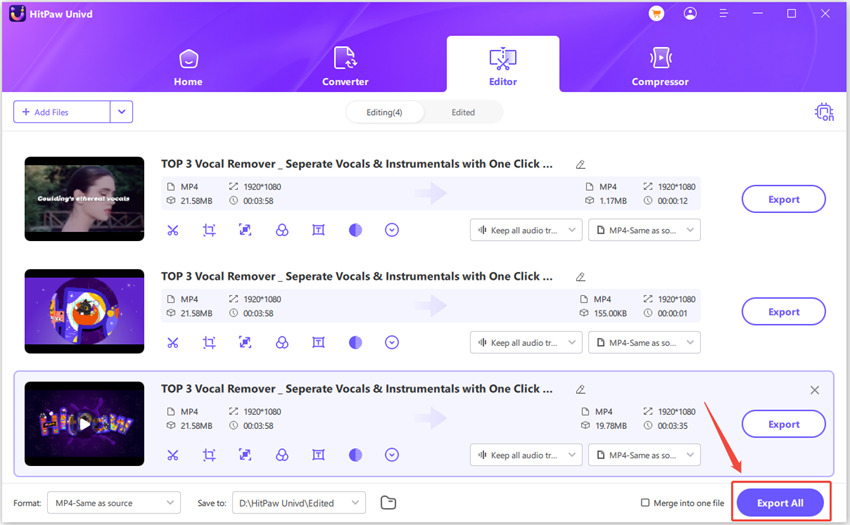
Step 5: Confirm Your Settings and Export the Rotate Video
Click the Confirm button to save the new videos. In the main interface, you can choose an output format and export the rotate video.
Conclusion
Rotating videos in DaVinci Resolve is simple once you understand the tools available. Whether you use the Inspector Panel or the Transform Tool, you have complete control over your video's orientation. For quick adjustments, tools like the HitPaw Univd provide a practical alternative. By applying these techniques, you can create polished and professional-looking footage.


 HitPaw VoicePea
  HitPaw VikPea (Video Enhancer)
 HitPaw FotorPea


Share this article:
Select the product rating:
Daniel Walker
Editor-in-Chief
This post was written by Editor Daniel Walker whose passion lies in bridging the gap between cutting-edge technology and everyday creativity. The content he created inspires the audience to embrace digital tools confidently.
View all ArticlesLeave a Comment
Create your review for HitPaw articles