Complete Guide on How to Rotate Video in Premiere Pro
I am sure you know consistency in shooting and capturing shots from the correct angle is crucial in video production. Yet, there are instances where editing demands the rotation of video clips from different perspectives. Thus, knowing how to rotate video in Premiere Pro is valuable for correcting errors or experimenting with creative angles. So, follow our guide on Adobe Premiere Pro, rotate and align your exclusive content seamlessly with your creative vision. Let us begin exploring the new digital creation era in the following sections.
Part 1. Full Steps on How to Rotate Videos in Premiere Pro
With Adobe Premiere, rotating videos in any direction is simple. Follow these quick stages to learn how to rotate a video in Adobe Premiere.
-
Step 1: Upload Video to Adobe Premiere Pro.
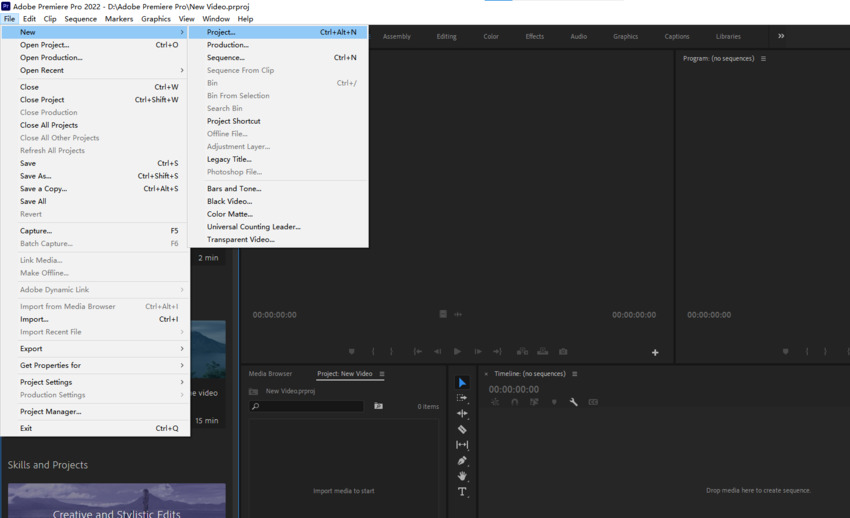
Launch Adobe Premiere Pro and start a new project by reaching the File menu and selecting "New" and Project.

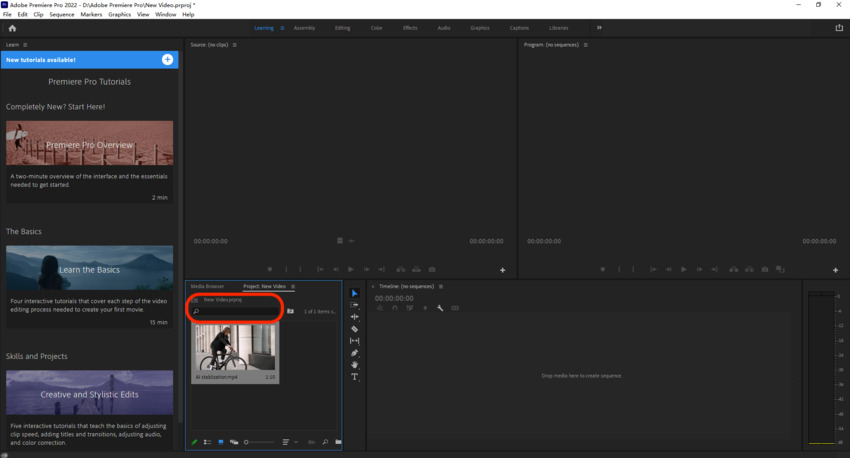
Locate the video using the search bar at the bottom. Drag and drop the video to the Adobe Premiere Pro timeline area.

-
Step 2: Find the Rotation button in Adobe Premiere Pro.
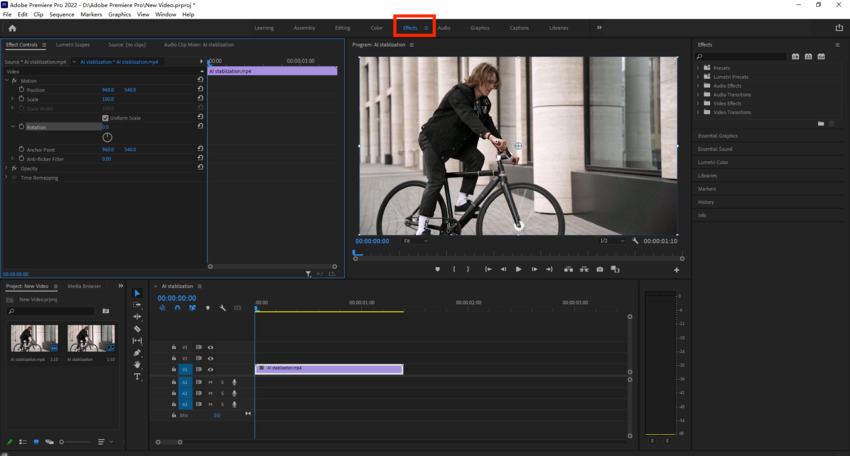
Now, go to the 'Effects' option on the top (see in blue). You will see the 'Rotation' button accessible on the left panel. Type in the degree of rotation you need for the video.

-
Step 3: Start the Rotate Process in Adobe Premiere Pro.
We adjusted the degree value (shown in blue text) to 90 to rotate the video accordingly.

Part 2. How to Rotate Videos with Premiere Alternatives
As you can see above, the Adobe Premiere Pro is a cumbersome process and you need to know the software in well, to proceed the video rotation. It is not an easy way to rotate videos in Premiere Pro.
Thus, we are here with the two best alternatives to rotate video in Premiere Pro.
1. HitPaw Edimakor- Best Way
HitPaw Edimakor, is the ultimate video editing tool with flawless video rotation capabilities without compromising resolution. Its intuitive interface ensures effortless navigation, catering to novice and experienced editors. This versatile tool supports 4K video editing and exporting, offering vertical and horizontal video rotation options. With its commitment to video quality and providing diverse editing functions, HitPaw Edimakor is an excellent go-to solution to rotate videos.
How to rotate a video in HitPaw Edimakor?
-
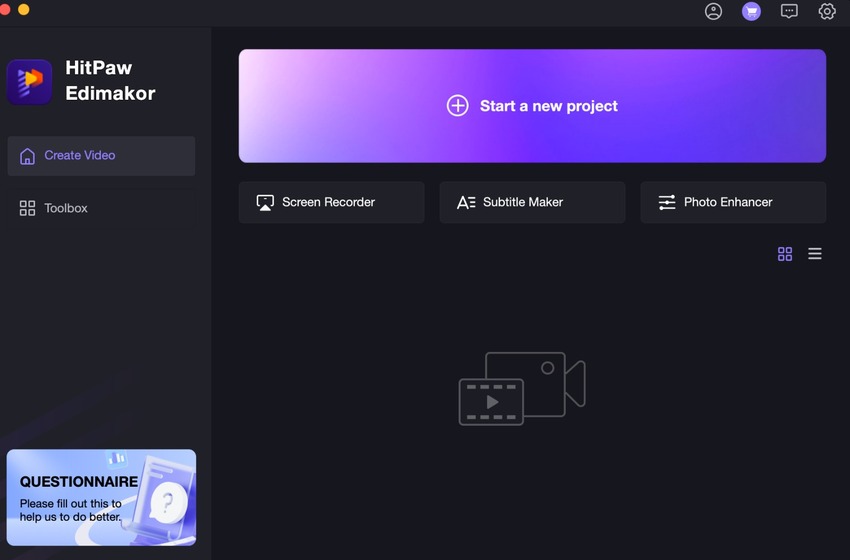
Step 1: Launch HitPaw Edimakor on your computer.
Install HitPaw Edimakor on your computer, launch the app and tap "Start a New Project". Then, drag and drop the clip you want to rotate into the main interface.

-
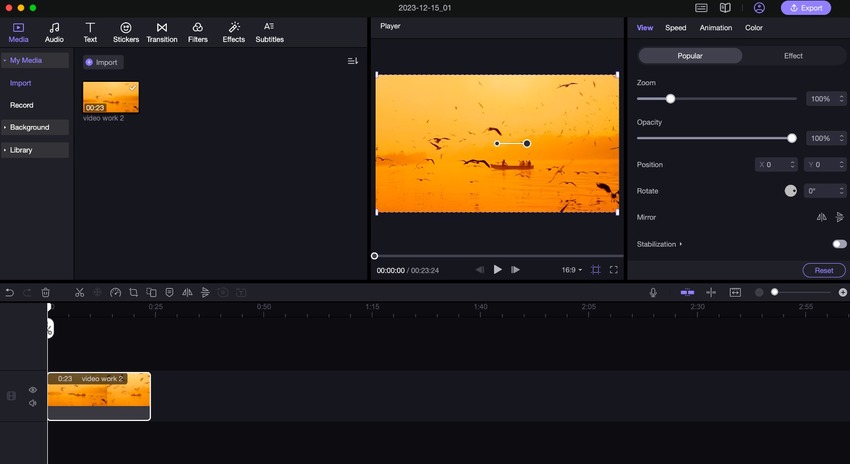
Step 2: Upload Media to HitPaw Edimakor.
The Edimakor will take a couple of seconds to upload the video on its interface. Once done, it will show as in the image below.

-
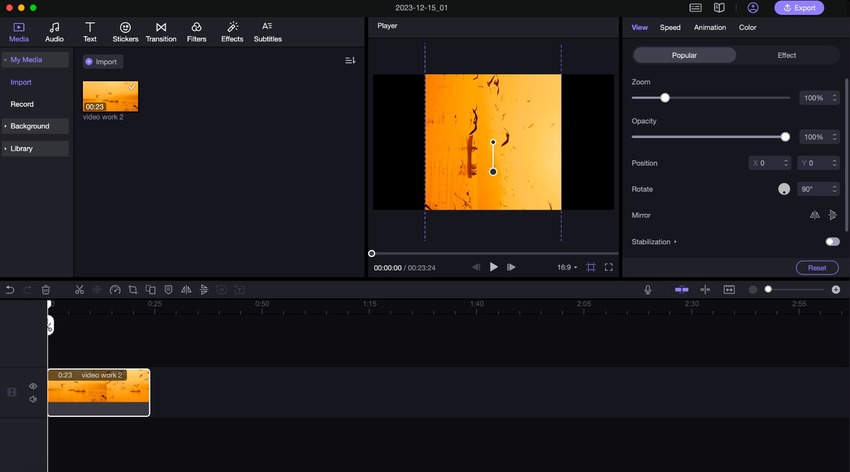
Step 3: Rotate and Export Video.
Now, drag the video to the track below to start editing. You will see the 'Rotate' option on the right above. Type in or use the arrows to select the rotation degree. Here we chose 90 degrees. Finally, once done, tap "Export" to download your rotated video.

2. HitPaw Online Video Editor
HitPaw Online Video Editor is a free tool that promises an ad-free, watermark-free experience, offering limitless usage across all devices, whether Windows PC, Mac, iPhone, or Android. Its user-friendly and accessible to all skill levels ensure easy video editing with top-notch security measures to safeguard your files. With regular updates and a focus on enhancing features regularly, HitPaw guarantees a seamless editing experience, empowering users to create standout content hassle-free.

How to rotate a video in HitPaw Online Video Editor?
-
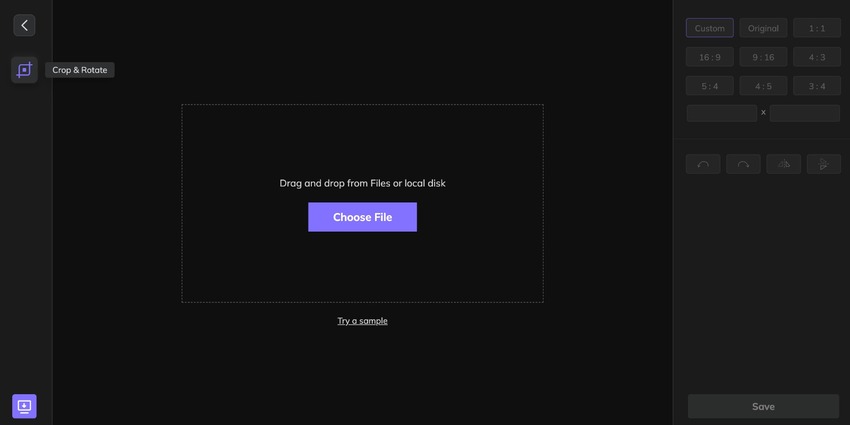
Step 1: Upload Video to HitPaw Online Video Editor.
To upload a video, drag and drop it or click the "Choose file" option.

-
Step 2: Choose crop and rotate option.
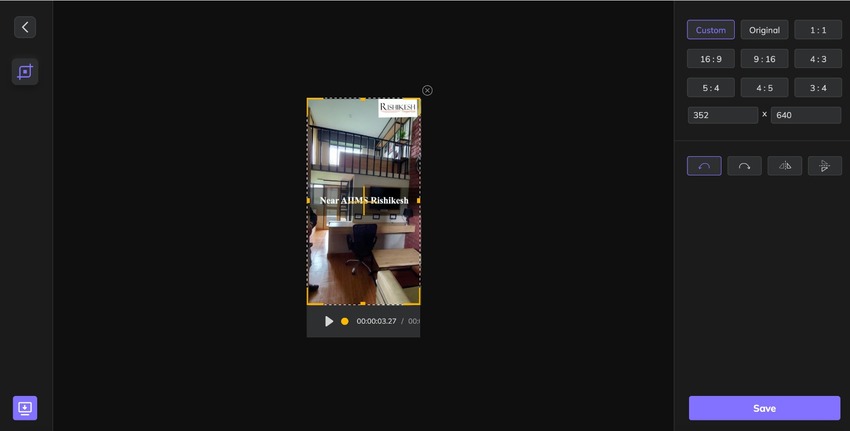
Once the video uploads successfully, you will see icons of rotate on the right panel. Select the 'Crop and Rotate' button at the left side panel.

-
Step 3: Save and download.
Once satisfied with the result, click the 'Save' option at the bottom right.

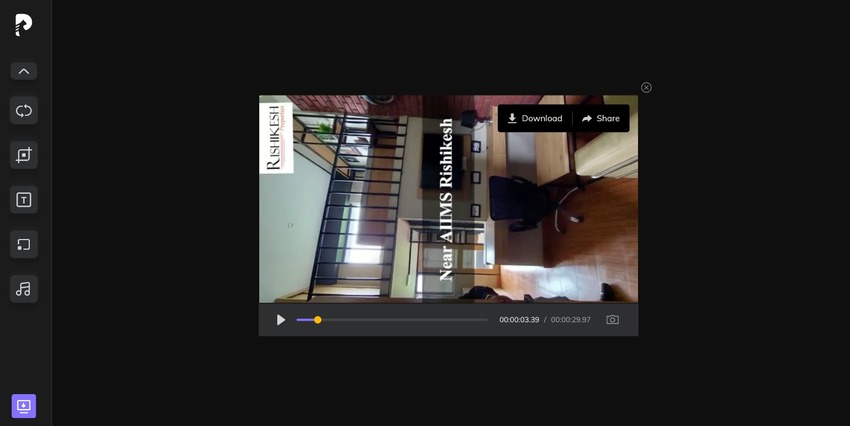
The online video maker will process your request and the rotated video will show as below with more editing options on the left panel.
3. VLC
VLC Media Player is a logical, trustworthy alternative to Premiere Pro rotating video that functions as a manager, converter, basic editor, and media player. Its three rotating options help transpose, rotate, and flip it to suit your immediate needs at 90, 180, and 270 degrees. You can choose random angles and the positions for rotating horizontally and vertically, adjust the playback speed and add subtitles. Then, you can use a URL to stream videos online.

Steps to rotate a video in VLC:
-
Step 1: Upload Video to VLC.
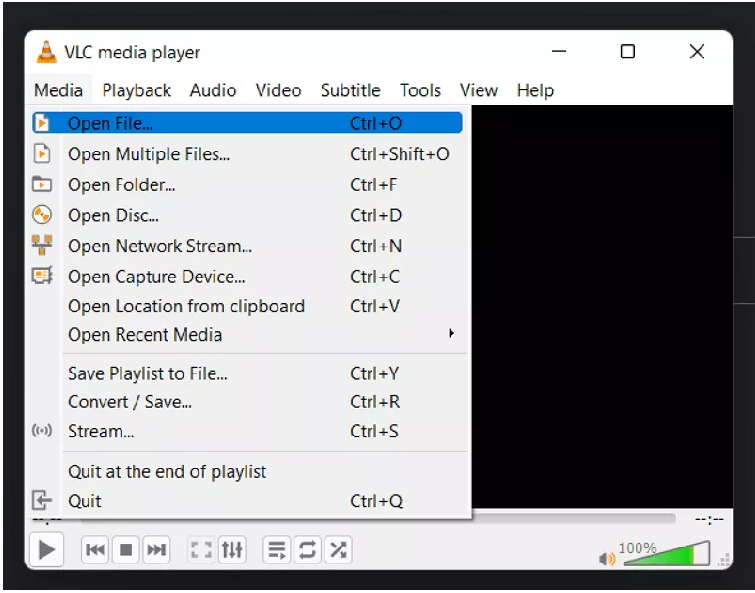
Download and install VLC Media Player and launch it. To upload and rotate the video, select Media > Open File.

-
Step 2: Edit Video
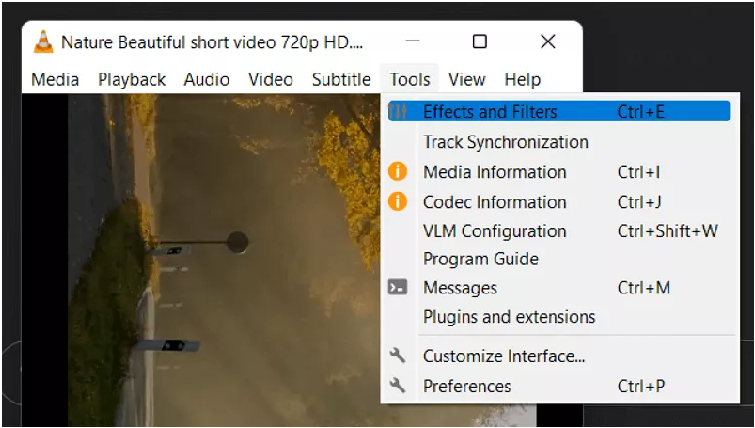
Select "Effects and Filters" under the "Tools" category on the main menu.

-
Step 3: Save the rotated video.
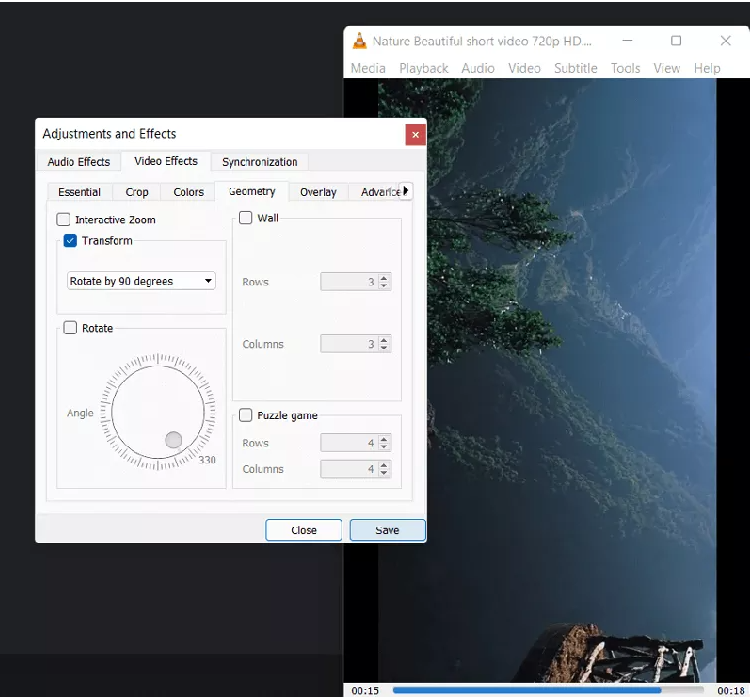
Click Video Effects > Geometry from the "Adjustments and Effects" pop-up menu. Check the "Transform" checkbox and choose any one of the drop-down lists for video rotation. That’s it! Your clip will rotate as per the selected degree when you hit the "Save" button.

Part 3. Frequently Asked Questions You May Want to Know
Q1. How do I rotate a video in the Premiere Pro bin?
For how to rotate video in the Premiere Pro bin, follow these steps:
-
Step 1: Rotate the clip properly by using the Transform effect and setting the rotation.
-
Step 2: Select the Transform effect with the appropriate rotation by right-clicking it in the Effects Control panel, then select Cut.
-
Step 3: Make sure every clip in the Project Panel is selected.
-
Step 4: Select the group with a right-click and choose Paste.
Q2. How do I change a video from vertical to horizontal in Premiere Pro?
Here's the simple step to turn Premiere Pro to rotate video vertically to horizontally:
-
Step 1: Launch Adobe Premiere Pro, create a new project, and import your clip into the 'Project' panel. Right-click the clip and choose 'New Sequence from Clip.'
-
Step 2: Adjust settings by right-clicking the sequence option in the 'Project Panel' and selecting 'Sequence Settings.' Opt for 'Custom' to set the 'Editing Mode,' ensuring a frame size of 9:16 and choosing 'Square Pixels' for the pixel aspect ratio.
-
Step 3: Crop the video from 'Window' > 'Effect Control,' select the clip, and navigate to the 'Motion' tab. Use the 'Scale' and 'Position' tools to crop. Preview the video to ensure the desired framing throughout.
Q3. How to flip videos in Premiere Pro?
For a full video rotation in Premiere Pro, just follow these easy steps:
-
Step 1: On the upper toolbar, select the Effects menu.
-
Step 2: Click the Transform tab.
-
Step 3: From the drop-down menu that displays, select either Vertical Flip or Horizontal Flip.
-
Step 4: To add any flip to the clip, just click and drag it.
Conclusion
Finally, learning how to rotate video in Premiere Pro introduces you to many end possibilities. These simple step guides allow editors to rotate video in Premiere Pro with ease, whether for fixing angles or exploring other angles. Moreover, you can accomplish video rotations with alternative programs like HitPaw Edimakor, HitPaw Online Video Editor, and VLC, which offer a variety of features to meet different editing requirements. So, learn these simple steps and FAQs to improve your editing skills and create visually stunning stories with ease.




 HitPaw VikPea
 HitPaw Video Object Remover
Share this article:
Select the product rating:
Daniel Walker
Editor-in-Chief
My passion lies in bridging the gap between cutting-edge technology and everyday creativity. With years of hands-on experience, I create content that not only informs but inspires our audience to embrace digital tools confidently.
View all ArticlesLeave a Comment
Create your review for HitPaw articles