Free and Easy Ways on How to Rotate a Video on iPhone in 2024
To learn how to rotate a video on an iPhone, all you need is the Photos app that is already present on your device. If that isn’t enough, you can download and install iMovie from the App Store, a free tool from Apple to produce more dynamic outputs. However, if you want to create something outstanding, you need a dedicated post-production program for that purpose.
For your convenience, all the processes are discussed in detail in the following sections.
Part 1: Rotate a Video on an iPhone with Built-in and Proprietary Apps
In this part, you will learn how to rotate videos on an iPhone using the device’s built-in app, and Apple’s proprietary program to get more control over your modifications.
Method 1: Rotate a Video on an iPhone with the Built-in App
This method explains how to rotate a video on an iPhone using the built-in Photos app. The step-by-step process is given below:
-
Step 1: Get to the Edit Mode
Launch the Photos app on your iPhone, go to Albums > Videos, and tap to open the video you want to rotate. Next, tap Edit from the upper-right area to switch to the Edit mode.

-
Step 2: Go to the Crop and Rotate Screen
Tap the Crop icon from the lower area of the interface.
-
Step 3: Rotate the Video in the Photos App
Use the Rotation slider at the bottom to rotate the video on the iPhone. Tap Done from the top-right to save the changes.

Pros:
- Photos is the built-in app in iOS.
- It’s free to use.
- Supports almost all formats iDevices recognize.
Cons:
- Limited options; not suitable for professional editing.
- Not as robust as a dedicated post-production tool.
- Resizing or modifying resolution is comparatively challenging.
Method 2: Rotate a Video on an iPhone with the Proprietary App
In this method, you will learn how to rotate a video on an iPhone using Apple’s free proprietary app, iMovie. iMovie is available for iOS and macOS, which means you can use the program on your iPhone, iPad, and Mac computers for free.
Unless you want to include high-end dynamics or extremely advanced effects in your videos, iMovie alone is capable enough to create publishable or distribution-ready films.
As for rotating a video with iMovie, you can follow the instructions given below to learn the procedure:
-
Step 1: Import the Source Media to iMovie
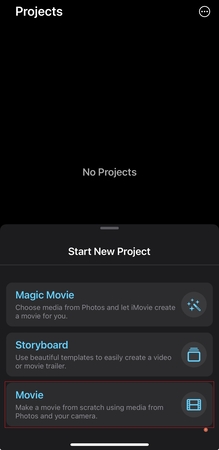
After installing iMovie from the App Store, launch the app. Tap Movie on the first screen and browse and tap the source video from your iPhone’s storage. Tap the Tick mark in the callout to select the media, and tap Create Movie to import.


-
Step 2: Rotate the Video in iMovie
On the My Movie screen, use your first finger and thumb to rotate the clip in the Preview window. Notice that this rotates the video in increments of 90 degrees. Repeat this step to rotate the video on the iPhone further until you get the desired result. Tap Done from the top-left area to save the changes and move to the next screen.

-
Step 3: Export the Rotated Clip
Tap the Share icon from the bottom of the window. Tap Export Protect on the Export and Share box to export the video. Alternatively, tap Share Video to share the clip with your family, friends, and colleagues, or publish it on a social media portal.


Pros:
- iMovie is free and comprises many tools for professional editing.
- The Mac instance of iMovie is sufficient for creating industry-standard movies unless you need extreme dynamics.
- iMovie offers an intuitive interface that flattens the learning curve.
Cons:
- The iOS instance of iMovie can rotate videos only in increments of 90 degrees.
- Clips edited with iMovie on iPhones lack professional touch and therefore, may not be suitable for commercial distribution.
- iMovie is available only for iDevices, limiting its access only to Apple users.
Part 2: How to Rotate a Video for iPhone/iPad/Windows/Mac
Although all the programs discussed in the previous section are free, they are available only to people with Apple gear. Even that is acceptable to some extent, but both Photos and iMovie apps lack advanced features, preventing you from expanding the scope of your creativity and imagination.
To bridge this gap, you need a robust and reliable tool that is platform-independent and doesn’t require any professional training to exploit all its features. Introducing HitPaw Edimakor!
Even though HitPaw Edimakor is mainly an AI-powered program, it also comprises a couple of tools that accept manual inputs, in case you want granular modifications. In addition, HitPaw Edimakor is available for Windows and Mac platforms. This means you can edit your videos in Windows and use them on Mac and vice versa.
Therefore, after learning how to rotate a video on iPhones, you will now see how HitPaw Edimakor works, so that you can choose the option that best suits your needs.
The steps given below explain how to use HitPaw Edimakor to rotate a video for iPhone:
-
Step 1: Add the Source Media to the Edimakor Timeline
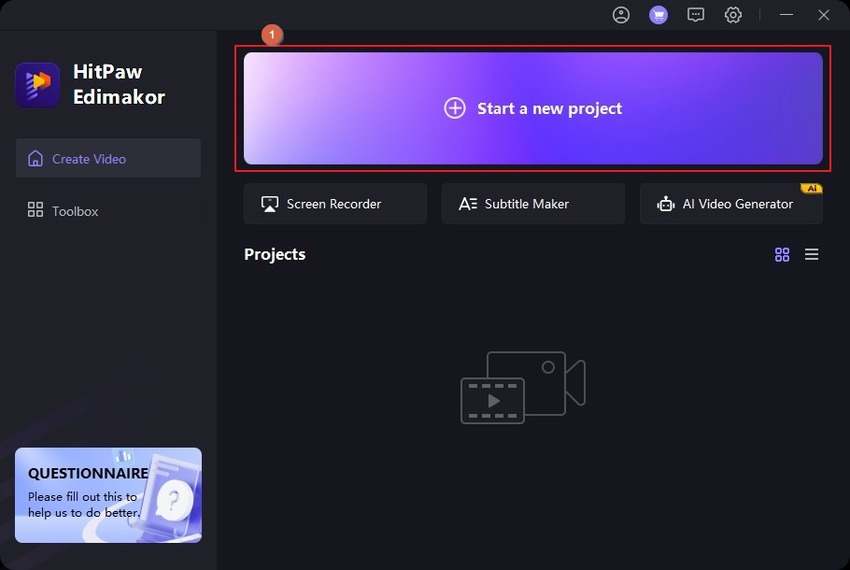
Assuming that you already installed HitPaw Edimakor on your computer, launch the program and tap Start a new project on the first screen. On the Video Editor window, click inside the Media Bin on the upper-left and import the source media clip. Now, hover the mouse over the thumbnail of the footage and click the + (Add to Timeline) button from its lower-right to add the clip to the Timeline.


-
Step 2: Rotate the Video for iPhone in Edimakor
Click to select the media in the Timeline. Use the Rotate knob or Up/Down arrows to rotate the video at your preferred angle. Optionally, explore the other options in Edimakor for further modifications to make the output look professional. Once done, click Export from the upper-right area.

-
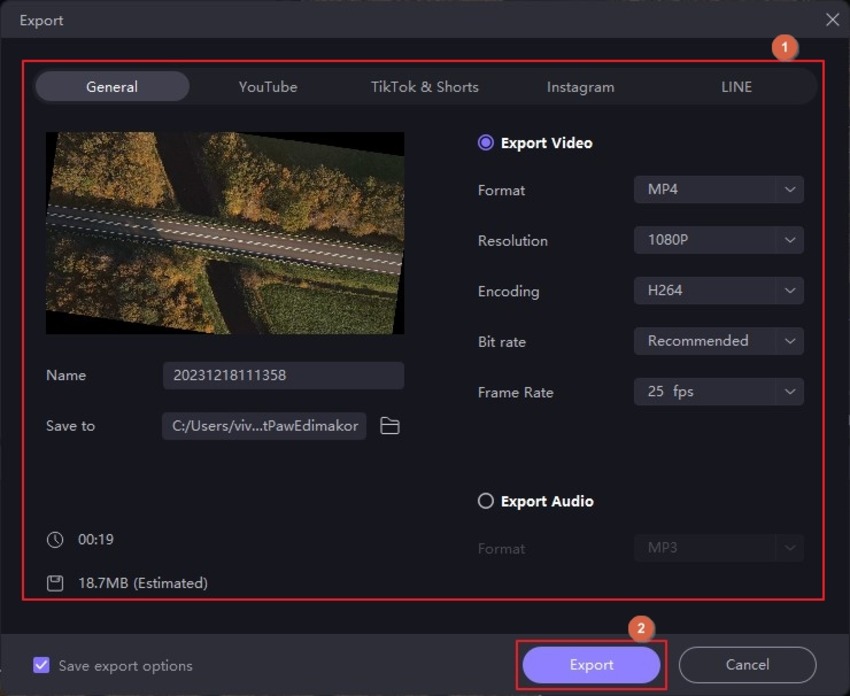
Step 3: Export the Rotated Video for Viewing or Sharing
Use the tabs and options on the Export box to set output parameters. Click Export to export the updated video for distribution or sharing.

Part 3: How to Fix If iPhone Video Won’t Rotate
If Photos or iMovie apps fail to rotate videos on an iPhone according to your needs, you may want to use a dedicated post-production program such as HitPaw Edimakor. Because Edimakor has advanced tools to edit videos, you can expect the desired output from it.
You can refer to the previous section to learn how to use HitPaw Edimakor to rotate videos for iPhones.
Part 4: Bonus Tip: How to Turn On/Off Auto Rotate on iPhone
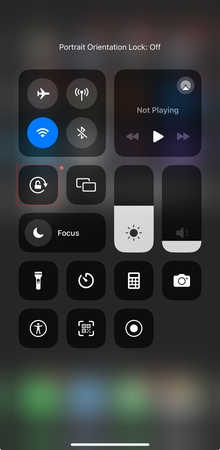
If you cannot rotate a video on an iPhone, you can enable the ‘Auto Rotate’ option, rotate the phone itself, and watch the clip in your preferred orientation. The step-by-step instructions on how to enable automatic rotation on an iPhone are given below:
Swipe the iPhone screen from the top-right to the center.
Note: Swipe the screen from the bottom to the center on iPhone SE, iPhone 8, or earlier models.
- Tap the Auto Rotate icon from the Control Center screen
Tap anywhere on the screen to close the Control Center window
Note: Tap the top of the screen or press the Home button to close the Control Center window on iPhone SE, iPhone 8, or earlier models.

Conclusion
While it is easy to rotate a video on iPhones using iMovie and the Photos app, these tools don’t offer advanced options to produce professionally distributable outputs. If you are a filmmaker or vlogger, you need more than that. This is where you can use HitPaw Edimakor to do all your post-production tasks instead of learning how to rotate a video on an iPhone.


 HitPaw VikPea
 HitPaw Video Object Remover

Share this article:
Select the product rating:
Daniel Walker
Editor-in-Chief
My passion lies in bridging the gap between cutting-edge technology and everyday creativity. With years of hands-on experience, I create content that not only informs but inspires our audience to embrace digital tools confidently.
View all ArticlesLeave a Comment
Create your review for HitPaw articles