Full Guide on How to Add Text in iMovie on Mac/iPhone/iPad
You don’t have to pay anything to learn how to add text in iMovie, as the app is Apple’s proprietary, it’s free, and so is this guide. Many professionals use iMovie for post-production tasks, and if they’re good at editing, they come up with industry-standard outputs that can be their cash cow in the long run. The idea behind explaining all this in the Introduction section is to help you understand the program’s potential.
However, the tool requires your intervention throughout the post-production procedure, and you must have an in-depth understanding of editing to produce appealing outcomes.
If you’re a professional video editor, using iMovie would be easy and fun. On the other hand, if the case is otherwise, you may need a third-party tool that offers an intuitive interface with self-explanatory options. With such a program, you don’t need to go through a learning curve, and you can still add text to your movies even if you don’t come from a technical, designing, or videography background.
Therefore, all the procedures are explained in the following sections for your convenience.
Part 1: Step-by-Step Guide on How to Add in iMovie on Mac
iMovie is compatible with Mac computers, and you can download the program from the App Store. Once downloaded, you can follow the steps given below to learn how to put words in iMovie:
-
Step 1: Create a New Movie Project
After installing iMovie on your Mac, launch the program, click the + (Create New) tile from the upper-left box of the main window, and click Movie to start a new movie project.

-
Step 2: Add the Source Video to the Timeline
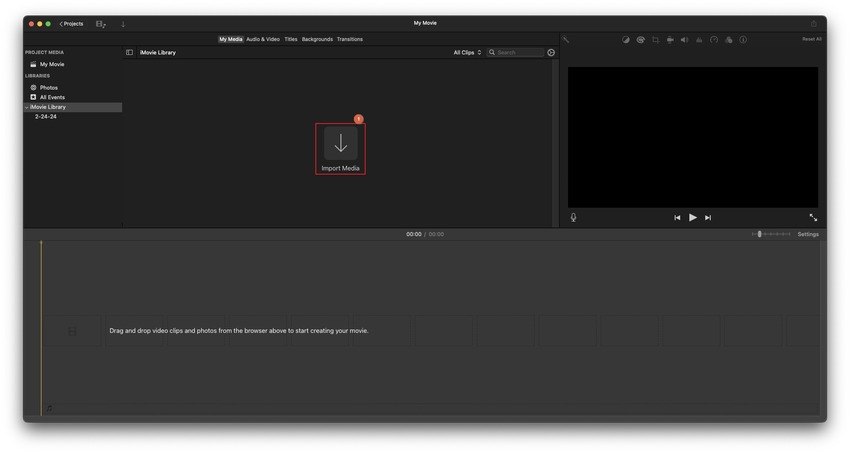
Click Import Media in the Media Library box on the next window and import the source video to iMovie. Next, drag the media clip to the Timeline at the bottom.

-
Step 3: Add Text to the Video and Export
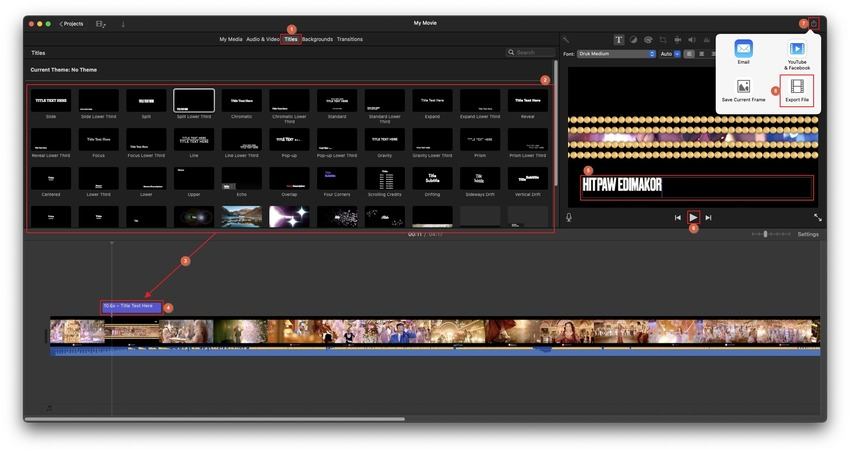
Go to the Titles tab at the top. Move the Playhead (Scrubber) to the frame you want the text to appear from. Choose your preferred text type from the available presets and drag and drop it to the Timeline as a new layer. Next, double-click the textbox in the Preview window and enter a custom text. Repeat this process several times to add text to the whole movie to use the text as subtitles. Alternatively, drag the right handle of the segment to the end of the Timeline to display the same caption throughout the video.
Once everything is done, click the Play button under the iMovie’s Preview box to review the video. Click Share from the top-right area, and click Export File to export the video with the subtitle or caption.

Part 2: Full Guide on How to Add Text in iMovie on iPhone/iPad
iPhones and iPads share a common iMovie interface, and therefore, if you learn how to add text with iMovie on one, you automatically know the process for the other. However, both these UIs slightly vary from the Mac version of the program. That is why this section is equally essential.
You can follow the step-by-step guide on how to add text to iMovie on iPhone given below:
-
Step 1: Import the Source Video to iMovie on an iPhone
Open iMovie on your iPhone and tap Movie from the Projects screen. Use the next window to locate and tap the video you want to add text and tap Create Movie from the bottom.


-
Step 2: Add Text to the Video
On the My Movie screen, swipe to position the Scrubber to the first frame of the media. Tap the Text button from the bottom, tap a relevant text preset, and edit its content in the Preview box. Tap Done to commit the text modification in iMovie.


If you want the same caption to remain visible throughout the film, you can proceed to Step 3. On the other hand, if you’re creating subtitles, tap the Cut button, swipe to position the Scrubber to the frame you want the next dialogue to appear, and tap Split. Repeat the text adding and editing process to add the second caption. Continue doing this for the rest of the movie.

Tap Done from the top-left after completion.

-
Step 3: Export the Movie
Tap the Share icon from the bottom of the next window and follow the on-screen instructions to export the video to your iPhone.

Part 3: Bonus Tip: How to Add Text Easily with the Best iMovie Alternative
Apple devices and apps are good and iMovie is free, alright. However, adding subtitles using the program requires significant human intervention, which could be tedious if the video is several hours long. To eliminate manual involvement, you need an efficient AI-powered third-party tool that automates most tasks and completes them within seconds. Now, if you’re not aware, HitPaw Edimakor is the best alternative to iMovie and checks all the boxes discussed above.
That’s not all. HitPaw Edimakor is extremely rich in video production and post-production features, as it comes with an integrated screen recorder, AI subtitle creator, AI video generator, AI scriptwriter, advanced video editor, and image enhancer.
Furthermore, because HitPaw Edimakor is a desktop program compatible with Mac and Windows platforms, it keeps your files protected from unintentional exposure to unwanted people.
Using HitPaw Edimakor is easy compared to learning how to add text in iMovie, and the method is explained below:
Note:A Mac computer is used here for illustrations.
-
Step 1: Add the Source Video to HitPaw Edimakor’s Timeline
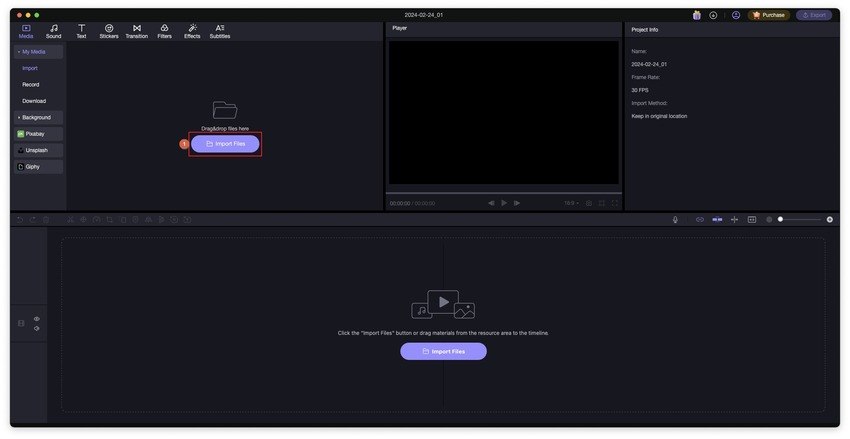
Open HitPaw Edimakor on your Mac computer. Click Create a video. Click Import Files on the Video Editor interface and import the source video to the program. Drag the movie from the Media Bin to the Timeline at the lower part of the Video Editor window.

-
Step 2: Auto-Generate Subtitles
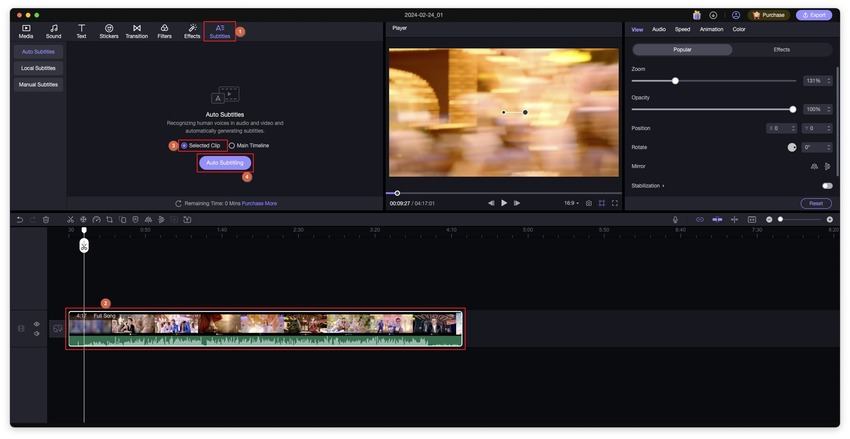
While you can use the Text tool at the top to add text that should appear throughout the video, the Subtitles screen allows you to exploit the power of AI to auto-generate subtitles. For this, click the Subtitles tool from the standard toolbar at the top, click to select the media in the Timeline, ensure that the Selected clip radio button in the Auto Subtitles box is selected, and click Auto Subtitling.

-
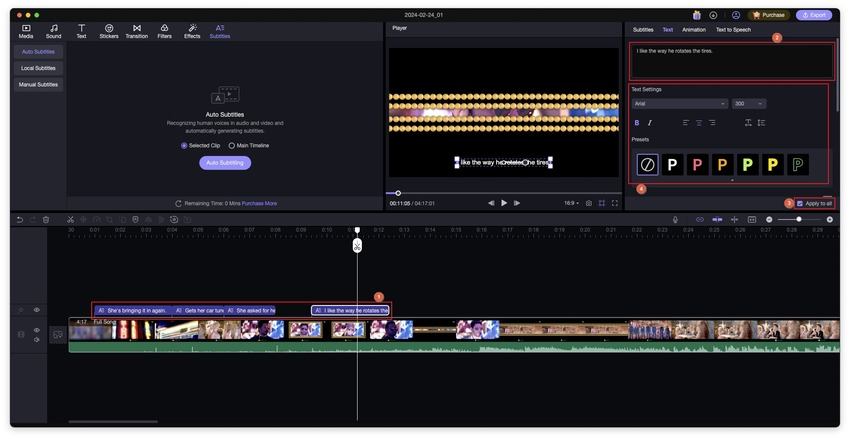
Step 3: Edit and Format Subtitles and Export the Video
Once HitPaw Edimakor generates subtitles and adds them to the Timeline, click any caption segment and use the text input field and other formatting options on the right to modify the content and modify its appearance. Although you will have to select each segment manually for text modifications, the formatting automatically applies to the entire track as long as the Apply to all box at the lower part of the right pane is checked.

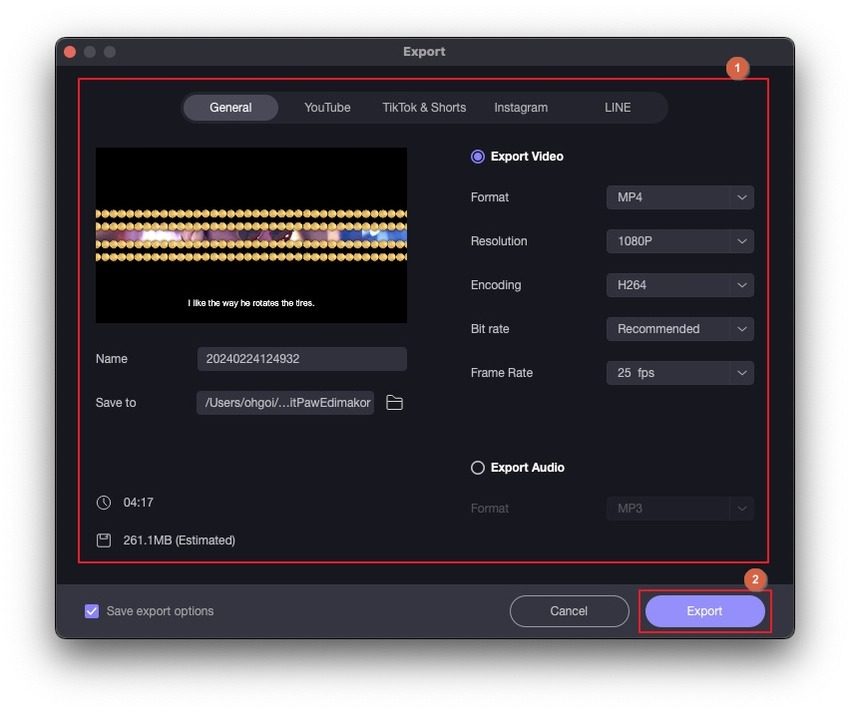
Once everything is done, click the Play button under the Video Editor’s Preview window to review the output, click Export, and use the tabs and available options on the Export box to define output preferences. Click Export from the bottom-right of the box to export the video.

Conclusion
After learning how to add a text in iMovie on a Mac or iPhone, if you find the task tedious and prone to human errors, you can try HitPaw Edmakor to automatically generate subtitles for you. With such an approach, your chances of producing erroneous output are minimized to almost nil, and you can safely skip the learning phase that teaches how to add text in iMovie.




 HitPaw Univd (Video Converter)
  HitPaw VikPea (Video Enhancer)


Share this article:
Select the product rating:
Daniel Walker
Editor-in-Chief
This post was written by Editor Daniel Walker whose passion lies in bridging the gap between cutting-edge technology and everyday creativity. The content he created inspires audience to embrace digital tools confidently.
View all ArticlesLeave a Comment
Create your review for HitPaw articles