How to Use Google Video Editor on PC/Phone/iPad (2024)
Being one of the most used service providers, the company has an integrated Google video editor to help users create videos from short clips and images for personal use. YouTube Studio is another tool by Google comprising a dedicated editor to create professional videos using its intuitive interface.
Explaining the YouTube Studio video editor is beyond the scope of this guide. Therefore, the following sections give detailed information about the Google Photos video editor and teach how to use it efficiently.
Nevertheless, on your part, you can choose any of these video editors according to your comfort and ease of usability.
Part 1: Does Google Have a Video Editor?
A short and quick answer would be, yes, it does, and it offers two types of Google video editors, namely the Google Photos video editor and an integrated video editor in YouTube Studio. Depending on your requirements, you can choose any of these tools for producing videos.
However, before proceeding, you must understand that while the video editor in YouTube Studio comprises more features for professional outputs, Google Photos video editor is for basic creations, where you can add multiple clips and images to form a collage for personal sharing and viewing.
Part 2: How to Use Google Video Editor on Windows/Mac
Although you can use any web browser to access Google video maker on a Windows or Mac computer, Google Chrome would be the best choice for compatibility reasons. You can learn how to create videos using the Google video editor by following the instructions given below:
Step 1: Pick Content Categories
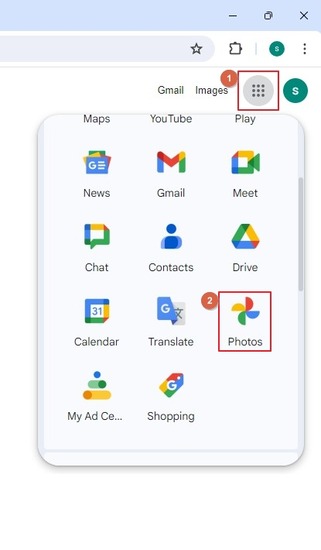
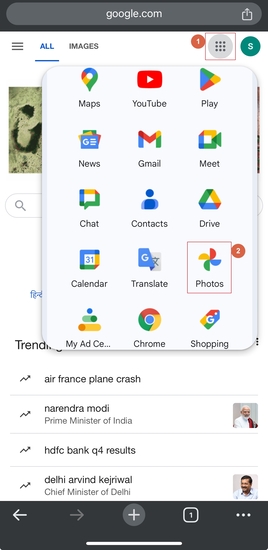
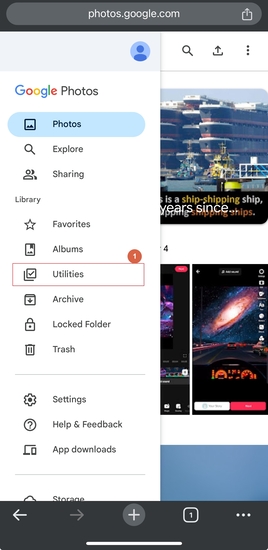
On Chrome, sign in to your Google account and click the Google apps icon from the upper-right. Scroll down the list and choose Photos from the available programs. On the next page, click Utilities from the navigation bar on the left and click Highlight video from the Utilities window in the center.
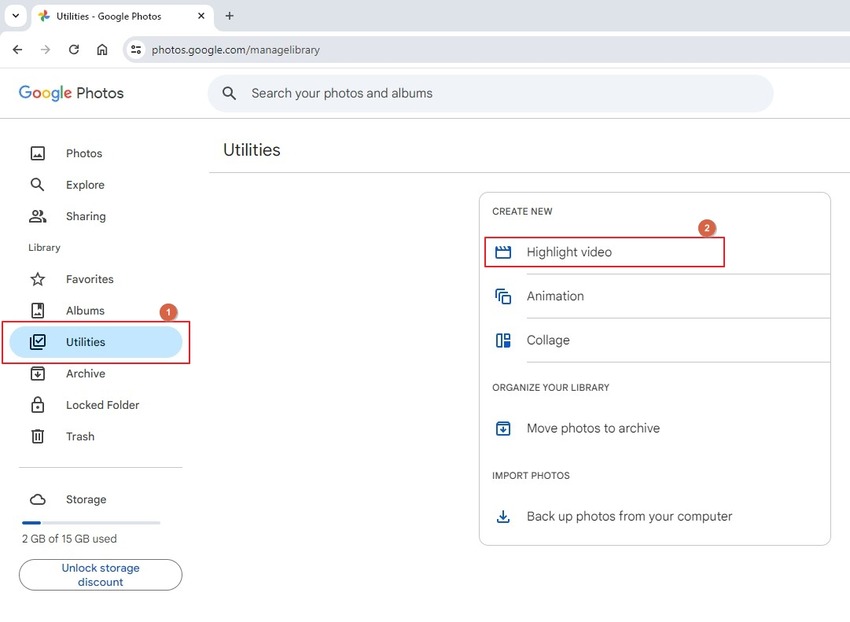
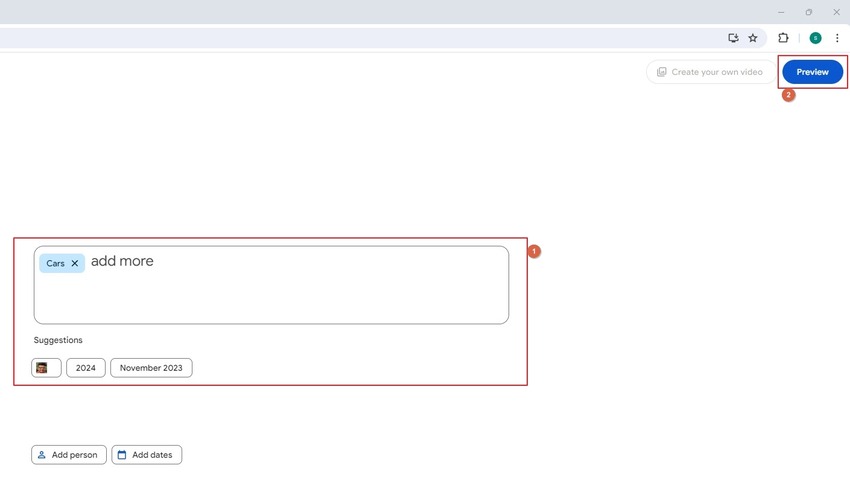
On the next page, use the Search box to find your preferred photos, videos, or categories. Alternatively, click the tiles under the Suggestions section below the Search box and click Preview from the upper-right to allow Google to choose clips and images for you automatically. Optionally, click Create your own video from the upper-right to start from scratch.
Step 2: Define Playback Order and/or Add More Content
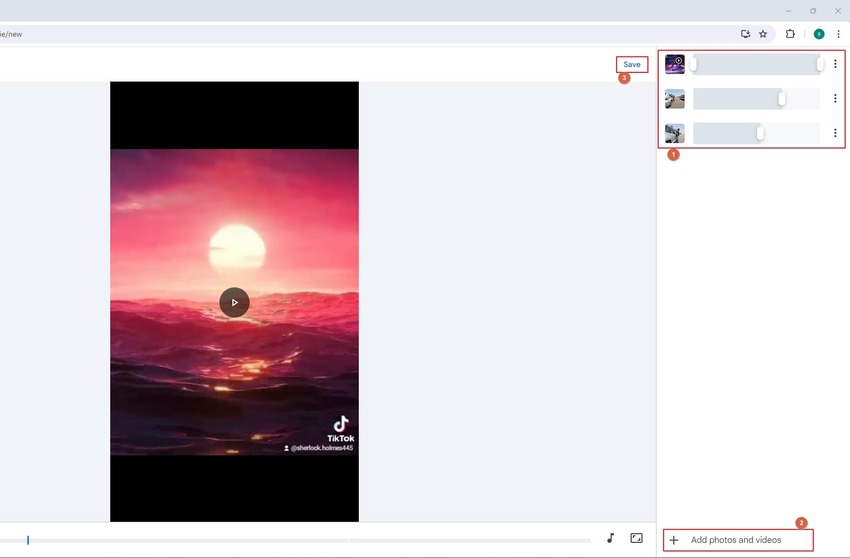
From the right pane of the next page, drag the layers up or down to define their playback order. Drag horizontal bars for each element to manage the duration of its visibility. Optionally, click Add photos and videos from the bottom of the right pane to add more clips or images, as needed.
Click Save from the top-right area of the center pane
Step 3: Download the Video
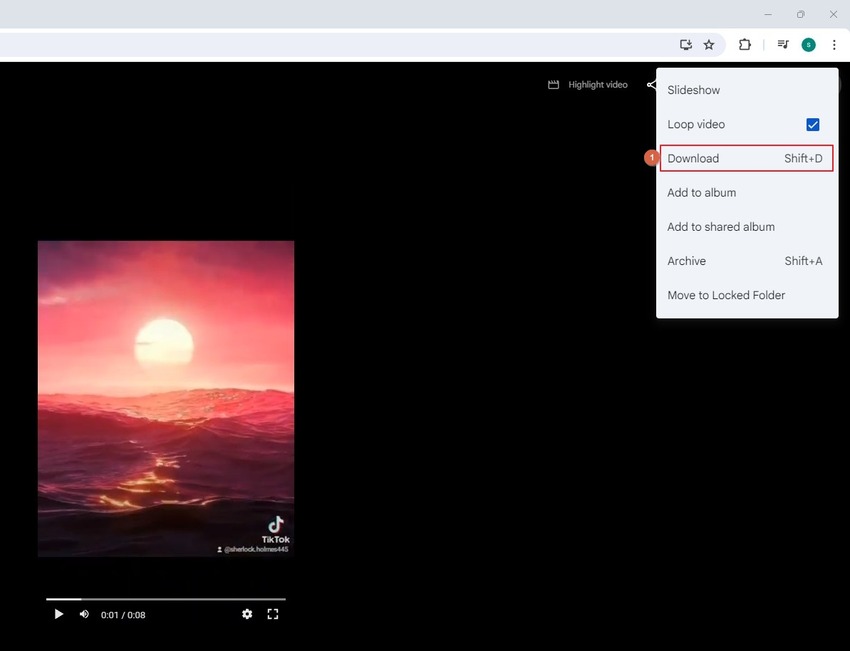
Click the More options icon from the top-right of the next page and click Download to save the clip from the Google video editor to your PC.
Part 3: How to Use Google Video Editor on Android/iPhone/iPad
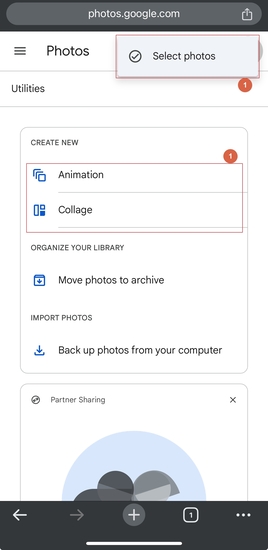
Besides the interface, everything else on a smart device is identical to what you learned about creating clips using the Google video maker in the previous section. Still, the following steps explain how to get to the Utilities screen on your Android/iPhone/iPad:
Note: Even in this method, you should use Google Chrome, as the Google app doesn't allow you to do so.
Note: Mobile instances of Google Chrome don't have the 'Highlight video' option in the 'Utilities' window, as the case is in desktop variants. Using 'Animation' instead would be a good idea.
- Launch Google Chrome on your Android or iPhone/iPad
- Sign in to your account
- Tap the Google apps icon from the top-right corner
- Scroll down the apps list and tap Photos

- Tap More options from the top-left of the next screen
- Tap Utilities from the Google Photos menu

From this point, you will have the same interface you saw in the previous section. Follow the on-screen prompts to create an animated video.
Part 4: More Powerful Google Video Editor Recommended
The idea of using the Google video editor sounds impressive as you don't need to install any application on your computer or create a new account on a third-party, often untrusted, portal. However, the integrated video editors in Google and YouTube Studio lack several advanced features essential to producing industry-standard outputs.Because of this, professionals prefer using a dedicated video editing program such as Adobe Premiere Pro, DaVinci Resolve, etc. But the problem is that even these tools have steep learning curves and require years of practice before you can export well-edited videos.
This is where an intuitive Windows/Mac app called HitPaw Edimakor comes into play. HitPaw Edimakor is an AI-powered all-in-one toolkit that allows you to record computer screens, write scripts, join videos, convert text to speech and vice versa, enhance photos, remove background from images, etc.
Above all, the program's one of the most used integrated tools is Video Editor, which has a Timeline-based layout to help you edit recorded clips, add elements, filters, and captions to them, and much more. Editing footage with HitPaw Edimakor is extremely simple compared to Google video editor, and the process is given below:
Step 1: Populate the Timeline
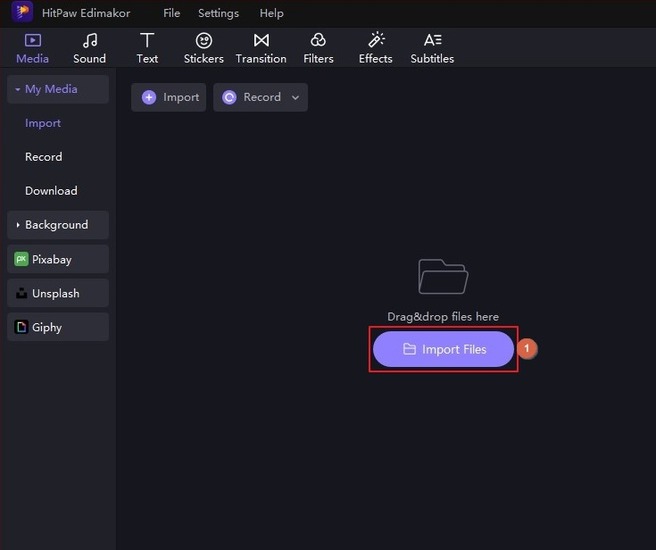
Initialize HitPaw Edimakor on a Windows or Mac computer and click Create a video on the first screen. Click Import Files on the video editor window and import the video and relevant images (if any) to the program. Next, drag the footage to the Timeline at the bottom and do the same with the images you imported.
Note: Ensure you place the photos on separate tracks for convenient management.
Step 2: Edit the Video
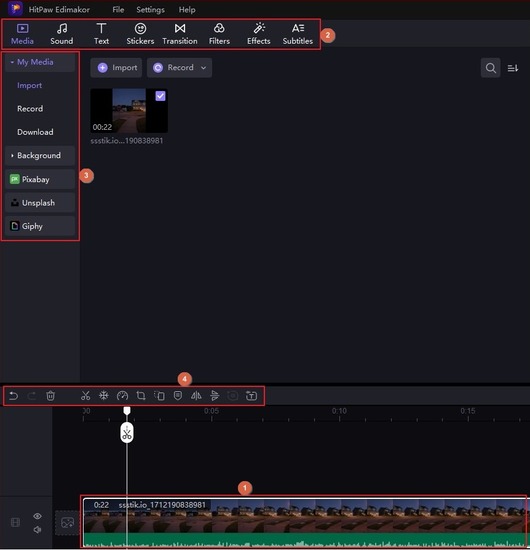
Use the options in the toolbar at the top and above the Timeline to edit the video and add elements, filters, headings, captions, etc. Also, the selected option's Properties pane on the right allows you to make further, more granular adjustments to the clips.
Step 3: Export the Video
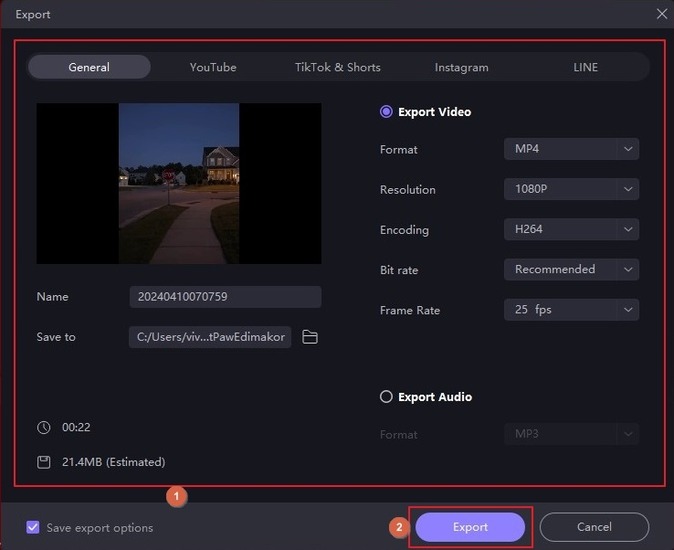
Click Export from the upper-right area of the video editor window. Use the tabs and options on the Export box to define output preferences for the video you edited with the HitPaw Edimakor video editor and click Export from the lower-right corner.
Part 5: Comparison Table between These Two Google Video Editors
| Google Video Editor | HitPaw Edimakor | |
|---|---|---|
| AI-Powered | Only for category selection | Everything except the screen recorder |
| Splitting Clips | No | Yes |
| Captions | No | Yes |
| Text-to-Speech | No | Yes |
| Speech-to-Text | No | Yes |
| Image Enhancer | No | Yes |
| Background Remover | No | Yes |
| Object Layering | Yes | Yes |
| Playback Speed Management | No | Yes |
Conclusion
Video editor for Google is good for beginners and those who want to create basic and short clips for personal use. YouTubers and vloggers can access the more advanced editor that comes with YouTube Studio. On the other hand, if you are conscious about the quality and wish to produce industry-standard outputs, HitPaw Edimakor would be your best bet, instead of picking the Google video editor.



 HitPaw Univd (Video Converter)
  HitPaw Screen Recorder
 HitPaw VikPea (Video Enhancer)


Share this article:
Select the product rating:
Daniel Walker
Editor-in-Chief
My passion lies in bridging the gap between cutting-edge technology and everyday creativity. With years of hands-on experience, I create content that not only informs but inspires our audience to embrace digital tools confidently.
View all ArticlesLeave a Comment
Create your review for HitPaw articles