[Tutorial]How to Denoise Footage in DaVinci Resolve
If you want your videos to seem professional, you need to get rid of the distracting background noise. Most amateur video creators have to make do with low-quality equipment like DSLR cameras or smartphones, while professionals may afford to utilize advanced audio recording techniques and technology to minimize ambient noise.
Thankfully, DaVinci Resolve denoise provides powerful built-in tools to reduce unwanted background noise and improve your audio quality. In this tutorial, we’ll walk through the steps for effectively denoising your clips using Resolve's noise reduction filter. With just a few simple tweaks, you can make your footage sound clean and crisp. Let's learn how to denoise footage in DaVinci Resolve.
Part 1. What is Background Noise?
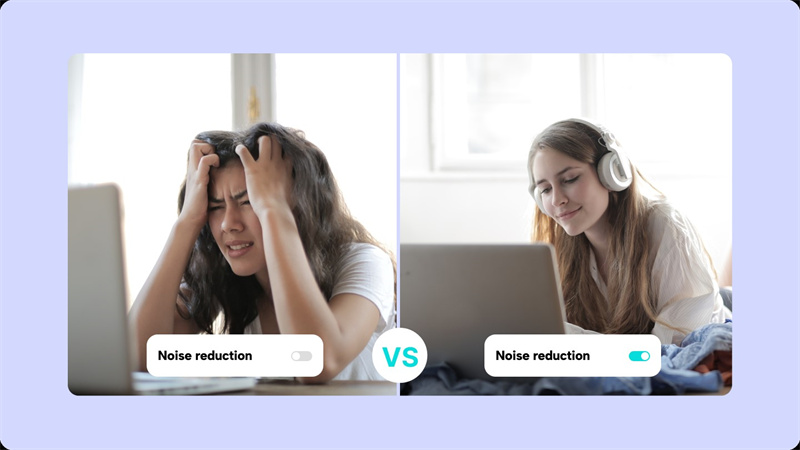
The first step in getting rid of noise is finding out where it's coming from. Audio background noise refers to any unintentional noises picked up by the microphone that distract from or otherwise confuse the primary audio information.
Ambient noise can come from a variety of sources, such as a computer fan, traffic, wind, vents, or even a microphone. Even minor noises can become gratingly annoying when amplified and mixed with other auditory features.
Excessive background noise gives your video an unprofessional, amateurish feel. It can make dialogue difficult to understand, force viewers to turn up their volume, and generally detract from the viewing experience. Background noise seriously affects the viewer’s video experience. But, DaVinci Resolve remove background noise feature can help.
Part 2. What is a DaVinci Resolve Audio Noise Reduction
Built right into Resolve is an advanced noise reduction filter designed to clean up your audio. It analyzes the clip to identify patterns of noise vs actual audio content.
The filter works by isolating and targeting just the frequencies where the noise lives. You can then turn down the volume on just the noise without affecting the rest of the sound.
It's like a surgeon carefully removing cancer cells without damaging healthy tissue. When used right, the filter makes noisy audio sound nearly as good as a studio recording.
The DaVinci Resolve noise reduction filter is highly customizable, allowing you to tweak settings like noise floor reduction, recovery speed, and frequency cutoff points. This gives you surgical-like precision to target the noise in your clip without introducing artifacts. Used properly, it can make noisy audio sound nearly as clean as if it was recorded in controlled studio conditions.
Part 3. How to Denoise Footage in DaVinci Resolve?
Here is how to remove background noise in DaVinci Resolve:
Step 1: Open Fairlight and Add the Noise Reduction Filter
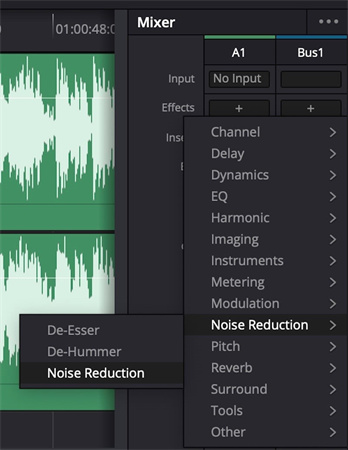
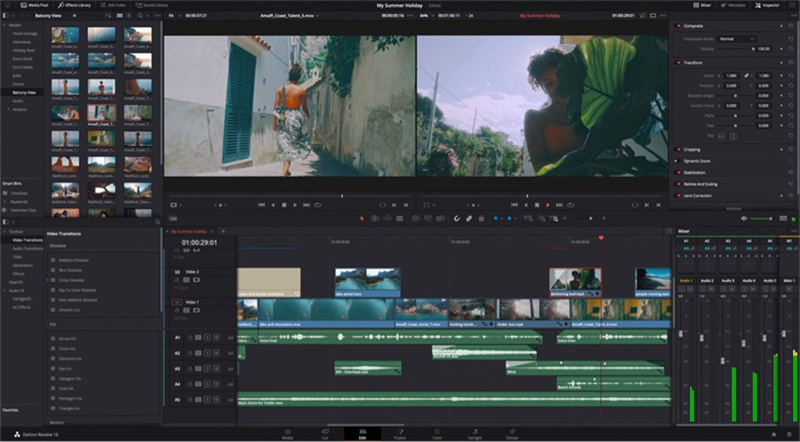
First, open up the Fairlight page in Resolve and locate the Audio Effects folder in the Mixer window. Click on Noise Reduction, then double-click on the Noise Reduction filter to add it to your audio track. This will open up the filter's parameter controls.
Step 2: Understand the Layout and Controls
The DaVinci Resolve 18 remove background noise filter has various settings and meters across the top and bottom. Key controls include the preset selector, the A/B comparison slots, the main On/Off toggle, and the Listen to Noise Only solo button. The input and output meters let you monitor volume levels before and after filtering. The center graph shows which frequencies are being targeted.
Step 3: Set the Detection Parameters
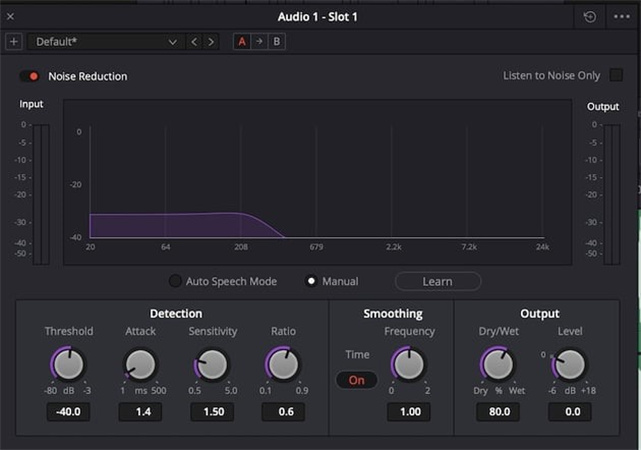
The detection settings determine how the filter analyzes the noise in your clip. Threshold adjusts the signal-to-noise ratio detection sensitivity. Attack controls how quickly the filter reacts to changes in noise over time. Sensitivity tweaks how responsive the filter is to the target noise frequency range. The ratio affects the attack time relative to the learned noise profile.
Step 4: Adjust Smoothing to Reduce Artifacts
The Frequency smoothing setting can help reduce audible artifacts like harmonic ringing that may occur as a side effect of the noise reduction. Use sparingly or disable if not needed.
Step 5: Dial in the Reduction with the Output Controls
The Dry/Wet mix knob lets you blend between the filtered and unfiltered signal to taste. The Level fader compensates for any volume loss from the reduction. Listen critically as you adjust these output controls to find the optimal balance of noise reduction for your clip.
Part 4. Pro-tip: How To Do VideoBackground Noise Reduction Using AI Enhancer?
Getting professional-looking video from smartphones and other consumer devices can be a challenge. You could use denoise in DaVinci Resolve 18, but an easier alternative is available. The compact lenses and small sensors often produce footage lacking in resolution, sharpness, and overall quality compared to dedicated video cameras. This is where AI-powered software like HitPaw VikPea (formerly HitPaw Video Enhancer) comes in.
HitPaw utilizes advanced neural network algorithms to upscale and enhance low resolution footage. It can take pixelated 480p video and enlarge it all the way up to crystal clear 4K or even 8K resolution.
Here are some of the key features and capabilities of HitPaw VikPea:- AI-powered upscaling up to 8K resolution
- Deep learning algorithms sharpen details and textures
- Removes noise, artifacts, and compression defects
- Specialized AI models for enhancing anime and human faces
- One-click batch processing to automate enhancement
Step 1:You can get HitPaw VikPea from their official website. Just click the download button to grab the latest package for your Mac or PC. The installation process is quick and easy.
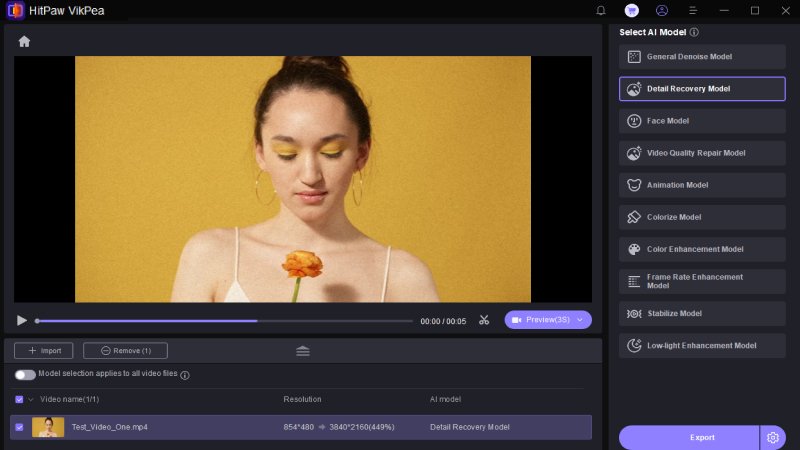
Step 2:Once HitPaw is installed, you can start enhancing footage. Click the "Choose File" button or simply drag and drop your video onto the interface. It supports all the common formats like MP4, MOV, AVI, MKV, and more.

Step 3:HitPaw gives you 7 different AI models to choose from based on the type of video you want to enhance. For example, the Animation Model is tailored for cartoons and anime. The Face Model specializes in human portraits. There's even a Colorize Model to add color to black-and-white videos.

Step 4:Hit the Preview button and let HitPaw's AI go to work. In just a few seconds, you'll see a dramatically improved version of your clip. If you like the results, click Export to save the high-quality enhanced video.

Part 5. FAQs of DaVinci Resolve Noise Reduction
Q1. Does DaVinci Resolve have noise reduction?
A1. Built right into Resolve is an excellent set of tools for reducing unwanted background noise and hiss in your clips. The Fairlight audio page includes editable filters like Noise Reduction and DeHummer to clean up your sound. There are also great noise removal options when color grading in the Color page.
Q2. Does DaVinci Resolve 18 have noise reduction?
A2. The latest version, Resolve 18, features the same fantastic noise reduction capabilities. So whether you're on version 17, 18, or the new Studio edition, you'll have access to all the audio and video denoising tools you need to make your footage look and sound crystal clear.
Q3. Is DaVinci Resolve 18 the best?
A3. Many video pros consider Resolve to be the industry leader when it comes to post-production. The noise reduction and color grading tools are top notch. Denoise DaVinci Resolve 18 18 adds even more pro-level features like automatic audio sync, customizable workspaces, and improved editing workflows. For high-end post needs, Resolve 18 certainly lands at the top of the pile.
Bottom Line
Getting pro-quality video from consumer devices can be a real challenge. But AI-powered software like HitPaw VikPea levels up your footage with the touch of a button.
In this guide, we covered how to reduce background noise in DaVinci Resolve 18 and the common problems like noise, pixelation, and lack of sharpness that plague phone and drone videos. HitPaw's deep learning AI clears these issues up amazingly well, letting you enlarge and enhance clips all the way up to 8K resolution.




 HitPaw Watermark Remover
  HitPaw Univd (Video Converter)
  HitPaw VikPea (Video Enhancer)


Share this article:
Select the product rating:
Daniel Walker
Editor-in-Chief
My passion lies in bridging the gap between cutting-edge technology and everyday creativity. With years of hands-on experience, I create content that not only informs but inspires our audience to embrace digital tools confidently.
View all ArticlesLeave a Comment
Create your review for HitPaw articles