How to Crop Video in QuickTime on Mac
What if you record a video with the wrong background or unwanted items in the corner of the frame? Well, you can crop the video and keep only the required part. The basic video cropping tool comes in handy when you edit your video to perfection. There are many tools available. Here we will learn how to crop videos on QuickTime Player.
Part 1: Brief Introduction to QuickTime Player
QuickTime is a multimedia player created by Apple. Working on your Mac, it can play, record, and edit videos or audio recordings. As for video editing, it mainly does video cutting, trimming, splitting, merging and rotating. As for screen recording, it can record the full screen or a portion of the screen with audio, and it can also capture your iPhone or iPad screen. QuickTime Player supports most video and audio formats like Apple-only MOV and M4V, common Mp4, AVI and MP3, and open-source MKV and WMV.
Part 2: How to Crop Video on QuickTime on Mac
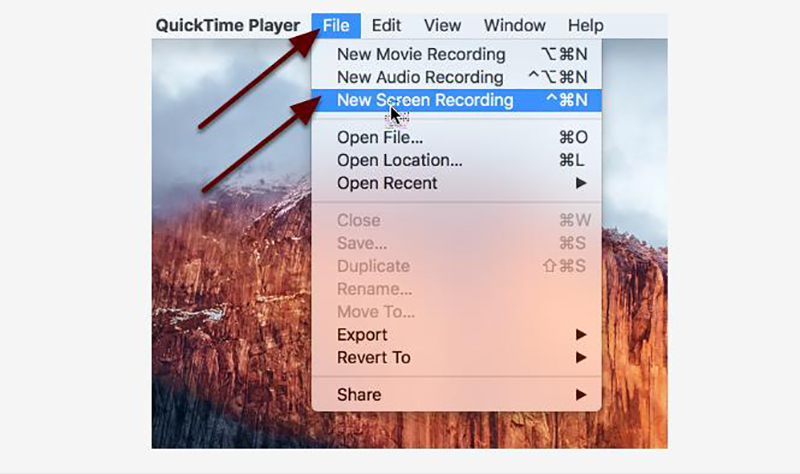
Can QuickTime Player crop videos? Well, the answer is no and yes. QuickTime does not have a direct Crop feature, but it provides screen recording feature, using which you can select and record the wanted crop area. Once done and saved, the video will appear as if it has been cropped. If you are interested in this way, check the following steps.
- 1. First of all, open the video you want to crop to play.
2. Now open QuickTime Player, choose File > New Screen Recording.

3. To record a portion of the video screen, click on the fifth button, select the crop area, then click on the Record button.

- 4. Play the video for recording. Once done, click on the black square in the menu bar to stop. Finally, save the crop video on your computer.
Part 3: Alternative to QuickTime Player Crop Video
As you can see, it is not very convenient to crop videos in QuickTime Player with the screen recording feature and you can not use this Apple software on Windows PC easily. So it is better to find a video editor. The alternative here to crop video on QuickTime player is HitPaw Edimakor.
QuickTime is primarily a media player. It allows Mac users to cut and trim videos without providing additional editing tools. On the other hand, Edimakor is an AI-powered video editing software with a user-friendly interface and various capabilities, including video editing, trimming, cropping, audio insertion, text and effect addition, and much more.
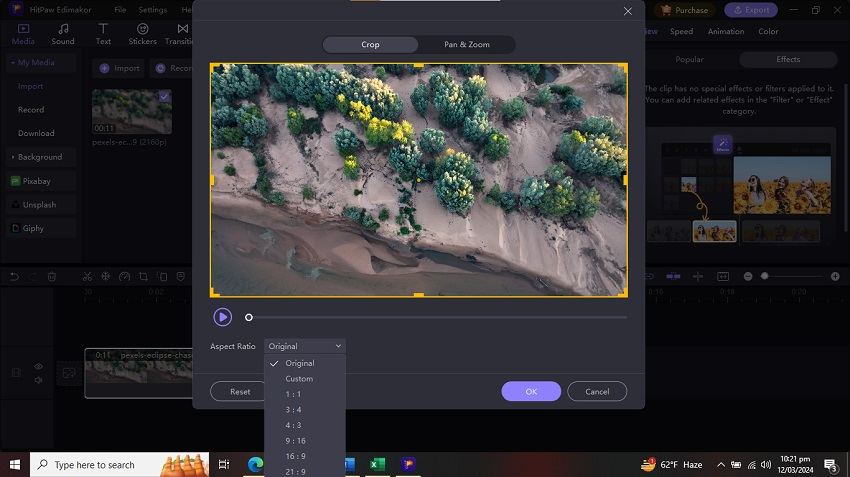
Back to the topic, you can quickly crop videos to popular aspect ratios such as 9:16, 4:3, and 16:9 in Edimakor. This flexibility ensures compatibility with social media platforms such as Instagram, YouTube and TikTok, which may require different aspect ratios for optimal viewing. You can also customize the crop area as needed. Let's see how to do it below:
-
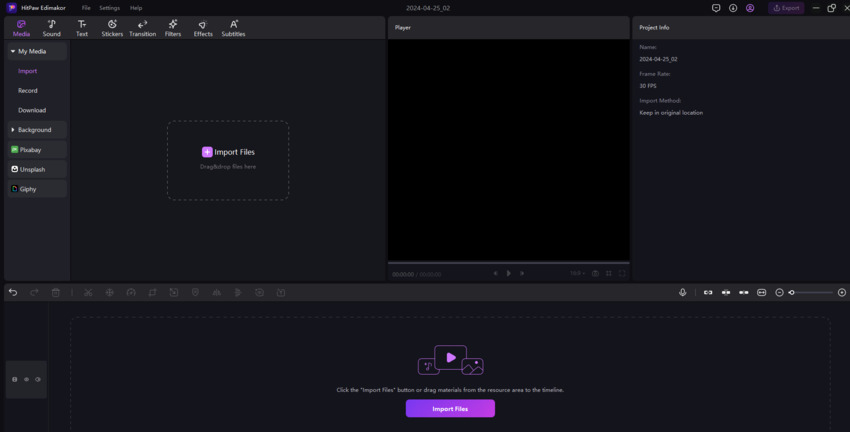
Step 1. Import the video
Download and run Edimakor and start importing your video file. Drag and drop it to the timeline.

-
Step 2. Crop the video
Now that you’ve added your video files Look for the small cropping icon above the timeline. In the pop up, choose the aspect ratio you want for your desired video or click on Custom and select any wanted area to crop.

-
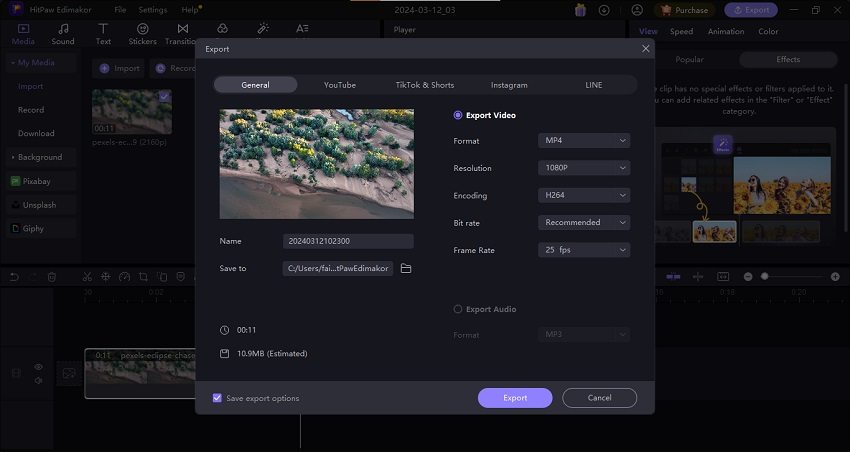
Step 3. Export the video
Once satisfied with your creation, export your cropped video file to your desktop.

Conclusion
QuickTime Player can only do basic video trimming, cutting, and rotating. But to crop video and change the video aspect ratio, you have to use its screen recording of a selected portion. So as a QuickTime crop video alternative, HitPaw Edimakor is recommended. It can crop and edit videos efficiently on both Windows PC and Mac, which is widely used by beginners and professionals.


 HitPaw Edimakor
 HitPaw VikPea (Video Enhancer)


Share this article:
Select the product rating:
Daniel Walker
Editor-in-Chief
My passion lies in bridging the gap between cutting-edge technology and everyday creativity. With years of hands-on experience, I create content that not only informs but inspires our audience to embrace digital tools confidently.
View all ArticlesLeave a Comment
Create your review for HitPaw articles