User Proven Ways for How to Add Videos from Desktop to YouTube Video Editor
Adding a touch of editing can make your YouTube videos more appealing to the audience. The good news is that you don’t need to learn tech-savvy editing software to polish your videos as YouTube has recently launched its new YouTube Video Editor.
If you haven’t heard of this remarkable editor yet, worry not as this article will walk you through how to add videos to YouTube video editor for editing. Additionally, this article will discuss a perfect alternative to YouTube editor for creating professional-looking videos with ease.
How to Add Videos to YouTube Video Editor from Your Computer/Desktop
In this part, we are going to list the step-by-step guide of adding videos to YouTube Video Editor from your computer for you.
1. Add Videos to YouTube Video Editor from Your Computer/Desktop
Uploading videos from your computer to Youtube editor is not as difficult as it may sound. All you need to do is follow the below steps for how to add videos to the YouTube video editor:
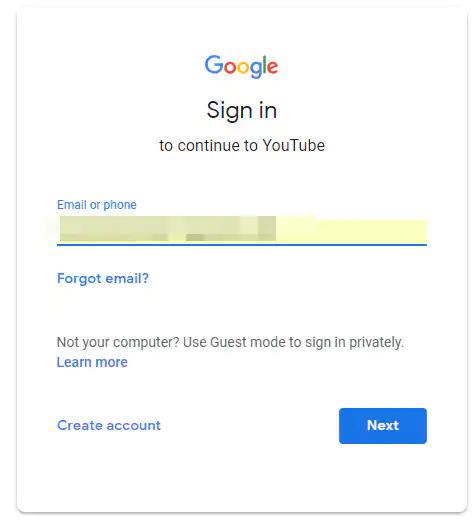
Step 01Sign in with your Google or YouTube account. Now, hit “Upload” on the top-right corner to enter the Upload page.
Step 02Here, adjust the privacy settings and then, browse the video from your desktop.
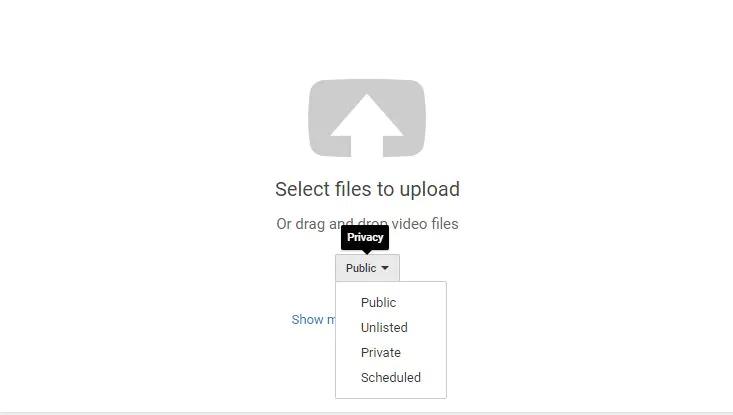
Step 03Wait until the video is uploaded on your channel. Write down its titles, description, and also choose a thumbnail.
That’s it, your video is uploaded on YouTube studio (YouTube Editor). You can access it at My Channel > YouTube Studio.
2. Add Videos on the Timeline on YouTube Video Editor
Consider if you want to edit a video that’s already uploaded on your YouTube channel. The normal process is to delete it from studio, edit it, and then, re-upload it. But YouTube video editor saves you from this trouble by allowing you to edit the uploaded video directly within the studio.
This is what makes YouTube editor so useful for content creators. Checkout yourself how to add videos on the timeline on YouTube video editor:
Step 01First of all, launch YouTube and sign in to your Google account.
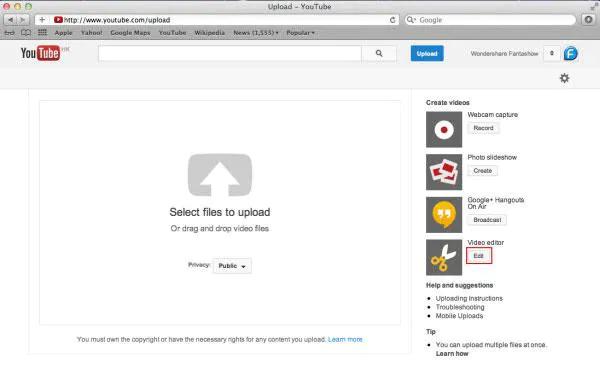
Step 02Now, hit on My Channel > YouTube Studio (video editor).
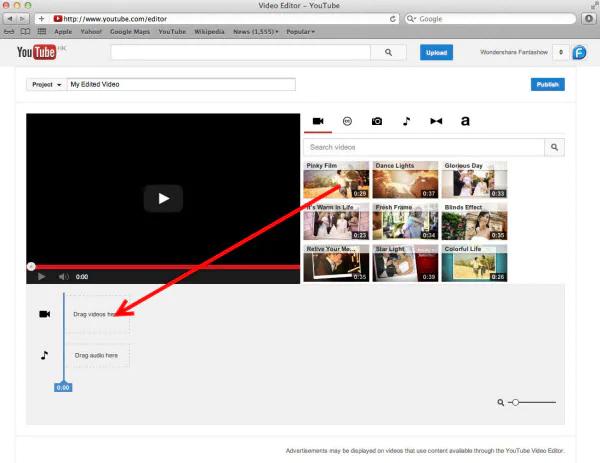
Step 03Here, you’ll see all the uploaded videos on your YouTube studio. Simply, drag and drop the video you want to edit to the timeline.
3. Add Pictures to YouTube Video Editor
Even after uploading a video on YouTube, users can still add pictures to it via a special feature of Youtube editor called “Enhancement.” It offers a simple and straightforward process to add pictures to any specific points on a YouTube video.
Follow the below steps to learn how to add pictures to YouTube video editor:
Step 01Once in the YouTube Studio, drag and drop the video right-click the video you want to edit in the timeline.
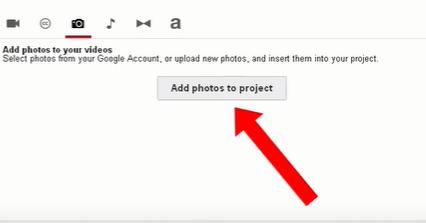
Step 02Simply, click on the “camera” icon in the quick tab and hit “Add Photos to Project.”
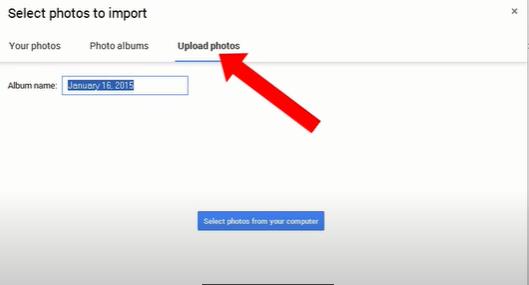
Step 03Then, hit Upload Photos and choose images from your computer.
Step 04Once the images are uploaded, simply drop and drag them next to the video clip on the timeline. And bang, you have just put the image on YouTube.
4. Remove Audio in YouTube Video Editor
YouTube Video Editor isn’t that great for editing audio on YouTube. If you want to have more control on audio editing, use HitPaw video editor. But still YouTube editor helps you perform basic audio editing functions including removing the original audio off video.
Here’s how to do that:
Step 01Sign in to your YouTube or Google account and hit on your Avatar > YouTube Studio.
Step 02Now, add the video to the timeline and click on the “Audio” option.
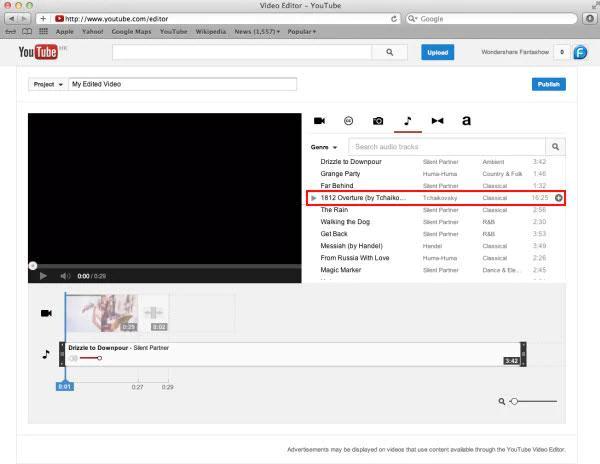
Step 03Simply, select the audio in the timeline and hit Delete to remove it.
Note:
Note that users can also replace the audio with any track from YouTube Audio Library. Unfortunately, YouTube doesn’t allow you to import audio from the desktop as you can only use the audio files offered by the YouTube itself.
Editor Picked: Popular YouTube Video Editors
With just one quick search, you can get plenty of YouTube video editors, all claiming to be the best in the business. We did a comprehensive research and found the below editing software as the most efficient when it comes to impeccable features, ease of use, and cost-friendly.
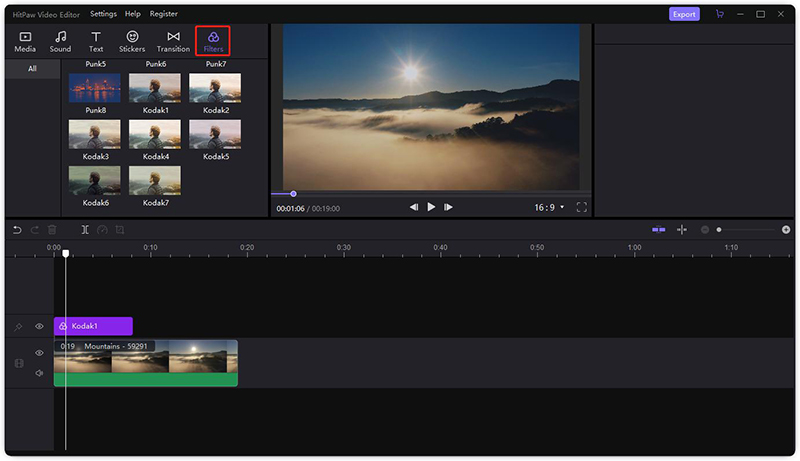
Of all the YouTube Video Editors that we have tested and tried, HitPaw Edimakor has proven to be the most efficient and comprehensive tool. It’s much more powerful than YouTube video editor and offers tons of amazing transitions, stickers, filters, and overlays.
With HitPaw installed on your computer, creating a professional grade YouTube video is just a few clicks away. Thanks to its sleek and easy to use interface, it won’t take you more than a few minutes to create a captivating YouTube video for your audience. Aside from offering all the features that YouTube Video Editor offers, HitPaw comes preloaded with tons of advanced editing tools as well.
Unlike its competitors, HitPaw doesn’t compromise the video quality during editing. Plus, users get tons of options to customize the Export settings including output format and resolution as needed.
Features of HitPaw Edimakor:
Below features make HitPaw the #1 smart video editing software:
- Easily edit YouTube videos like a pro
- Add hundreds of stunning transitions, filters, and stickers
- Cut, crop, split, rotate, and adjust a YouTube video
- Add text and music to your videos
- Allows multi-layer video editing
- Precise timeline to apply editing tools to specific positions easily
- Picture in picture mode
- Tons of audio editing options
- Export 4K solution
- 24/7 customer support service
- Sleek and user-friendly interface
- Unlimited tracks
How to Add Videos to YouTube Video Editor through HitPaw Edimakor
This section will outline a step-by-step guide on how to add videos to the YouTube video editor using HitPaw Edimakor.
Final Words
To wrap it up, this article has provided a detailed guideline on how to add videos to YouTube video editor. YouTube editor is a great choice to edit your videos effortlessly but it only performs basic editing functions. Also, it crashes a lot while editing larger videos.
We recommend users installing HitPaw Edimakor to create spectacular videos with just a few clicks. Using this tool, even non-technical users can make professional-looking videos to captivate their audience.
Feel free to ask any questions.


 HitPaw Watermark Remover
  HitPaw Screen Recorder

Share this article:
Select the product rating:
Daniel Walker
Editor-in-Chief
My passion lies in bridging the gap between cutting-edge technology and everyday creativity. With years of hands-on experience, I create content that not only informs but inspires our audience to embrace digital tools confidently.
View all ArticlesLeave a Comment
Create your review for HitPaw articles