Guide of How to Stabilize Video in Premiere Pro
“You've just returned from a breathtaking hiking trip, capturing stunning views and memorable moments on your camera. But when you review the footage, you realize it's shaky and hard to watch.” This is a common scenario for many video creators, whether you're a seasoned filmmaker or an enthusiastic hobbyist.
Here, we'll guide you through the process for how to stabilize a video in Premiere Pro, which is one of the most popular video editing software programs out there.
Part 1. How Can I Stabilize Video in Premiere Pro?
One of its most useful functions is the ability to stabilize shaky footage that makes your videos look smooth and polished. Whether you're dealing with handheld shots or footage captured in motion, Premiere Pro provides an efficient way to enhance your video quality.
Now, we'll break down the step-by-step process for how to stabilize video in Premiere, ensuring that you can easily follow along and achieve great results.
Steps for How to Stabilize Video in Premiere Pro
Step 1: Import Your Media
First, you need to bring your video clips into Premiere Pro. There are a few simple ways to do this:
- File Import: Go to the top menu and select “File > Import” to choose your video files.
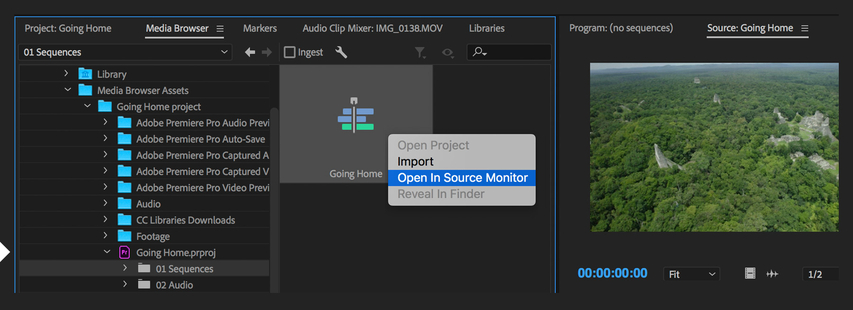
- Right-Click Method: If you're using the Media Browser, right-click the file and select “Import”.
- Drag and Drop: You can also drag the file directly from the Media Browser into the Project panel or the timeline.
If you have an existing sequence, just drag your clip onto the timeline. If not, right-click in the Project panel and choose “New Sequence from Clip” to create a new timeline.

Step 2: Isolate the Shaky Portions
To ensure smooth performance while stabilizing, it's a good idea to work on the smallest portions of the clip that need stabilization. The Warp Stabilizer effect can be resource-intensive, so isolating the shaky sections will help.
- 1) Identify the Shaky Footage: Watch your video and find the parts that are shaky.
- 2) Split the Clips:Move the playhead to the points where you want to split the clip. Make sure to highlight the relevant video channels. If you want to split audio with video, ensure the audio track is highlighted too.
To split, you can use the keyboard shortcut “Command/Control + K” (for Mac or PC). Alternatively, go to “Timeline > Split Clip”.
Now you have shorter clips that can be edited independently, allowing for more focused stabilization.
Step 3: Apply the Warp Stabilizer Effect
Next, it's time to add the Warp Stabilizer effect to your isolated clip.
- 1) Select the Clip:Click on the clip you want to stabilize in the timeline.
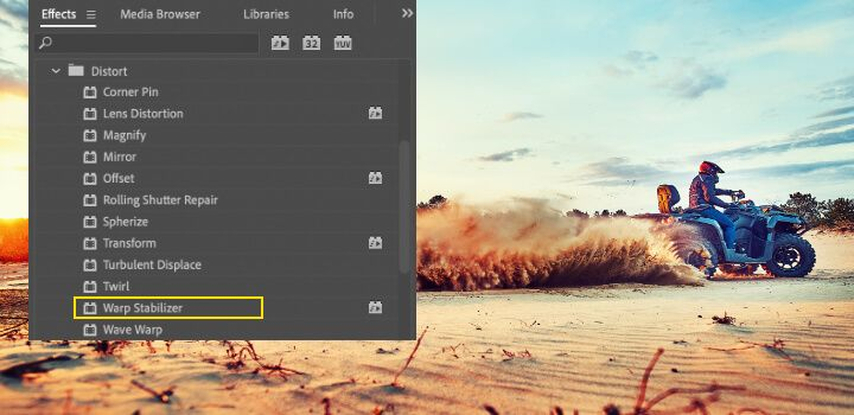
- 2) Find the Effect:In the Effects panel, navigate to “Distort > Warp Stabilizer”.
- 3) Apply the Effect:You can either double-click on the effect or drag it onto your selected clip in the timeline.

Once applied, Warp Stabilizer will begin analyzing the clip automatically. This process may take some time, depending on the length and complexity of your footage. You can monitor the progress in the Project panel.
Step 4: Adjust Stabilization Settings
After the analysis is complete, it's important to review the stabilized footage and make any necessary adjustments.
- 1) Check the Framing:Look at the stabilized video to see if it meets your expectations. If the video appears too wobbly or if you've lost important visual details, adjustments may be needed.
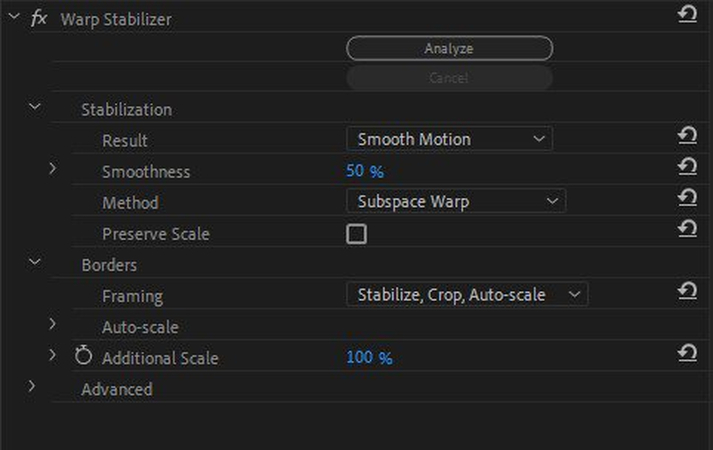
- 2) Use “Stabilize Only”:Change the setting to “Stabilize Only” under the Framing menu. This allows you to see how much the stabilizer has adjusted the image. It displays the entire frame, including the edges that may have been trimmed.
- 3) Tweak the Settings:
- Smoothness: If the footage still looks shaky, reduce the Smoothness value in the Advanced Settings. This will make the stabilization less aggressive.
- Crop Less Smooth More: If you find that you need to keep more of the original frame, adjust this setting to allow for less cropping.
By fine-tuning these settings, you can achieve the desired look for your video.

Pros and Cons of Premiere Pro
Pros
- Premiere Pro offers a wide range of advanced editing tools and effects.
- If you're already using other Adobe software like After Effects or Photoshop, Premiere Pro integrates seamlessly with them.
Cons
- It often requires a powerful processor and plenty of RAM to run smoothly.
- The interface is packed with options, and learning how to navigate it effectively takes time and effort. This can be frustrating for those looking for a quick and easy editing solution.
- Premiere Pro lacks advanced AI-driven tools for frame upscaling and enhancement. While it offers basic scaling options, it doesn't provide the sophisticated algorithms.
Part 2. The Best Alternative to Stabilize Video in Premiere Pro
As we have discussed, Adobe Premiere Pro is a powerful tool for video editing but it has some limitations when it comes to stabilizing footage. If you're looking for a more efficient and user-friendly option, HitPaw VikPea (formerly HitPaw Video Enhancer) is an excellent alternative.
This software stabilizes video with advanced features like frame upscaling, which ensure that your final product maintains high quality. Here's why we recommend HitPaw VikPea stands as the best choice for stabilizing video.
Why Choose HitPaw VikPea?
- Using this tool saves time due to its fast processing speed.
- Any user can easily work with the videos with its user-friendly interface design, regardless of their degree of experience.
- Color fixing and resolution upscaling are only two of the many enhancement options offered.
- Increase video resolution without worrying about sacrificing video quality thanks to its sophisticated algorithms.
- Edit in peace and without interruptions from advertisements and without watermark.
Steps to Stabilize Video
Step 1: Get HitPaw VikPea
Before you begin, you need to install HitPaw VikPea on your computer.
Step 2: Add Your Video File
Open HitPaw VikPea and import your video file. You can do this by dragging and dropping the video into the software's interface.

Step 3: Choose the Stabilize Model
Once your video is loaded, you will see various options to enhance your footage. Select the Stabilize Model to focus on smoothing out any shaky parts of your video. Depending on your needs, you can also explore other options like color enhancement or noise reduction. Each model is designed to improve your video in different ways, and they all take a short time to process.

Step 4: Preview and Export the Final Video
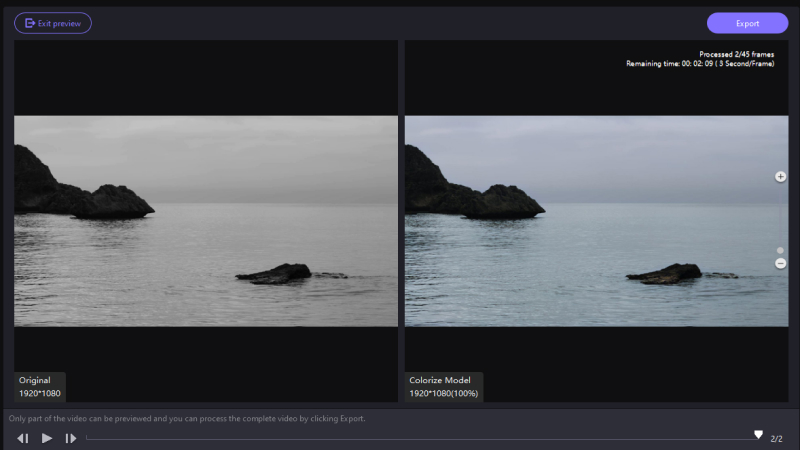
After selecting your desired model, click on the Preview button to see how your video will look after stabilization. Take a moment to review the changes. If you're happy with the results, hit the Export button to save your masterpiece. Choose your preferred file format and quality settings, and the software will render your stabilized video.

Learn More about HitPaw VikPea
Part 3. FAQs of Video Stabilizer Premiere Pro
Q1. Does stabilizing video reduce quality?
A1. Stabilizing a video can sometimes reduce its quality, but this largely depends on the extent of the stabilization needed. When you stabilize a video using Premiere Pro's Warp Stabilizer, the software analyzes the motion in the clip and adjusts it to appear more stable. This process often involves cropping the edges of the frame and zooming in to fill the frame, which can lead to a reduction in resolution and sharpness.
Q2. Can you stabilize multiple clips in Premiere Pro?
A2.
Yes, you can stabilize multiple clips in Premiere Pro, but each clip must be stabilized individually. The Warp Stabilizer effect works by analyzing the motion in each clip and applying the necessary adjustments to stabilize it. To do this effectively, it needs to process each clip separately.
Here's how you can stabilize multiple clips:
Q3. Can I use Warp Stabilizer on an adjustment layer?
A3. No, you cannot use Warp Stabilizer on an adjustment layer in Premiere Pro. Warp Stabilizer requires analyzing the specific motion present in a single video clip to apply stabilization correctly. Adjustment layers apply effects uniformly across all clips below them in the sequence, which doesn't provide Warp Stabilizer with the necessary individual clip data to perform its analysis and stabilization.
The Final Verdict
While Adobe Premiere Pro is a powerful tool for video editing, it has its limitations when it comes to stabilizing footage effectively. HitPaw VikPea emerges as the best alternative to Adobe Premiere stabilize video process, offering user-friendly features like intuitive controls, automatic upscaling, intelligent video repair, and batch processing.
By following simple steps, you can easily stabilize your videos and enhance their quality. If you want smoother, clearer videos without the hassle, HitPaw VikPea is the perfect choice for your editing needs!


 HitPaw Univd (Video Converter)
 HitPaw VoicePea
  HitPaw FotorPea


Share this article:
Select the product rating:
Daniel Walker
Editor-in-Chief
My passion lies in bridging the gap between cutting-edge technology and everyday creativity. With years of hands-on experience, I create content that not only informs but inspires our audience to embrace digital tools confidently.
View all ArticlesLeave a Comment
Create your review for HitPaw articles