Mastering Video Stabilization with Final Cut Pro Stabilizer
Mastering the Final Cut Pro Stabilizer can help you transform unstable material into smooth, professional-looking videos. Whether you're photographing a picturesque environment or capturing fast-paced action, your images should be consistent and clean. In this guide, you'll discover how to easily stabilize your video and transform raw footage into a smooth, cinematic masterpiece with Final Cut Pro. Let's get started now.
Part 1. What Is Final Cut Pro Stabilizer?
The Final Cut Pro Stabilizer is a strong tool for stabilizing shaky or unstable video footage. The stabilizer analyzes your video and automatically changes the position and movement of each individual frame to make the final result appear stable and smooth. This is vital for smoothing down choppy, shaky pictures or footage filmed in motion to look like professional videos.
Here's how it works:
1. Analysis: Final Cut Pro scans the video for areas that the program detects as shaky and unstable.
2. Correction: The software corrects the image by using all the three cropping, zooming and repositioning of the frames, stabilizing it.
3. Result: It results in a smoother video that is more professional-looking without noticeable artifacts or distortions.
Why Stabilization Matters
The stabilization of your video ensures that the viewer's focus is not disrupted by jerky movements, making your footage appear smoother and more cinematic. Whether it's handheld camera shots, drone shots, or fast action shots, stabilizing video in Final Cut Pro (FCPX stabilizer) allows you to focus on your content while avoiding unpleasant vibrations.
Stabilization in Final Cut allows you to take your projects to the next level by producing smooth and professional-looking footage.
Part 2. Step-by-Step Guide to Stabilize Video in Final Cut Pro
Stabilizing your footage in Final Cut Pro (FCPX) is simple process that can improve the quality of your video. Achieving smooth, professional-looking visuals starts with learning how to stabilize video Final Cut.You can follow these easy steps to smooth out any shaky footage to create best results..
1. Import Your Footage into FCPX
- Open Final Cut Pro on your computer.
- Import your video footage by selecting File then Import, and then Media. You can drag and drop the file directly into your project.
- Select video clip you want to stabilize from your media library and add it to the timeline.
2. Apply the Stabilizer in Final Cut Pro
- Select the video clip in timeline that you want to stabilize.
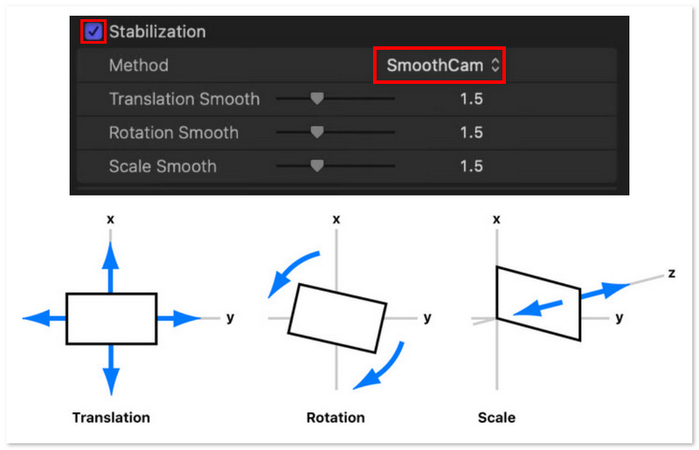
- In the Inspector panel which is located at top right, go to the Video section and find Stabilization settings.
- Check the box next to Stabilization to enable it.
- FCPX will automatically begin analyzing your clip and applying the stabilization effect.
3. Adjust Stabilization Settings for Optimal Results
- Method: Choose from three stabilization methods: Automatic, InertiaCam, or SmoothCam. Each method affects how FCPX stabilizes your footage, so test out which one works best for your specific video:
- Automatic: Best for general stabilization.
- InertiaCam: Best for handling fast camera movements.
- SmoothCam: Ideal for reducing small, natural shakes and bumps.


- Amount: Adjust the amount of stabilization using the slider. The higher the percentage, the more FCPX will crop and adjust the footage to eliminate shakes.
- Zoom: Adjust the zoom level to control how much the footage will be cropped to achieve the desired stabilization.
4. Refine Stabilization to Suit Different Footage Types
- For handheld footage, start with SmoothCam for subtle adjustments and increase the stabilization amount if needed.
- For fast-moving shots (e.g., action sequences or sports), try using InertiaCam to handle rapid movements.
- For slower, controlled shots, the Automatic method is usually sufficient.
Tips for Better Results:
- Use Keyframes: If certain sections of the video need more stabilization than others, use keyframes to adjust stabilization settings at different points in the timeline.
- Preview Regularly: Regularly preview your footage after applying stabilization to ensure the effect looks natural.
- Export Test: Once you’re satisfied, export a short test to check the results before processing the entire video.
By mastering these procedures will teach you exactly how to stabilize footage Final Cut Pro and get flawless results on any project!
Part 3. Common Issues When Stabilizing Video in Final Cut Pro (and How to Fix Them)
While FCPX stabilizer is a very powerful tool, there are instances when this can cause problems. Here, we address some of the most common problems and how to resolve them so your video ends up smooth and professional looking.
Over-stabilization and unnatural motion artifacts.
Problem:Over-stabilization can cause unnatural, jerky movements or "popping" effects, such that the motion of video appears too smooth or "robotic." This may be due to an excessive Amount in stabilization settings, so that the image is significantly cropped.
Solution:1. Turn down the Amount slider. Experiment with different levels of amount to find the suitable balance.
2. Try using either InertiaCam or SmoothCam for smoother transitions between frames.
3. Tune the Zoom to a finer level to ensure only that part of the image is cropped to stabilize without overdoing it.
When the stabilizer struggles with certain types of footage (e.g., fast-moving or handheld).
Problem:When the video has fast-moving or handheld shots, the Final Cut Pro stabilizer tends to be unable to deal with them, and it is easily noticeable by the distortion, blur, or erratic movements, which cannot be corrected with automatic settings.
Solution:1. For fast-moving shots, use the InertiaCam method. This setting is designed to handle sudden movements and retain more natural motion.
2. For handheld footage, SmoothCam works well for reducing shakes without distorting the motion too much.
3. Apply keyframes to adjust stabilization settings during different parts of the clip, especially if the camera movement changes.
Solutions and Alternatives: Using HitPaw VikPea for Advanced Stabilization and Enhancement
Problem:Sometimes, Final Cut Pro's built-in stabilizer cannot correct the footage entirely, especially if the video has severe shaking or distortion that the standard settings cannot fix.
Solution:1. You can use HitPaw VikPea (formerly HitPaw Video Enhancer) for more advanced stabilization and enhancement.
2. HitPaw VikPea can improve the quality of a video using AI technology by stabilizing shaky footage, and even repairing damaged files. The software is also powerful enough to upscale a video to 8K, and it has an interface that allows easy adjustment, especially if the stabilization part that needs to be addressed is beyond what Final Cut Pro can do alone.
3. Import your footage, use its stabilization feature, and the rest would be done by AI.
Part 4. Best Alternative to Final Cut Pro Stabilizer
While Final Cut Pro comes with an excellent stabilizer, sometimes you require something more advanced for highly shaky footage or stabilization needs. That is when HitPaw VikPea (formerly HitPaw Video Enhancer) comes in and proves to be one of the best alternatives for such purposes, which may provide very effective features that enhance video quality and stabilization.
Features
- HitPaw VikPea uses leading-edge AI technology to help stabilize shaky footage.
- It can enhance your video quality by not only stabilizing but also enhancing overall resolution to make your videos look sharper and more professional.
- HitPaw VikPea can even recover if there was video that became damaged or corrupted.
- Simple UI makes it easy to use for novices and professionals alike.
- You can set the stabilization settings according to your video's needs, making it a best option for different types of videos.
Steps to Enhance Videos
Step 1. Download and Install: Download the software from its official page on HitPaw VikPea and install it on your computer.
Step 2. Import the video: Open HitPaw VikPea. Click on "Choose File" and the video wants to improve.

Step 3. Select AI Model: Depending on the image type, make use of the proper AI stabilization feature to automatically analyze and fix the shaky frames.
If needed, adjust the stabilization settings to match the specific needs of your footage.

Step 4. Preview Enhancements: Use the preview to see stabilized footage and confirm that they are what you wanted.

Step 5. Export Enhanced video: Now, click "Enhance" after you like what you see; HitPaw will enhance video, then export the improved video to your preferred device.

Learn More about HitPaw Video Enhancer
Bottom line
In this article we explored how to stabilize videos using Final Cut Pro, discussed common stabilization concerns, and highlighted options for producing smooth graphics. HitPaw VikPea is an excellent tool for people looking for complex features. It's the ideal choice for enhancing and stabilizing your videos because of its AI-powered features. Try HitPaw VikPea now and improve your video editing experience!


 HitPaw Edimakor
 HitPaw FotorPea
 HitPaw Univd (Video Converter)

Share this article:
Select the product rating:
Daniel Walker
Editor-in-Chief
My passion lies in bridging the gap between cutting-edge technology and everyday creativity. With years of hands-on experience, I create content that not only informs but inspires our audience to embrace digital tools confidently.
View all ArticlesLeave a Comment
Create your review for HitPaw articles