Removing Scan Lines: The Complete Restoration Guide
Scan lines are basically horizontal artifacts that appear on monitors, video recordings, and TVs. These artifacts affect the display quality and occur due to faulty hardware, improper video settings, or interlacing. Regardless of the cause, the issue is concerning and can be resolved through various software and hardware solutions that will be mentioned in this guide. So, review the article while exploring the best possible solution to remove scan lines.
Part 1. What Should You Know About Scan Lines?
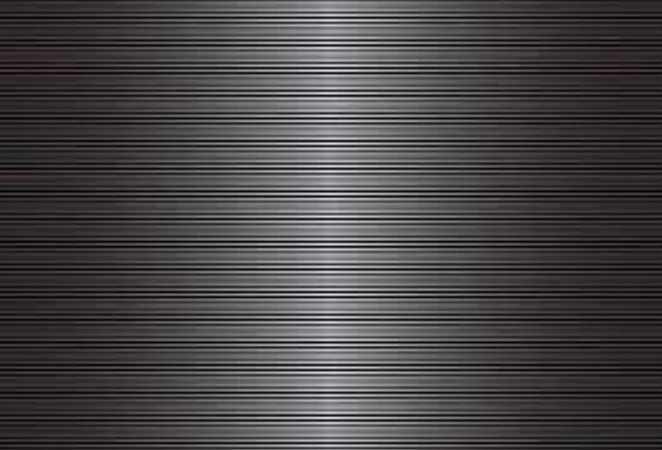
As mentioned, scanner lines occur due to numerous causes, but do you know what type of lines you are facing? To determine this, let’s explore a few kinds of scan lines mentioned below:
1. Interlaced Video Artifacts: These occur when older video formats display alternating scan lines per frame, leading to flickering and motion blur.
2. Horizontal Tearing: This happens when the screen displays mismatched frames due to synchronization issues between the monitor and the video source.
3. Signal Interference: Poor cable connections or electromagnetic interference can cause distorted or wavy scan lines on displays.
How Scan Lines Affect Video Playback and Clarity?
No matter the type or scanning line issue users face, know that it can degrade your video quality, causing flickering and blurring. This makes it difficult to enjoy smooth playback, affecting overall visibility. Additionally, digital recordings can affect the sharpness and detail, mainly in fast-paced scenes.
Part 2. Remove Scan Lines With HitPaw VikPea: AI-Based Solution
Scan line problems may sometimes not be caused by hardware devices such as computer monitors, but may be caused by video corruption. Video problems require professional software to fix, which is where HitPaw VikPea (formerly HitPaw Video Enhancer) comes in.
This tool is designed to restore details, remove flicker and noise from videos, and leverages cloud acceleration to increase processing speed by 1-3 times to provide users with 8K lossless video.
Key Features
- With the One-Click RT Acceleration feature, no additional download is needed.
- Detects and removes the variety of noises present in the video while preserving important details.
- AI video enhancement, effortlessly repair video scan lines, video noise, flicker and other problems.
- Powerful and rich functions, repair color, restore picture sound, enhance face video, solve video freeze, etc.
Guide to Resolve Scan Lines with HitPaw VikPea
To know how HitPaw VikPea resolves scan lines and flickering, dive into the given steps:
Step 1. Access the Video Enhancer to Import a FileLaunch the tool and pick the “Video Enhancer” tool from the main screen to import the scan lines file by hitting the “Import” button.

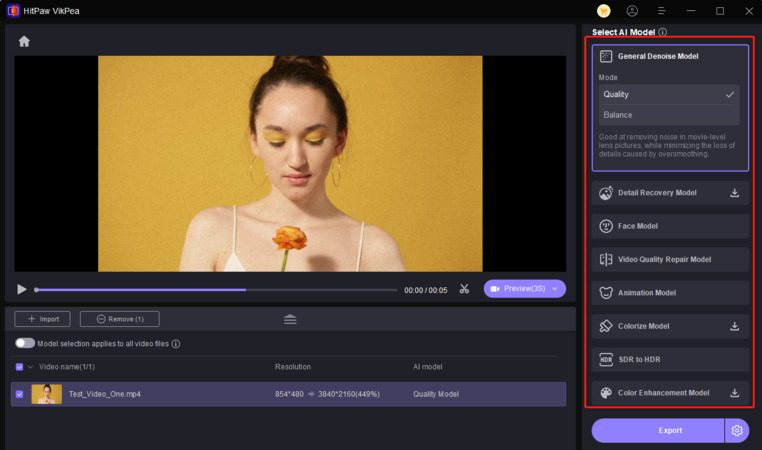
Step 2. Toggle General Denoise Model
As the video is there, enable the “General Denoise Model” from the select AI model section and press the “Preview” button to begin resolving the scan lines.
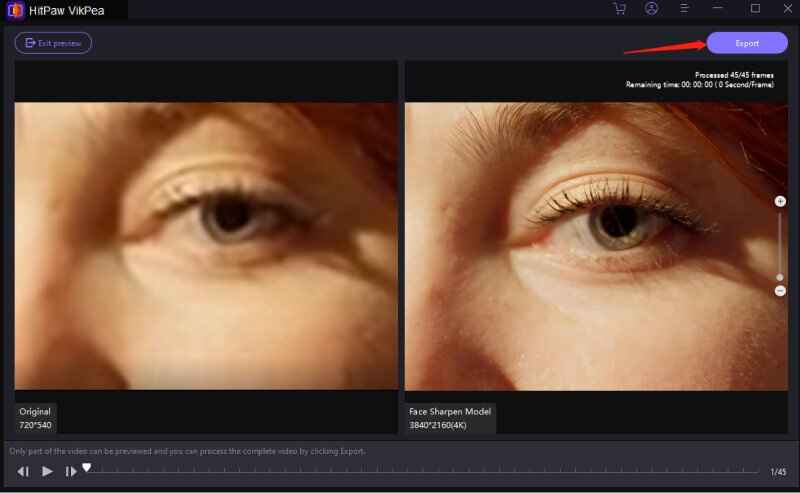
Step 3. Export the Repaired Video to Device
As the tool removes the scan lines and artifacts, tap the “Export” button to save the repaired video.
Part 3. Hardware Solutions for Monitor Scan Lines
While HitPaw VikPea provides a complete software-based solutions for scan lines, the issue can involving hardware problems as well. In that case, the following solutions mention all the essential hardware solutions which can help resolve this scanner lines problem instantly:
1. Restarting Computer
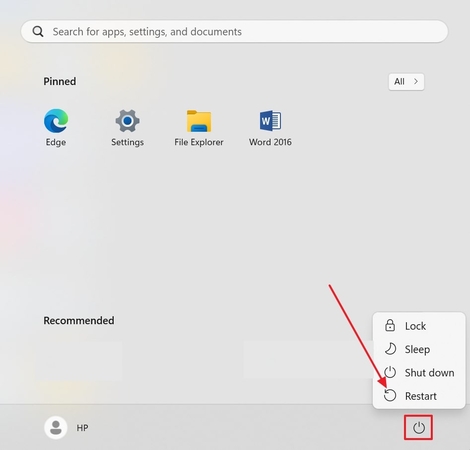
There is a possibility that minor glitches are causing scanner lines that can be fixed by restarting the computer. This will clear out the temporary files and resolve minor software conflicts that could be affecting display performance. The instructions below will guide you to restart your device:
Instructions. Upon opening the startup window of your computer, simply press the “Power” button, pick the “Restart” button, and wait for the system to reboot.
2. Checking Display Drivers
You can also try checking the display drivers through the given method since outdated or corrupted display drivers can cause visual artifacts. Keeping your drivers up to date helps prevent graphical glitches and ensures a smooth performance. Follow the steps below to check your display drivers to fix the unnecessary scan lines issue in your device:
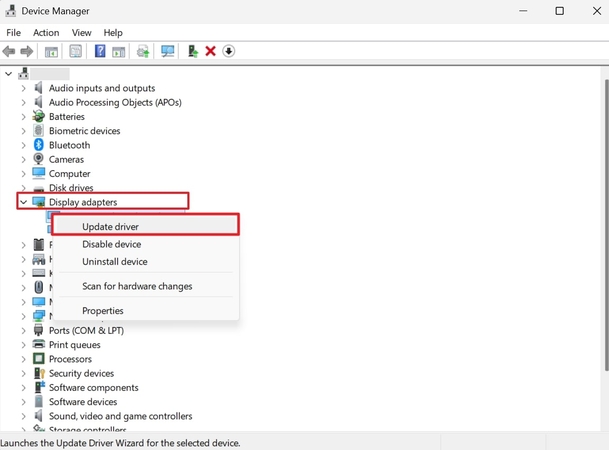
Step 1. Open the “Device Manager” and expand the menu for “Display Adapters.” Then, pick the particular driver and tap the “Update Driver” option from the list.
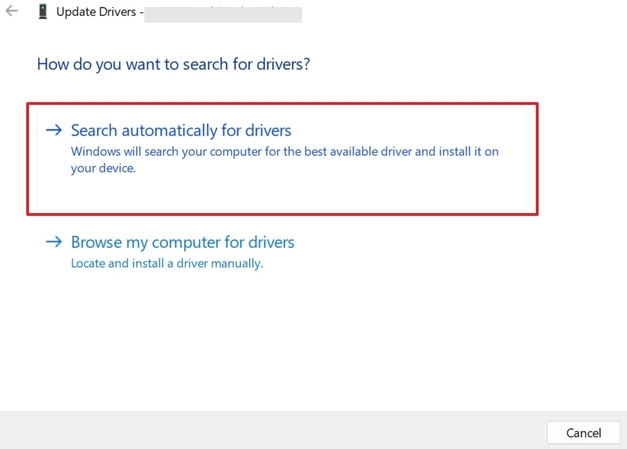
Step 2. From the given window, press the “Search Automatically for Driver” option and follow the prompts to install any available updates.
3. Troubleshooting a Computer
This will scan the system for potential issues and apply the fixes automatically. Hardware or software conflicts can create scan lines that can be fixed by troubleshooting the computer via the given steps:
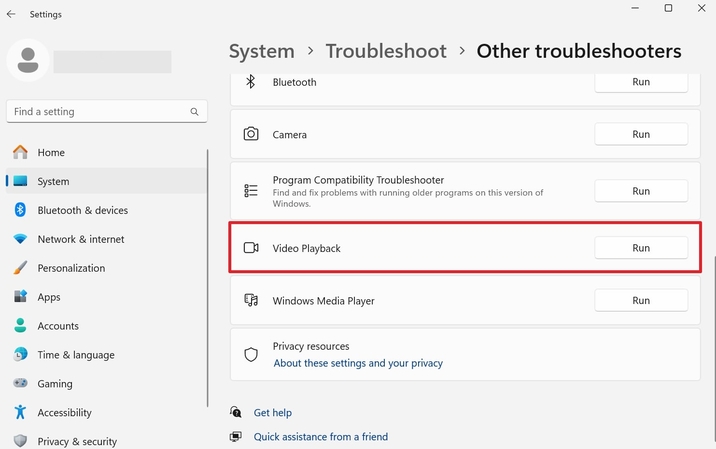
Instructions. Open your device’s “Settings,” navigate to the “Troubleshoot” option in the “System” section. Following this, pick the “Other Troubleshooter” option and look for “Video Playback” for executing.
4. Trying a Different Monitor
The problem might be specific to your current monitor. Testing with a different display can help rule out hardware issues. If the second monitor works fine, it indicates that your original display may need repairs or replacement.
Part 4. How to Prevent Scan Lines in the Future?
These fixes can temporarily resolve TV or VHS scan lines, and you can prevent them in the future by following the expert tips mentioned below:
A. Recording in Progressive Scan Mode
Recording in progressive scan mode captures video frame by frame, reducing interlacing issues that cause scan lines. This ensures smoother, more detailed playback without flickering lines. Moreover, it enhances video clarity, which makes it ideal for modern displays for progressive formats.
B. Using High-Quality Capture Devices
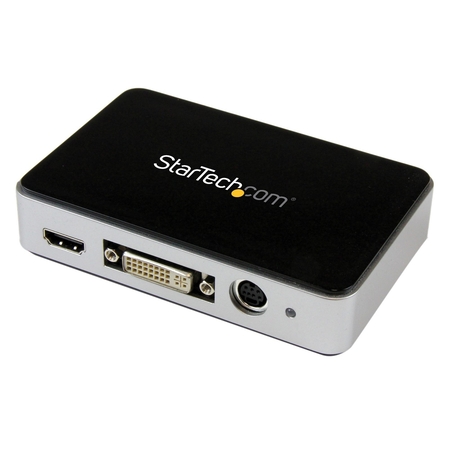
Invest in professional-grade capture cards or devices that support high-resolution inputs to reduce noise and distortion. Quality devices ensure clearer, more stable video signals during Recording or streaming. To maintain color accuracy and reduce unwanted artifacts, you need to choose the right hardware.
C. Proper Video Compression and Encoding Practices
Use optimal compression settings that balance quality and file size, preserving detail while preventing artifacts. Applying the correct encoding standards minimizes the risk of scan lines appearing in the final output. Ensuring compatibility with playback devices further enhances video consistency and reduces display issues.
Part 5. FAQs on Scan Lines
Q1. Is there a way to remove scan lines in Photoshop?
A1. Yes, using the "Noise Reduction" filter or the "Gaussian Blur" filter can help reduce visible scan lines in Photoshop.
Q2. What is deinterlacing, and how does it help in scan lines?
A2. Deinterlacing is the process of converting interlaced video into a progressive format, helping eliminate scan lines caused by alternating fields.
Q3. Can scan lines be removed from old VHS recordings?
A3. Yes, scan lines in VHS recordings can be reduced with specialized software or hardware deinterlacing tools like HitPaw VikPea.
Q4. How many lines does a CRT TV have?
A4. A standard CRT TV typically has 480 lines of resolution for NTSC or 576 lines for PAL.
Conclusion
Summing up, scanner lines are caused by issues like interlacing or low-quality video signals. Hence, to resolve these various artifacts, various software and hardware solutions are given in this guide. Among all, we recommend using HitPaw VikPea since the tool is intuitive and features a General Denoise Model that can resolve video noise while minimizing the loss of details.


 HitPaw Edimakor
 HitPaw FotorPea
 HitPaw Univd (Video Converter)


Share this article:
Select the product rating:
Daniel Walker
Editor-in-Chief
My passion lies in bridging the gap between cutting-edge technology and everyday creativity. With years of hands-on experience, I create content that not only informs but inspires our audience to embrace digital tools confidently.
View all ArticlesLeave a Comment
Create your review for HitPaw articles