[100% Useful] What is Transcoding and How to Transcode Videos
In the ever-evolving world of digital media, transcoding has become a fundamental process for ensuring videos are compatible with various devices and platforms. Whether you're a content creator, a media professional, or simply a video enthusiast, understanding transcoding is essential to optimizing your video content for the best viewing experience.
Transcoding involves converting video files from one format to another, allowing for adjustments in resolution, bitrate, and codec to meet the specific requirements of different playback environments.
This process not only enhances compatibility but also improves the quality and efficiency of video delivery. For instance, streaming services rely heavily on transcoding to provide smooth playback across a multitude of devices, from smartphones to smart TVs. This article explores the intricacies of transcoding, and its significance in the digital media landscape.
Part 1. What is Transcoding?
Transcoding is a critical process in the realm of digital media, where it involves converting media files from one format to another courtesy of the media transcoder. This conversion ensures that the media files are compatible across various devices and platforms, facilitating a seamless viewing experience.
As the consumption of digital content continues to surge, transcoding has become indispensable, enabling users to enjoy videos on different devices, such as smartphones, tablets, and computers, regardless of the original file's specifications. By understanding and leveraging the power of transcoding, anyone working with video content can transcode videos and ensure their videos are seen in the best possible light.
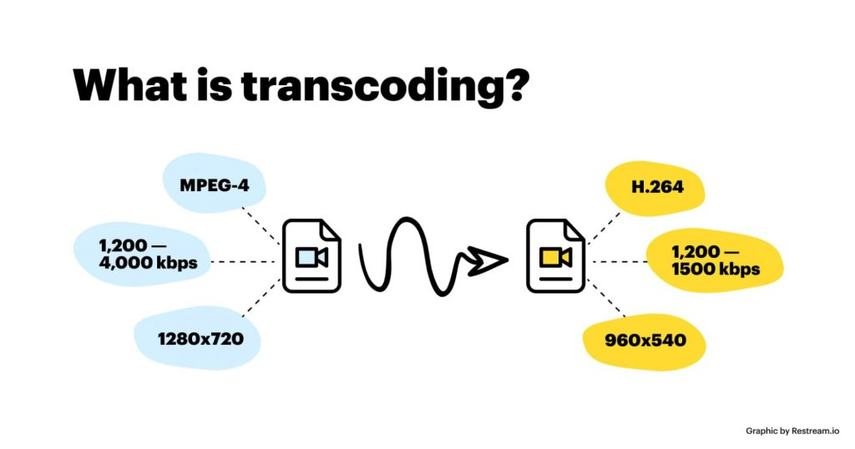
The Importance of Transcoding
1. Transcoding serves multiple purposes in the digital media ecosystem:Device Compatibility: Different devices support different media formats. A video that plays perfectly on a computer might not work on a smartphone or a smart TV. Transcoding ensures that the video is converted into a format that is compatible with the target device.
2. Optimizing for Screen Sizes and Resolutions:Devices come with various screen sizes and resolutions. Transcoding allows for the adjustment of videos to fit these different specifications, ensuring the best possible viewing experience on each device.
3. Reducing File Size:High-resolution videos can be very large, making them difficult to store and share. Transcoding can compress these files without significantly compromising quality, making them easier to manage.
4. Streaming Efficiency:For streaming platforms, transcoding is essential. It helps in creating multiple versions of the same video at different quality levels, allowing for adaptive streaming based on the user's internet speed.
Part 2. How to Transcode Videos with HitPaw Univd (HitPaw Video Converter)
Transcoding videos can seem daunting, but with the right tools, it becomes a straightforward task. HitPaw Univd stands out as an exceptional media transcoder for converting videos, offering a user-friendly interface and powerful features to ensure high-quality output. Below, we explore the features of the HitPaw Univd and provide a detailed guide on how to use it for transcoding videos.
HitPaw Univd supports a wide range of video formats, making it incredibly versatile. It also includes features like batch conversion, which allows you to convert multiple videos at once, saving you valuable time. The software is designed to be intuitive, so even beginners can navigate it with ease. Advanced users will appreciate the customization options available, including setting video resolution, bitrate, and frame rate.
Features of HitPaw Univd
- HitPaw Univd supports a vast array of video and audio formats, making it versatile for any conversion needs.
- Utilizing advanced technology, HitPaw ensures fast conversion speeds without compromising quality.
- Convert multiple videos simultaneously, saving time and effort.
- Basic editing features such as trimming, cropping, and adding subtitles are integrated into the software.
- Its intuitive design ensures that even beginners can navigate and use the software with ease. The clean layout and simple controls make the conversion process straightforward.
Step-by-Step Guide to Convert Videos
Step 1: Download and Install HitPaw Univd. Visit the HitPaw website and download the video converter. To install the software on your computer, follow the instructions provided. The process is quick and straightforward, ensuring you can get started right away.
Step 2: Launch the Software and Add Videos. Open HitPaw Univd and click on the "Add Files" button to import the videos you wish to convert. You can add multiple files at once, thanks to the batch processing feature.

Step 3: Choose the Output Format. Choose your preferred output format from the list of supported formats. You can choose from various video and audio formats depending on your needs. HitPaw provides detailed format descriptions to help you make the best choice.
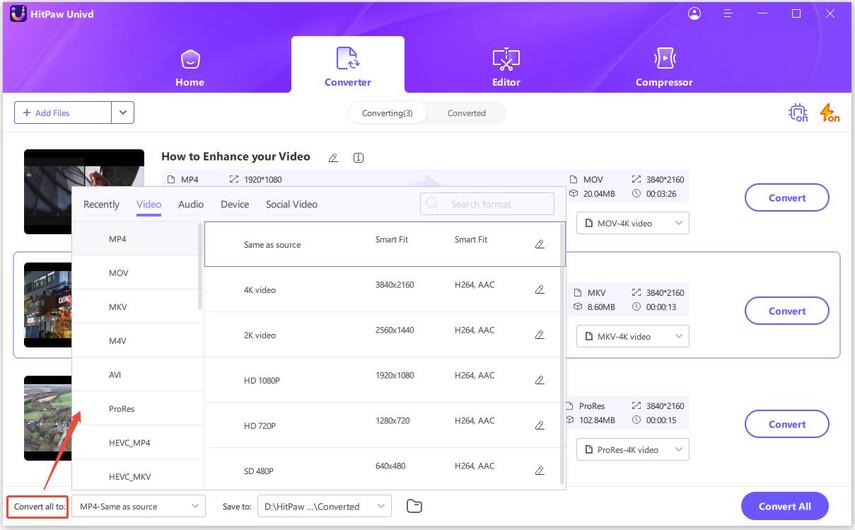
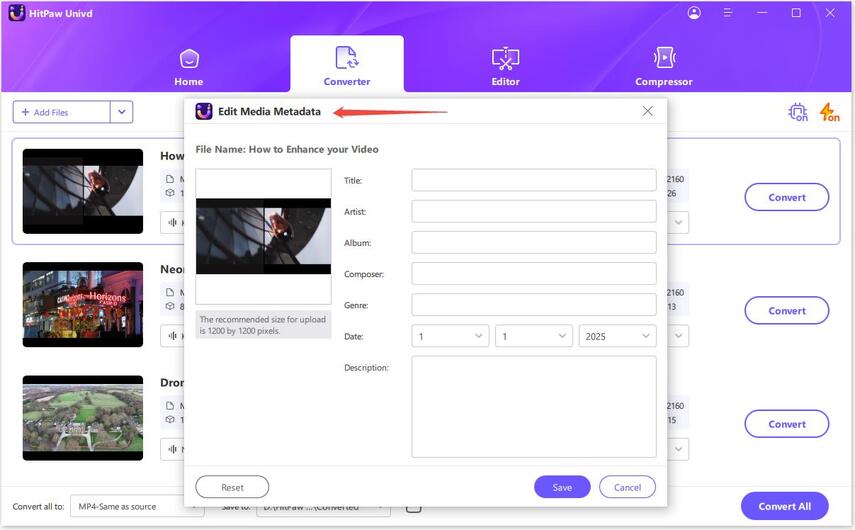
Step 4: Adjust Settings and Edit (Optional). If needed, adjust the video settings such as resolution, bitrate, and frame rate. You can also use the editing tools to trim or crop the video. This step allows you to customize the output to your specific requirements.
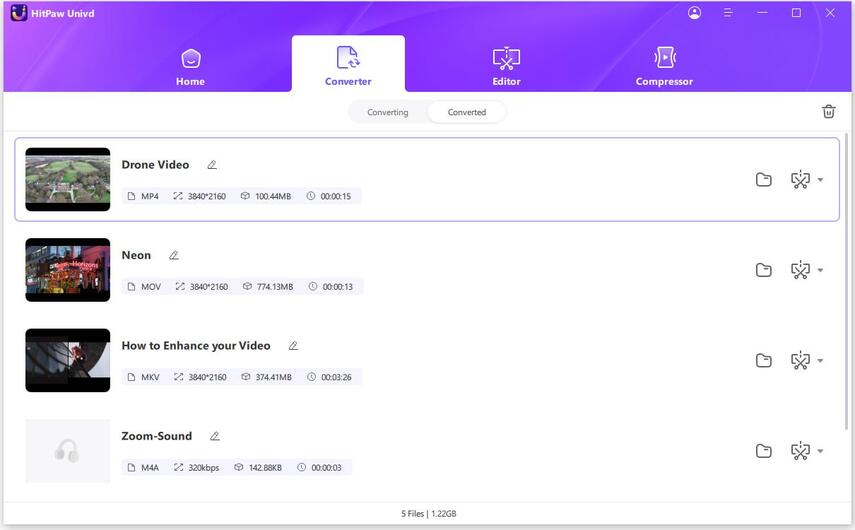
Step 5: Start the Conversion Process. Click on the "Convert" button to begin the transcoding process. The software will process the videos and save them in the chosen format. You can monitor the progress in real-time and cancel or pause the process if necessary.
Part 3. FAQs of Transcoding Videos
Q1. What is a transcode in film?
A1. Transcoding in film refers to the process of converting video files into a different format to ensure compatibility with editing software, playback devices, or for distribution purposes. It helps in optimizing the file size, quality, and compatibility, making it easier to work with the video in various environments. For filmmakers, transcoding is crucial for maintaining the integrity of the footage while adapting it to different stages of the production process.
Q2. Does transcoding reduce quality?
A2.
Transcoding can potentially reduce the quality of a video, especially if the output format has a lower bitrate or resolution than the original. However, with advanced tools like the HitPaw Univd, the quality loss is minimal. Users can adjust settings such as codec, bitrate, resolution, and frame rate to maintain the best possible quality during the conversion process.
By carefully selecting the right settings and high-quality output formats, you can ensure that the transcoded video retains most of its original quality, making it virtually indistinguishable from the source. Additionally, using lossless formats can further minimize any potential degradation, ensuring the final product meets high standards.
In Conclusion
In conclusion, transcoding is a vital process in the realm of digital video, ensuring compatibility and optimal playback across various platforms and devices. This article has provided a comprehensive guide on transcoding, highlighting the features and steps to use HitPaw Univd effectively to transcode videos.
With its wide format support, high-speed conversion, and user-friendly interface, HitPaw Univd is the best tool for all your video conversion needs. We hope this guide has been informative and helpful in understanding the process of video transcoding and using the best available tools to achieve it. By following the steps outlined and leveraging the powerful features of HitPaw Univd, you can ensure your videos are always ready for any device or platform.


 HitPaw Edimakor
 HitPaw Watermark Remover
  HitPaw VikPea (Video Enhancer)


Share this article:
Select the product rating:
Daniel Walker
Editor-in-Chief
My passion lies in bridging the gap between cutting-edge technology and everyday creativity. With years of hands-on experience, I create content that not only informs but inspires our audience to embrace digital tools confidently.
View all ArticlesLeave a Comment
Create your review for HitPaw articles