How to Use Premiere Pro to Speed Up Video
Adobe Premiere Pro is the industry standard for video editing among professionals and content creators. Among its many features, adjusting video speed is one of the most popular features. Whether you're creating fast-motion effects, time-lapses, or action-packed edits, speed up a video can be a crucial skill to learn. The versatile tool Adobe Premiere Pro offers creators multiple ways to speed up their videos. And they all have their uses in different contexts, based on the kind of effects you're trying to create. So, we've created this detailed step-by-step guide to help you master all these methods for speeding up videos in Adobe Premiere Pro.
Part 1: 2 Ways to Speed Up Video in Adobe Premiere Pro
1. Use Speed/Duration Control in PR to Speed Up Video
This method is possibly the easiest way to speed up videos using Adobe Premiere Pro. Beginners prefer this method for its simple steps. The Speed/Duration Control feature lets you adjust the playback speed of the video by percentage. You can increase it to speed up the video and vice versa. With Speed/Duration Control in Premiere Pro, play speed adjustment becomes easy. Here's how to do it:
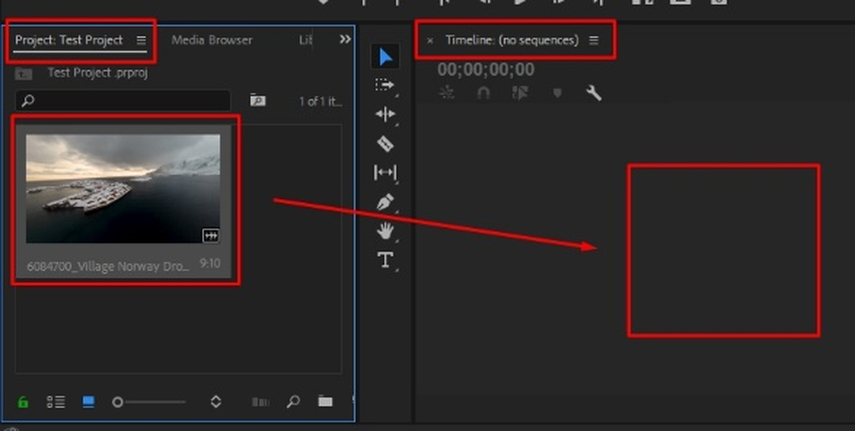
Step 1:Launch Adobe Premiere Pro >> Go to 'File'>> Use 'Import' to select and import the video >> Drag and drop the video into Timeline at the bottom of the main interface.

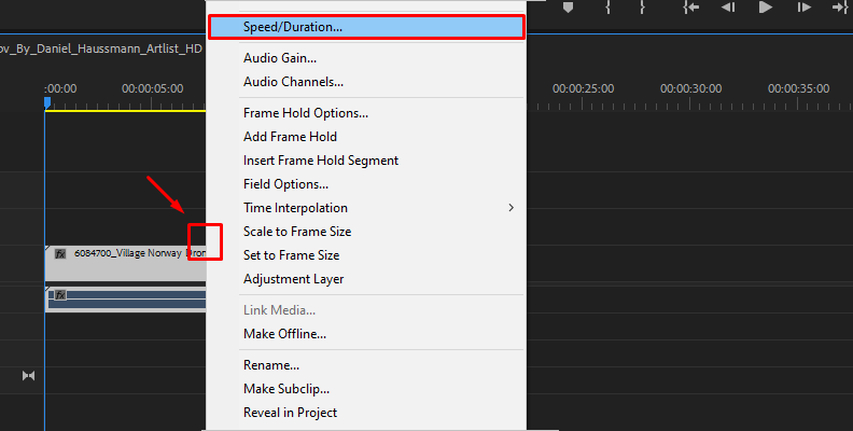
Step 2:Right-click on the imported video in the timeline >> Choose 'Speed/Duration' from the options.

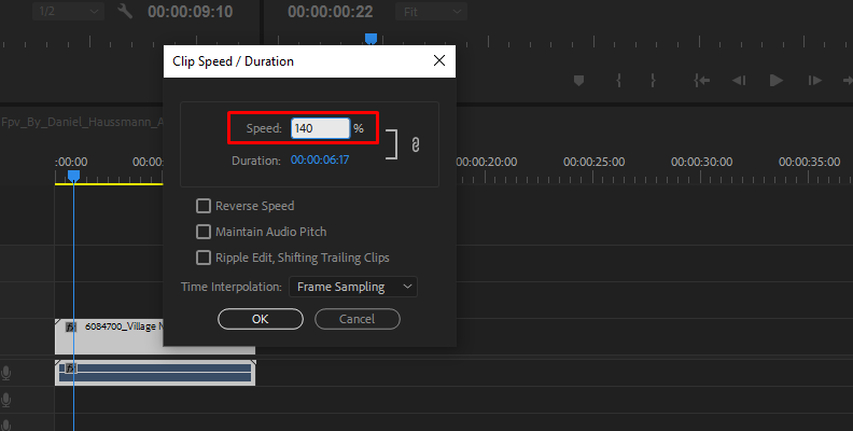
Step 3:In the new popup window, edit the speed value by percentage >> Click 'OK'.

First-time users may find the percentage value slightly confusing, but it's quite intuitive. For instance, 200% speed translates to 2x the normal playback speed, 300% means 3X, and so on.
To slow down video in Premiere Pro, all you need to do is lower the percentage value to below 100%. For instance, 50% speed would result in a playback speed that's half its normal.
2. Use Time Remapping in Premiere Pro to Speed Up Video
Time Remapping gives broad controls for adjusting the speed of the video but it comes at the cost of ease. Therefore, beginners are usually discouraged from using this method to speed up their videos. However, if you're generally comfortable with technology, then use Time Remapping in Premiere Pro for play speed adjustment.
Perhaps the biggest advantage of using Time Remapping is that users can speed up specific portions of the video, unlike the previous method, which speeds up the entire video. Time Remapping also lets creators create smooth transitions in speed, making it suitable for professional content. Here's how to use it:
Step 1:Launch Adobe Premiere Pro >> Go to 'File'>> Use 'Import' to select and import the video >> Drag and drop the video into Timeline at the bottom of the main interface >> Double-click on the video track to expand it.
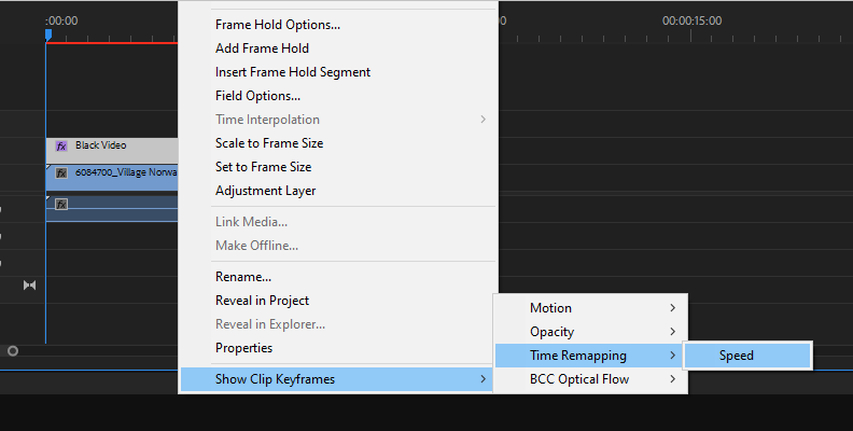
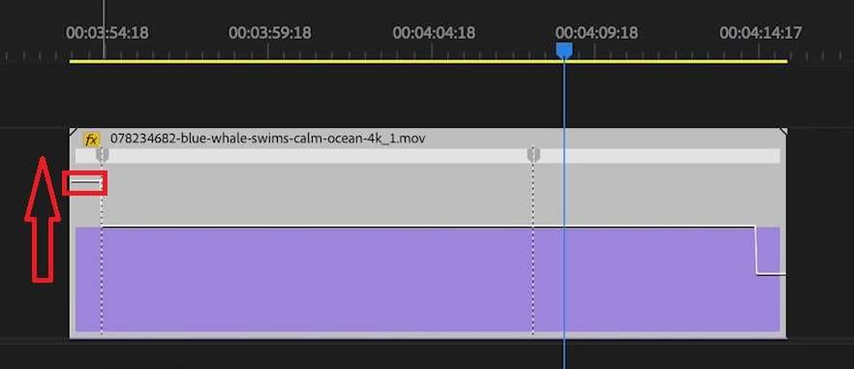
Step 2:Right-click on the video >> Hover over 'Show Clip Keyframes'>> Move your cursor to 'Time Remapping'>> Click 'Speed.'

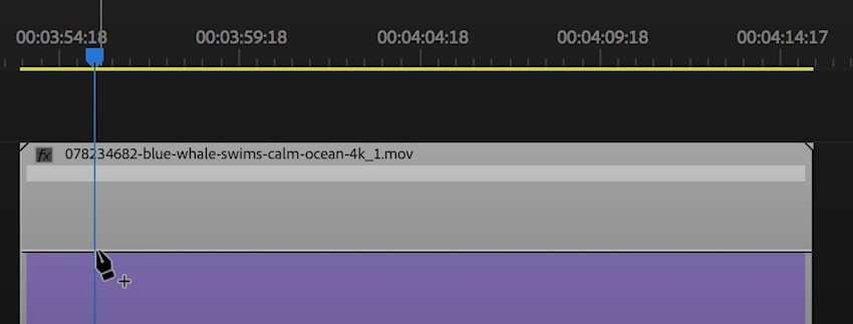
Step 3:Drag playhead to the beginning of the clip segment where you would like to begin the speed change >> Add a keyframe at this point using the 'Pen' tool.
Repeat this step at the end of the clip segment, where the speed change should end.

Step 4:Drag the white bar between the keyframes upward to increase the speed of the clip segment. To slow down video in, drag it down.

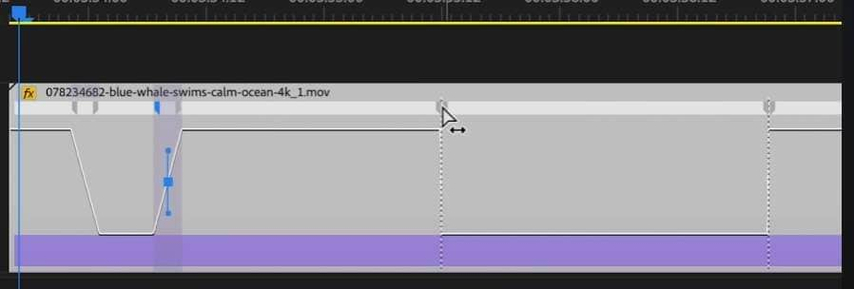
Step 5:Click and drag one of the sides of the keyframes to induce a gradual speed adjustment.

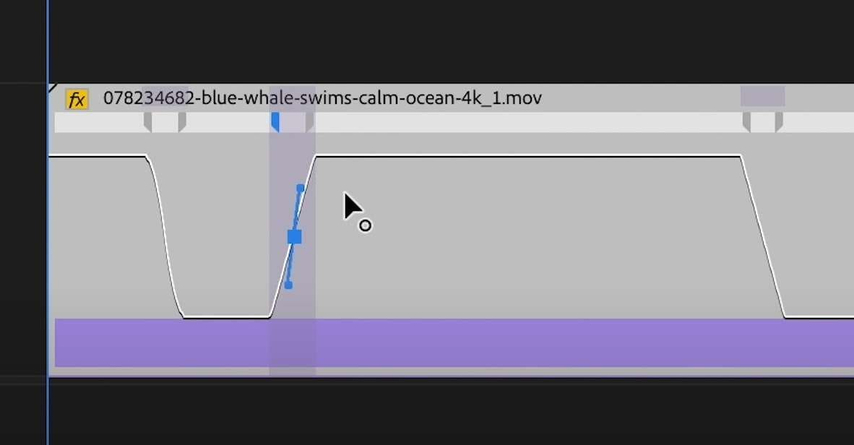
Step 6:Click on the blue box in keyframes to active Bezier Handles >> Rotate them to smoothen out the speeds with more granular control.

Part 2: Increase Playback Speed with Premiere Pro Alternative
While Adobe Premiere Pro is the top choice of professionals for video editing, it's an awfully complicated tool with an expensive subscription pricing. HitPaw Univd offers a more user-friendly and cost-effective alternative to Premiere Pro. Univd packs a broad suite of advanced video editing features typically found in professional tools.

HitPaw Univd - All-in-one Video Solutions for Win & Mac
Secure Verified. 254,145 people have downloaded it.
- Easy to Use: Univd is so user-friendly that even beginners can speed up videos.
- 1,000+ Formats Support: Univd can speed up or speed down videos in any format.
- Batch Editing: With Univd, thousands of videos can be sped up in a single batch.
- Fast Speed: No transcoding, no waiting. Editing or conversion, everything is fast with Univd.
- Lossless Editing: Speed up, crop, cut, and do more without losing the original quality of the video.
- Great Transitions: A full library of effects and transitions makes your playback speed changes smooth.
Secure Verified. 254,145 people have downloaded it.
Guide to Speed Up Videos with Hitpaw Univd
- Step 1: Import Videos to Univd
- Step 2: Speed Up Videos
- Step 3: Export Edited Videos
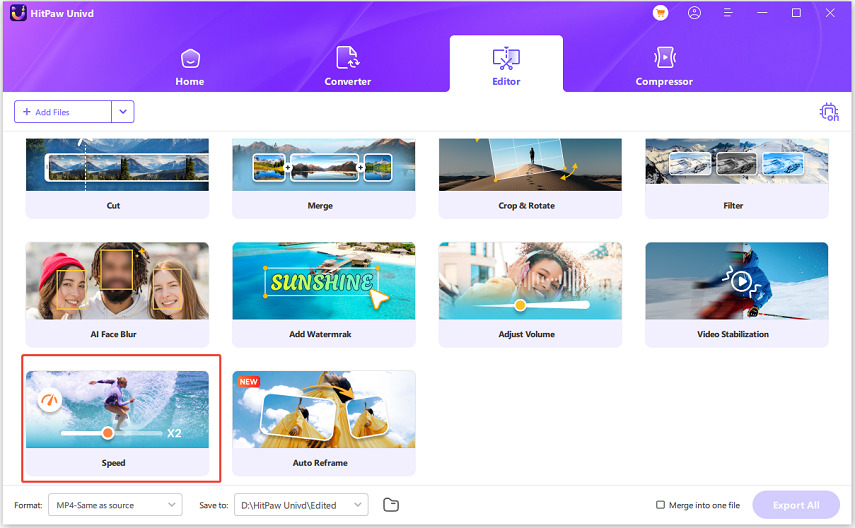
Launch Hitpaw Univd >> Go to the 'Editor' module >> Click on 'Crop & Rotate'>> Drag your video into the tool.
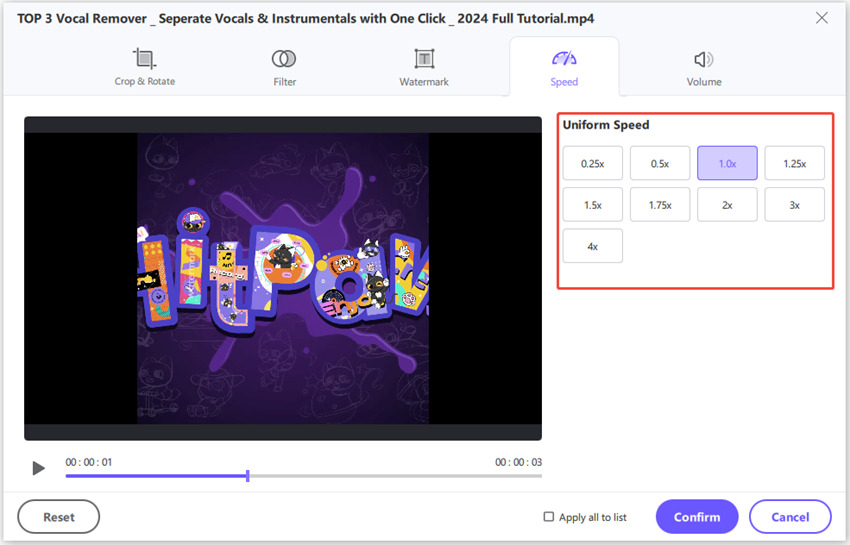
Click on the 'Scissors' button to open the cropping toolset >> Go to the 'Speed' tab >> Choose from the speed presets >> Click 'Confirm'.
If you'd like to apply the speed settings to all videos in your imported list, don't forget to check the 'Apply all to list' checkbox.
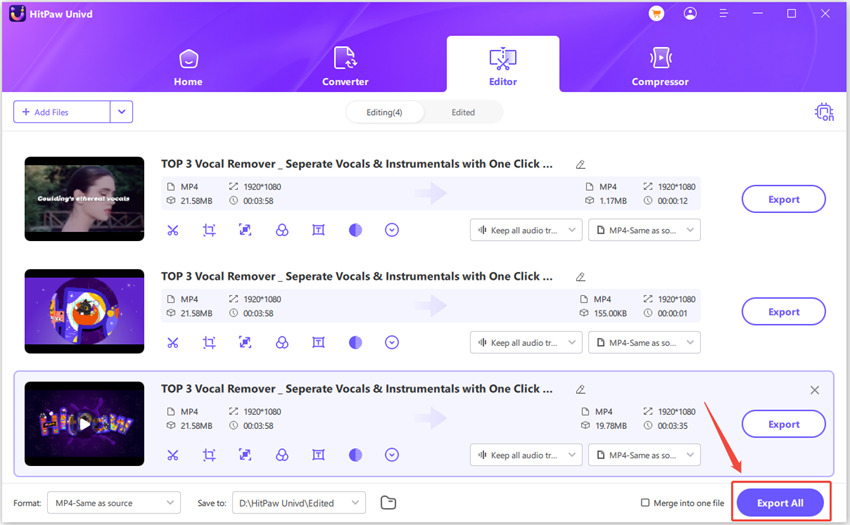
Click 'Export' or 'Export all' to save your changes to a new output file.
FAQs on Using Adobe Premiere Pro to Speed Up Video
Q1. Can I speed up a video without affecting the pitch of the audio?
A1. Yes, you can. After speeding up the video, right-click on it to access the 'Speed/Duration' option and click on it. In the popup window for the 'Speed/Duration' feature, check the box that says 'Maintain Audio Pitch.' This will ensure that the pitch of the audio remains the same despite the speed changes to the video.
Q2. Why does my video get choppy after speeding it up?
A2. Choppy video playback is a symptom of Adobe Premiere Pro being overwhelmed, either because of the video size, or the computer's limited resources. It can also happen when you've drastically increased the playback speed in Premiere Pro. You can overcome this issue with Frame Blending. Frame Blending can be accessed under Time Extrapolation, available among the options when you right-click on the video. Another option is Optical Flow for more advanced users.
Q3. How to speed up an entire batch of videos in Adobe Premiere Pro?
A3. You can use the 'Shift' button to select multiple videos in the timeline. With multiple videos selected, right-click on one of the videos and choose 'Nest' to combine the videos into a nested sequence. Now, when you right-click on the nested sequence, you get the 'Speed/Duration,' as usual, but with one major difference-the speed changes apply to all videos in the nested sequence.
Conclusion
Knowing how to speed up videos in Adobe Premiere Pro can make your editing process much easier and more fun. Whether you're working on a time-lapse, fast-motion effect or just want to change the pace of your video, understanding how to adjust the speed is an important skill. While Adobe Premiere Pro is an excellent tool for speeding up videos in complex projects, HitPaw Univd is a fast, lightweight, and easy-to-use alternative preferred for its high performance. Univd makes it easy for beginners to perform speed chances at the click of a button in a matter of seconds.



 HitPaw VoicePea
  HitPaw VikPea (Video Enhancer)
 HitPaw FotorPea


Share this article:
Select the product rating:
Daniel Walker
Editor-in-Chief
My passion lies in bridging the gap between cutting-edge technology and everyday creativity. With years of hands-on experience, I create content that not only informs but inspires our audience to embrace digital tools confidently.
View all ArticlesLeave a Comment
Create your review for HitPaw articles