The Step-by-Step Guide on How to Trim Video in Premiere Pro
No matter you are editing a YouTube vlog, a short film, or a professional video, trimming and cutting are essential tasks in the video editing process. Although multiple tools exist to help you with this, Adobe Premiere Pro is a widely used video editor available today. But no worries if you don’t know how to trim video in Premiere Pro. In this article, you will learn the steps on how to trim a video in Premiere Pro, its pros and cons, and an alternative to cut videos!
Part 1: Can I Use Premiere Pro to Trim Video?
Yes, you can use Premiere Pro to trim videos. This is a full-fledged, professional-grade video editing software used by professionals worldwide. Adobe Premiere Pro allows you to trim, cut, and rearrange clips with ease while offering an array of other advanced editing tools, such as color correction, transitions, and audio effects.
While this is much more than just a video trimmer, Adobe video trimmer is efficient and user-friendly. If you're looking for high precision in your cuts or need to make more complex edits, Premiere Pro is the tool for you.
Part 2: How to Trim Video in Premiere Pro?
Here is a detailed procedure to use Adobe Premiere Pro to trim and cut videos:
Step 1. Import Your Video

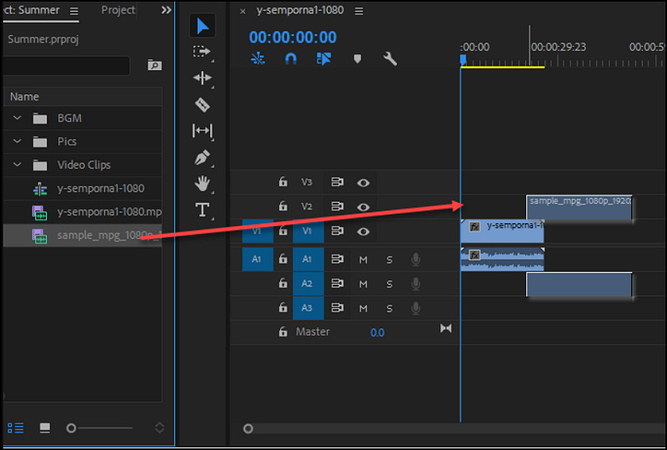
Launch Premiere Pro and select “File” > “New” > “Project” from the main menu. Name your project, select the destination folder, and press “OK.” Now, select "File" > "Import" to upload your video footage or drag & drop the file into the "Project" panel.
Step 2. Open the Video in the Timeline
Once your video is imported, drag it from the "Project" panel into the timeline. This is where all the trimming and cutting will take place. You can also use the Trim mode in the Program Monitor for a two-up view for frame-by-frame trimming.
Step 3. Select the Trim Tool

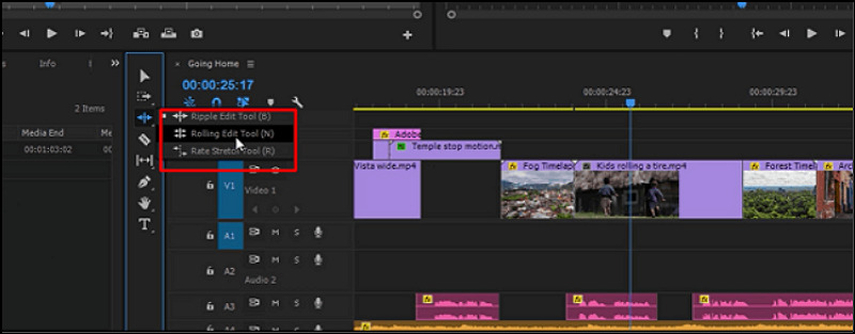
You can trim a clip to shorten the whole project as a ripple edit or trim a clip to shorten it and extend the following clip so the entire project is the same length, which is called a rolling edit.
Step 4. Make Your Cut
Move the play head in the timeline to the part of the video you want to trim. When you're ready, click at the exact point you want to cut. You can make multiple cuts in your video if necessary.
Step 5. Delete and Adjust the Trimmed Clips

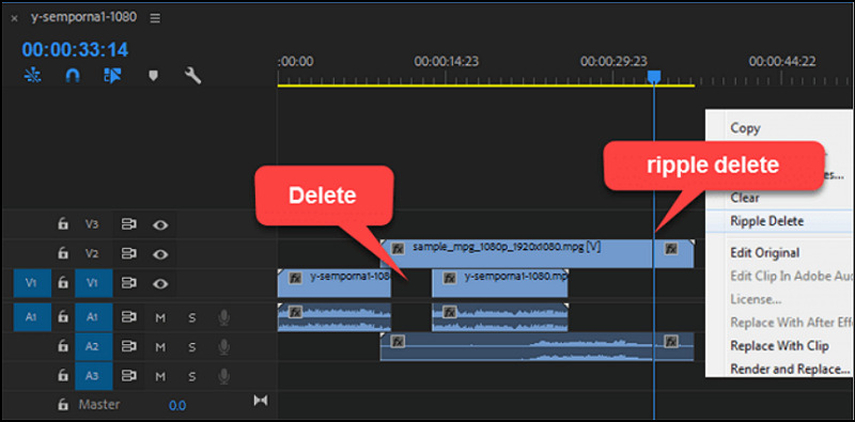
After making your cuts, select the portion of the video you want to delete and hit the "Delete" key to remove it from the timeline. Later, drag the remaining clips together to eliminate any gaps. This will create a seamless transition between the clips.
Pros
- Efficient and reliable to use
- Help you with high-quality video edits
- Offer timeline-based interface for frame-accurate trimming
- Provide a wide range of other editing tools for additional adjustments
Cons
- A subscription-based software, pricey for those only looking for basic trimming
- The learning curve is steep, especially for beginners unfamiliar with video editing
Part 3: Bonus tip. Best Alternative to Adobe Premiere to Cut Videos
If you need an easier-to-use and more affordable alternative to Premiere Pro for trimming and cutting videos, HitPaw Univd (HitPaw Video Converter) is an excellent option.
This remarkable software offers multiple video editing tools, including a cut video feature. You can cut a long video into several parts. It lets you rearrange different segments at the desired position or delete those no longer needed. You can also merge all the clips into one file. You can crop or rotate, add a filter or watermark, and change the video speed or volume.
Key Features:
- Offer a quick and hassle-free process of cutting videos
- Diverse editing features to cut your videos at your will
- Allow you to merge trimmed video parts into one file
- Help you cut videos without compromising their quality
- Built-in player to preview trimmed video in real-time
Steps for Cutting Videos Using HitPaw Univd:
Step 1. Select the Cut Tool
The first step involves installing and launching the software and navigating to the “Edit” section. Here, you need to select the “Cut” tool to browse and select the source file you want to cut.

Step 2. Cut Video with Editor
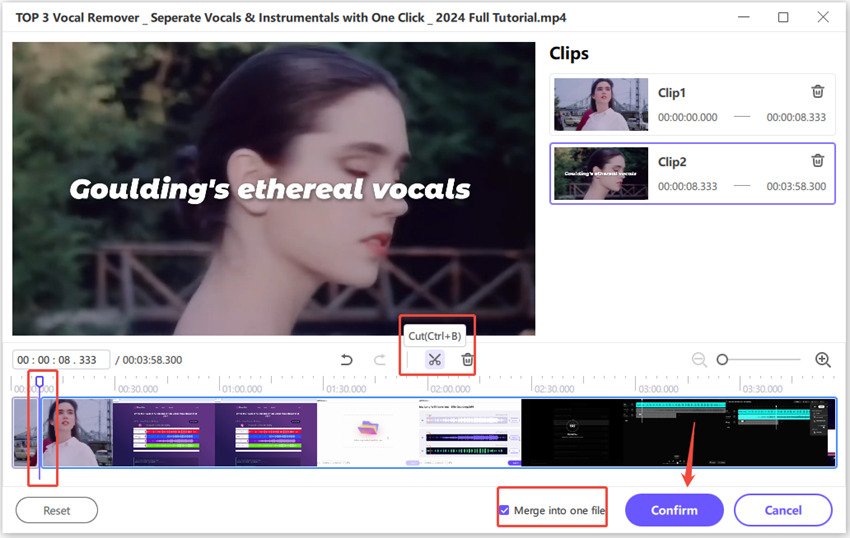
It’s time to drag the play head to the time point from which you need to cut the video and then click the scissor icon to split the video. You can repeat the process to cut more clips. You can checkmark the “Merge into one file” box and press the “Confirm” button.

Step 3. Preview and Export
Once all is done, preview the cut video. Select the preferred “Format” and the destination folder if it is OK. Then, hit “Export” or “Export all.” You are done!

Part 4: FAQs about Trimming Video in Premiere Pro
Q1. Is there a trim mode in Premiere Pro?
A1. Yes, Premiere Pro offers five trimming modes for precise functionality: regular, ripple, rolling, slip, and slide. You can access them by selecting the Trim tool or dragging clips directly in the timeline.
Q2. Is Adobe Premiere Pro completely free?
A2. No, Adobe Premiere Pro is subscription-based and part of Creative Cloud membership. You can select a Single-App plan or one with several apps.
Conclusion
This post has covered how to trim video in Premiere Pro. Although this software offers high precision and a wide range of editing tools that make it perfect for professional use, it is too complex and costly for users who only need basic trimming functions. In such cases, the HitPaw Univd is an excellent alternative, providing a range of editing tools, including a quick trimming feature. Get this software now and start editing like never before!


 HitPaw Edimakor
 HitPaw FotorPea
 HitPaw Watermark Remover
Share this article:
Select the product rating:
Daniel Walker
Editor-in-Chief
My passion lies in bridging the gap between cutting-edge technology and everyday creativity. With years of hands-on experience, I create content that not only informs but inspires our audience to embrace digital tools confidently.
View all ArticlesLeave a Comment
Create your review for HitPaw articles