How to Cut Video in DaVinci Resolve in 2025: Full Guide
DaVinci Resolve is a widely used tool in the world of video editing. Known for its flexibility and advanced features, it has become a favourite among both new and experienced editors. The DaVinci Resolve split clip feature, allows you to break your video into smaller, manageable parts for detailed editing.
In this guide, we will walk you through every step to efficiently cut video in DaVinci Resolve, ensuring you make the most of its features.
Part 1. Keyboard Shortcuts for Splitting Clips in DaVinci Resolve
Understanding keyboard shortcuts can significantly speed up your editing workflow in DaVinci Resolve. Here are the essential shortcuts for splitting clips:
Command
Description
Shortcut
Blade Edit Mode
Enables cutting directly on the timeline
Press B
Split Clip
Splits a clip at the playhead position
Ctrl/Command + B or \ (Mac)
Join Clips
Rejoins split clips from the same source
Ctrl/Command + Shift + [
Ripple Trim Start
Trims the start of a clip
Ctrl/Command + Shift + [
Ripple Trim End
Trims the end of a clip
Ctrl/Command + Shift + ]
These shortcuts ensure quick navigation and editing. If the default shortcuts don't suit you, customize them by going to Keyboard Customization in the menu. Knowing these shortcuts can save you time and allow you to focus on creative aspects rather than technical details. Practice regularly to incorporate these into your editing routine seamlessly.
Part 2. How to Split a Clip in DaVinci Resolve
Cutting clips is one of the foundational tasks in video editing. Let's delve into the step-by-step process using the Split Clip Tool and Blade Tool. Both tools have unique applications, making them essential for precise and efficient editing.
1. Splitting a Clip with the Split Clip Tool in DaVinci Resolve
The Split Clip Tool is perfect for making quick and accurate edits. It is especially useful when you need to segment long footage into smaller, manageable parts. These steps make it easy to divide your video exactly where you need.
Step 1: Import Your Media
Drag your video file to the timeline after importing it into DaVinci Resolve. Ensure the timeline is visible for better control of your edits.
Step 2: Position the Playhead
Move the playhead to the exact point where you want to split the clip. Use the zoom tool for greater accuracy.
Step 3: Activate Split Tool:
Press Ctrl/Command + B or use the scissors icon on the toolbar. Alternatively, navigate to Timeline > Split Clip from the menu.
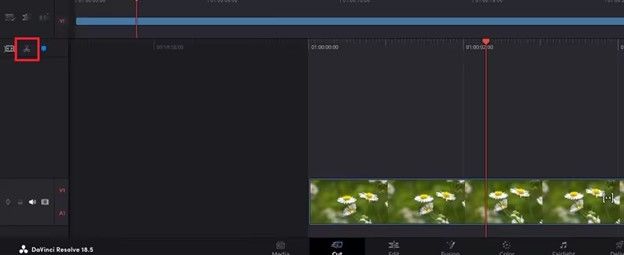
Step 4: Edit Segments
Once split, you can delete unwanted parts, rearrange sections, or apply unique effects to each segment. You can also add transitions to enhance the flow between clips.
2. Using the Blade Tool to Split a Clip in DaVinci Resolve
The Blade Tool provides more precision for intricate edits. This method is ideal for cutting across multiple layers or adding effects to specific sections. Following these steps will give you fine control over your cuts.
Step 1: Activate Blade Tool
Press B to enable the Blade Tool or click the razor icon on the toolbar. This tool is particularly useful for detailed cuts.
Step 2: Cut the Clip
Click on the clip where you want to cut. The tool splits the video at that precise point. For added precision, magnify the timeline.
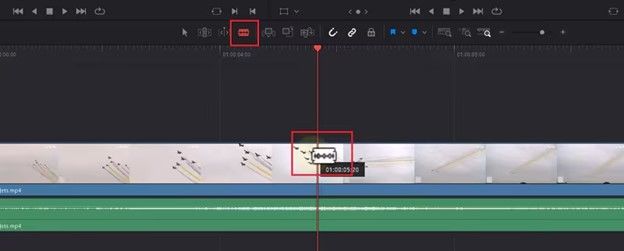
Step 3: Switch Back to Selection Tool
After cutting, press A to switch to the Selection Tool for further adjustments. This step allows you to move and edit clips with ease.
Both tools offer precision, but the Blade Tool is ideal for more complex cuts involving multiple layers or effects. Experiment with both to determine which works best for your project needs.
Part 3. How to Split Multiple Clips Across Different Tracks
Sometimes, you may need to cut multiple layers of video and audio simultaneously. This is common when working with projects that require synchronization across tracks or maintaining consistency in edits. Here's a simple process to split multiple clips:
Step 1: Organize Your Clips
Ensure the clips you want to split are stacked neatly on the timeline. Arrange all related video and audio tracks to ensure a clean and organized workflow.
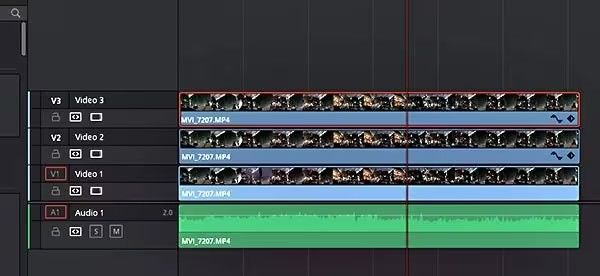
Step 2: Enable Track Selectors
Activate the track selectors for the layers you want to edit. If these are enabled, you won't need to select individual clips manually, saving time and effort.
Step 3: Position the Playhead
Move the play head to the exact point where you want the split to occur. Double-check that all the layers align correctly to avoid cutting the wrong sections.
Step 4: Split the Clips
Press Ctrl/Command + B or *Ctrl/Command + * to make the cut across all selected tracks. Ensure that every clip is divided at the same point on the timeline.
This method is particularly useful when handling multi-camera edits or projects with complex audio-video synchronization. It eliminates the need for individual edits, streamlining the process and saving valuable time.
Part 4. How to Combine Split Clips in DaVinci Resolve
Combining clips in DaVinci Resolve is straightforward and requires just a few steps. However, it's important to note that the clips you want to rejoin must come from the same source clip for this process to work.
Step 1: Select the Clips
Highlight the split clips you want to rejoin on the timeline. Ensure they are from the same original clip and are positioned adjacent to one another.
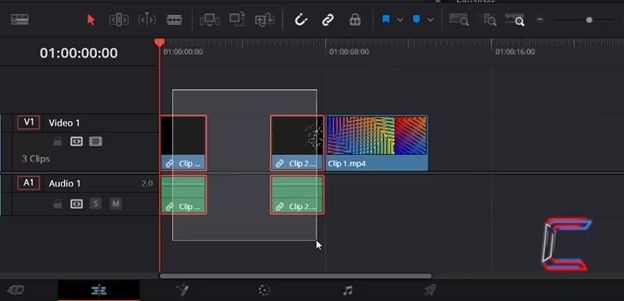
Step 2: Use the Join Clips Feature
Navigate to Timeline > Join Clips in the top menu, or use the shortcut *Alt + * (Windows) or Option + / (Mac) for a quicker process. The selected clips will merge seamlessly into one.
Step 3: Refine the Joined Clip
If necessary, use the Ripple Trim tool to adjust the starting or ending points of the newly joined clip.
- Trim the Start: Place the playhead where you want the clip to begin and press Ctrl/Command + Shift + [.
- Trim the End: Position the playhead at the desired ending point and press Ctrl/Command + Shift + ].
Once joined, you can further enhance the clip by adding transitions, effects, or adjusting the audio to match the new edit. This process ensures smooth playback and a cohesive result for your project.
Part 5. Cut Video with DaVinci Resolve Alternative
While DaVinci Resolve offers many features, its interface can sometimes feel overwhelming for beginners. If you're looking for a simpler solution, Univd Video Converter is an excellent alternative. This tool simplifies video cutting, making it a great choice for quick edits. It is ideal for users who need results without navigating a complicated interface.

HitPaw Univd - All-in-one Video Solutions for Win & Mac
Secure Verified. 254,145 people have downloaded it.
- Crop, cut, and merge videos with intuitive interface.
- Add filtersand watermarks to videos in bulk.
- Convert videos to different format and devices.
- Auto reframe videos for social media platforms like Instagram, YouTube, Facebook, and TikTok.
- Compress videos and images without compromising quality.
- Additional AI tools to enhance your video experience
Secure Verified. 254,145 people have downloaded it.
Step-by-Step Guide to Cut Video in Univd
Step 1: Access the Cut Feature
Navigate to the Edit section on the main interface and select the Cut feature. Then, add the source video you wish to edit.

Step 2: Cut Videos
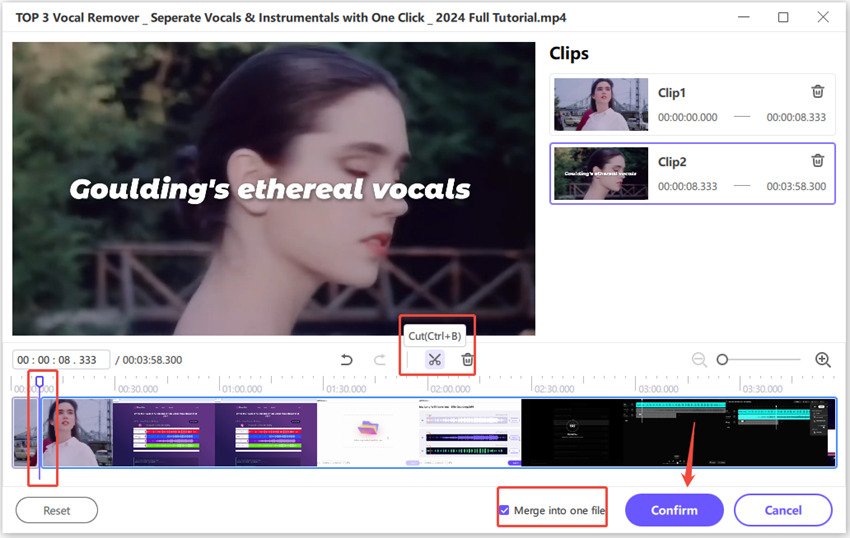
Once the video is successfully added, it will appear on the timeline. Use the play head to locate the time point where you want to cut, then click the scissor icon to split the video. Repeat this process to create multiple clips if needed. If you'd like to combine the cut clips into one file, check the option Merge into one file. After finalizing your cuts, click the Confirm button to proceed.
Step 3: Preview and Export
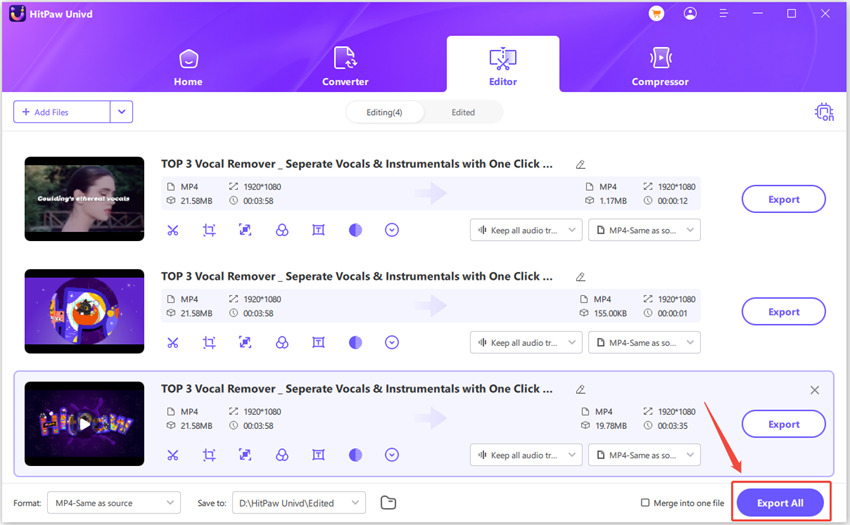
Preview the edited video directly on the main interface. Select your preferred output format, then click the Export button to save a single file or Export All to save all clips as separate files.
With HitPaw Video Converter, you can achieve great results without the complexity of DaVinci Resolve. It's a practical alternative for those looking for efficiency and simplicity in video editing.
Conclusion
Cutting videos in DaVinci Resolve is an essential skill for creating effective edits. For those seeking a simpler solution, Univd Video Converter provides an easy-to-use alternative. Its straightforward interface and useful features make video editing accessible to everyone.


 HitPaw VoicePea
  HitPaw VikPea (Video Enhancer)
 HitPaw FotorPea


Share this article:
Select the product rating:
Daniel Walker
Editor-in-Chief
My passion lies in bridging the gap between cutting-edge technology and everyday creativity. With years of hands-on experience, I create content that not only informs but inspires our audience to embrace digital tools confidently.
View all ArticlesLeave a Comment
Create your review for HitPaw articles