The Ultimate Guide of VP9 Encoder
Welcome to the ultimate guide for mastering the VP9 encoder! Whether you're a novice or an experienced user, this comprehensive resource is packed with expert tips and tricks to help you achieve the best possible video quality and efficiency. Dive in to learn how to optimize your encoding process like a pro.
Part 1. What is VP9 Video Codec
VP9 Video Codec and Its Benefits
VP9 is an open and royalty-free video codec developed by Google as a successor to VP8. It is designed to offer improved compression efficiency compared to its predecessors and other codecs like H.264. VP9 achieves high-quality video at lower bitrates, making it ideal for streaming services and platforms that require efficient use of bandwidth.
Benefits- Enhanced Compression: VP9 can reduce file sizes significantly without compromising video quality, which is crucial for streaming high-definition content.
- Bandwidth Savings: With its efficient compression, VP9 helps in reducing data usage, making it cost-effective for both content providers and consumers.
- Wide Adoption: Many popular platforms, including YouTube and Netflix, use VP9 for streaming due to its efficiency and quality.
Importance of VP9 Encoder in Hardware Decoding
The VP9 encoder hardware plays a critical role in the video streaming ecosystem by ensuring videos are efficiently encoded for VP9 hardware decoding across various devices. Hardware decoding support for VP9 is crucial as it allows for smooth playback of VP9-encoded videos with lower power consumption. Key points include:
- Device Compatibility: Modern devices, including smartphones, smart TVs, and streaming devices, often support VP9 for smooth playback.
- Power Efficiency: Hardware decoding is more power-efficient than software, extending battery life on mobile devices and reducing energy consumption on larger screens.
- Performance: Hardware decoders handle higher resolutions and frame rates effectively, enhancing the user experience with HD and UHD content.
Overview of SVT-VP9 for Efficient Video Compression
SVT-VP9 (Scalable Video Technology for VP9) is an open-source encoder developed by Intel and Netflix to enhance the efficiency of VP9 video compression. SVT-VP9 offers a range of features designed to optimize performance and quality:
- Scalability: Efficient performance across a range of hardware, from low-power devices to high-performance servers.
- Parallel Processing: Utilizes multiple CPU cores to significantly speed up the encoding process.
- Quality and Speed Balance: Offers various presets to balance encoding speed and video quality for different use cases, from live streaming to video on demand.
Part 2. Best Practices for VP9 Encoding
How to Use FFmpeg for VP9 Encoding
FFmpeg is a powerful and versatile tool for encoding videos, including those in the VP9 format. Here’s a step-by-step guide to using FFmpeg VP9 encoding:
1. Install FFmpeg: Download and install FFmpeg from the official website or your package manager.
2. Basic Command for VP9 Encoding:
Copy code
ffmpeg -i input.mp4 -c:v libvpx-vp9 -b:v 1M output.webm
This command encodes the input video to VP9 format with a bitrate of 1 Mbps.
- Two-Pass Encoding: Improves video quality by analyzing the video twice.
bash
Copy code
ffmpeg -i input.mp4 -c:v libvpx-vp9 -b:v 1M -pass 1 -an -f null /dev/null && \
ffmpeg -i input.mp4 -c:v libvpx-vp9 -b:v 1M -pass 2 -c:a libopus output.webm
- Quality Control: Adjusts the constant quality mode (CQ) for better control.
Copy code
ffmpeg -i input.mp4 -c:v libvpx-vp9 -crf 30 -b:v 0 output.webm
4. Audio Encoding: Add audio encoding to the command.
Copy code
ffmpeg -i input.mp4 -c:v libvpx-vp9 -b:v 1M -c:a libopus output.webm
Tips for Optimizing VP9 Encoding Speed
Optimizing VP9 encoding speed involves tweaking settings to balance speed and quality:
1. Use Faster Presets:
Copy code
ffmpeg -i input.mp4 -c:v libvpx-vp9 -speed 4 -b:v 1M output.webm
Higher speed values (up to 8) increase encoding speed at the expense of compression efficiency.
2. Adjust Threads: Utilize multiple CPU cores to speed up encoding.
Copy code
ffmpeg -i input.mp4 -c:v libvpx-vp9 -threads 8 -b:v 1M output.webm
3. Limit Resolution: Reducing the resolution can significantly speed up the encoding process.
Copy code
ffmpeg -i input.mp4 -c:v libvpx-vp9 -vf scale=1280:720 -b:v 1M output.webm
4. Use One-Pass Encoding: While two-pass encoding improves quality, one-pass encoding is faster.
Copy code
ffmpeg -i input.mp4 -c:v libvpx-vp9 -b:v 1M output.webm
Comparison of Adobe Media Encoder vs. FFmpeg for VP9 Encoding
When comparing Adobe Media Encoder VP9 vs. FFmpeg encode VP9, the choice often boils down to user preferences and specific requirements
Adobe Media Encoder:- User-Friendly Interface: Ideal for users who prefer a graphical interface.
- Integration: Works seamlessly with Adobe Creative Cloud applications.
- Preset Options: Provides a wide range of presets for different devices and platforms.
- Performance: Generally slower encoding times compared to FFmpeg, but with strong integration and support.
- Command-Line Power: Offers extensive control over encoding parameters through command-line interface.
- Flexibility: Highly customizable and supports a wide range of codecs and formats.
- Performance: Typically faster encoding times due to its efficient use of system resources and parallel processing capabilities.
- Advanced Features: Allows for advanced settings and optimizations that may not be available in Adobe Media Encoder.
Part 3. How to Easily Convert Videos?
HitPaw Univd (HitPaw Video Converter) is the most-recommended format conversion program for handling VP9 video files. It offers a user-friendly interface and supports a wide range of video formats, including VP9, ensuring high-quality conversions with minimal effort. With its fast processing speed and powerful features, HitPaw Univd is perfect for both novice and advanced users looking to convert VP9 videos efficiently and effectively.
Features
- Wide Format Support: Converts videos to and from a variety of formats, including VP9, MP4, AVI, MKV, and more.
- High-Quality Conversion: Ensures minimal loss of video quality during the conversion process.
- Fast Processing Speed: Utilizes advanced algorithms for quick and efficient video conversions.
- User-Friendly Interface: Easy-to-navigate interface suitable for both beginners and advanced users.
- Batch Conversion: Supports converting multiple videos simultaneously, saving time and effort.
Steps
Step 1.Import Videos: Add files to HitPaw Univd by selecting "Add Video" or dragging them into the program.

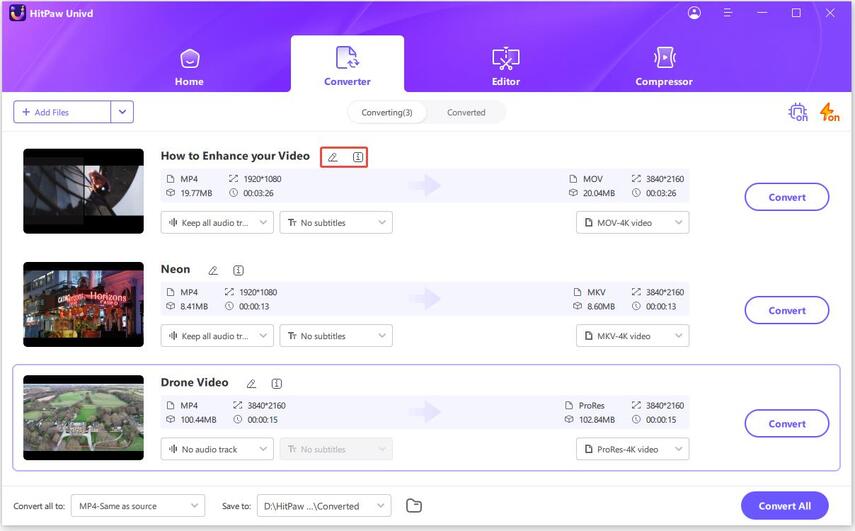
Step 2. Edit Video Info: Optionally modify metadata like title, artist, and description.
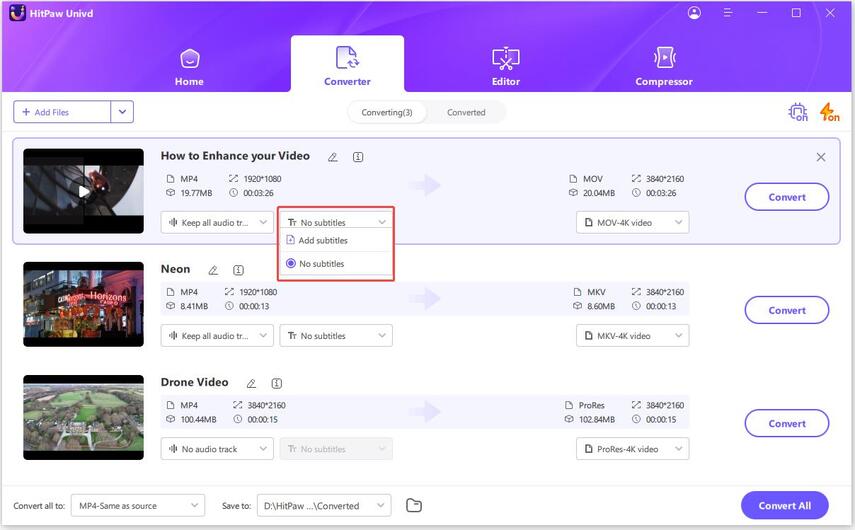
Step 3. Add Subtitles: Include external subtitles (SRT, ASS, VTT, or SSA) if needed.
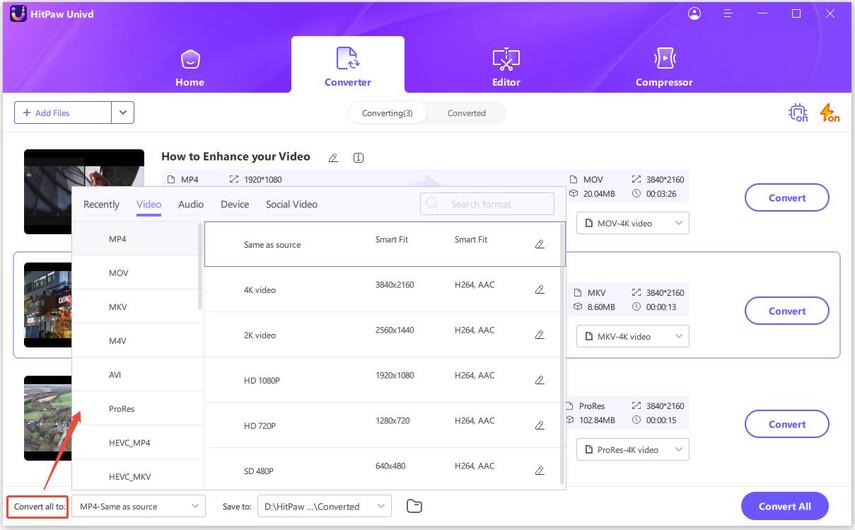
Step 4. Select Output Format: Choose the desired format for conversion.
Step 5. Convert Videos: Start the conversion process, optionally adjusting parameters like quality and codecs.
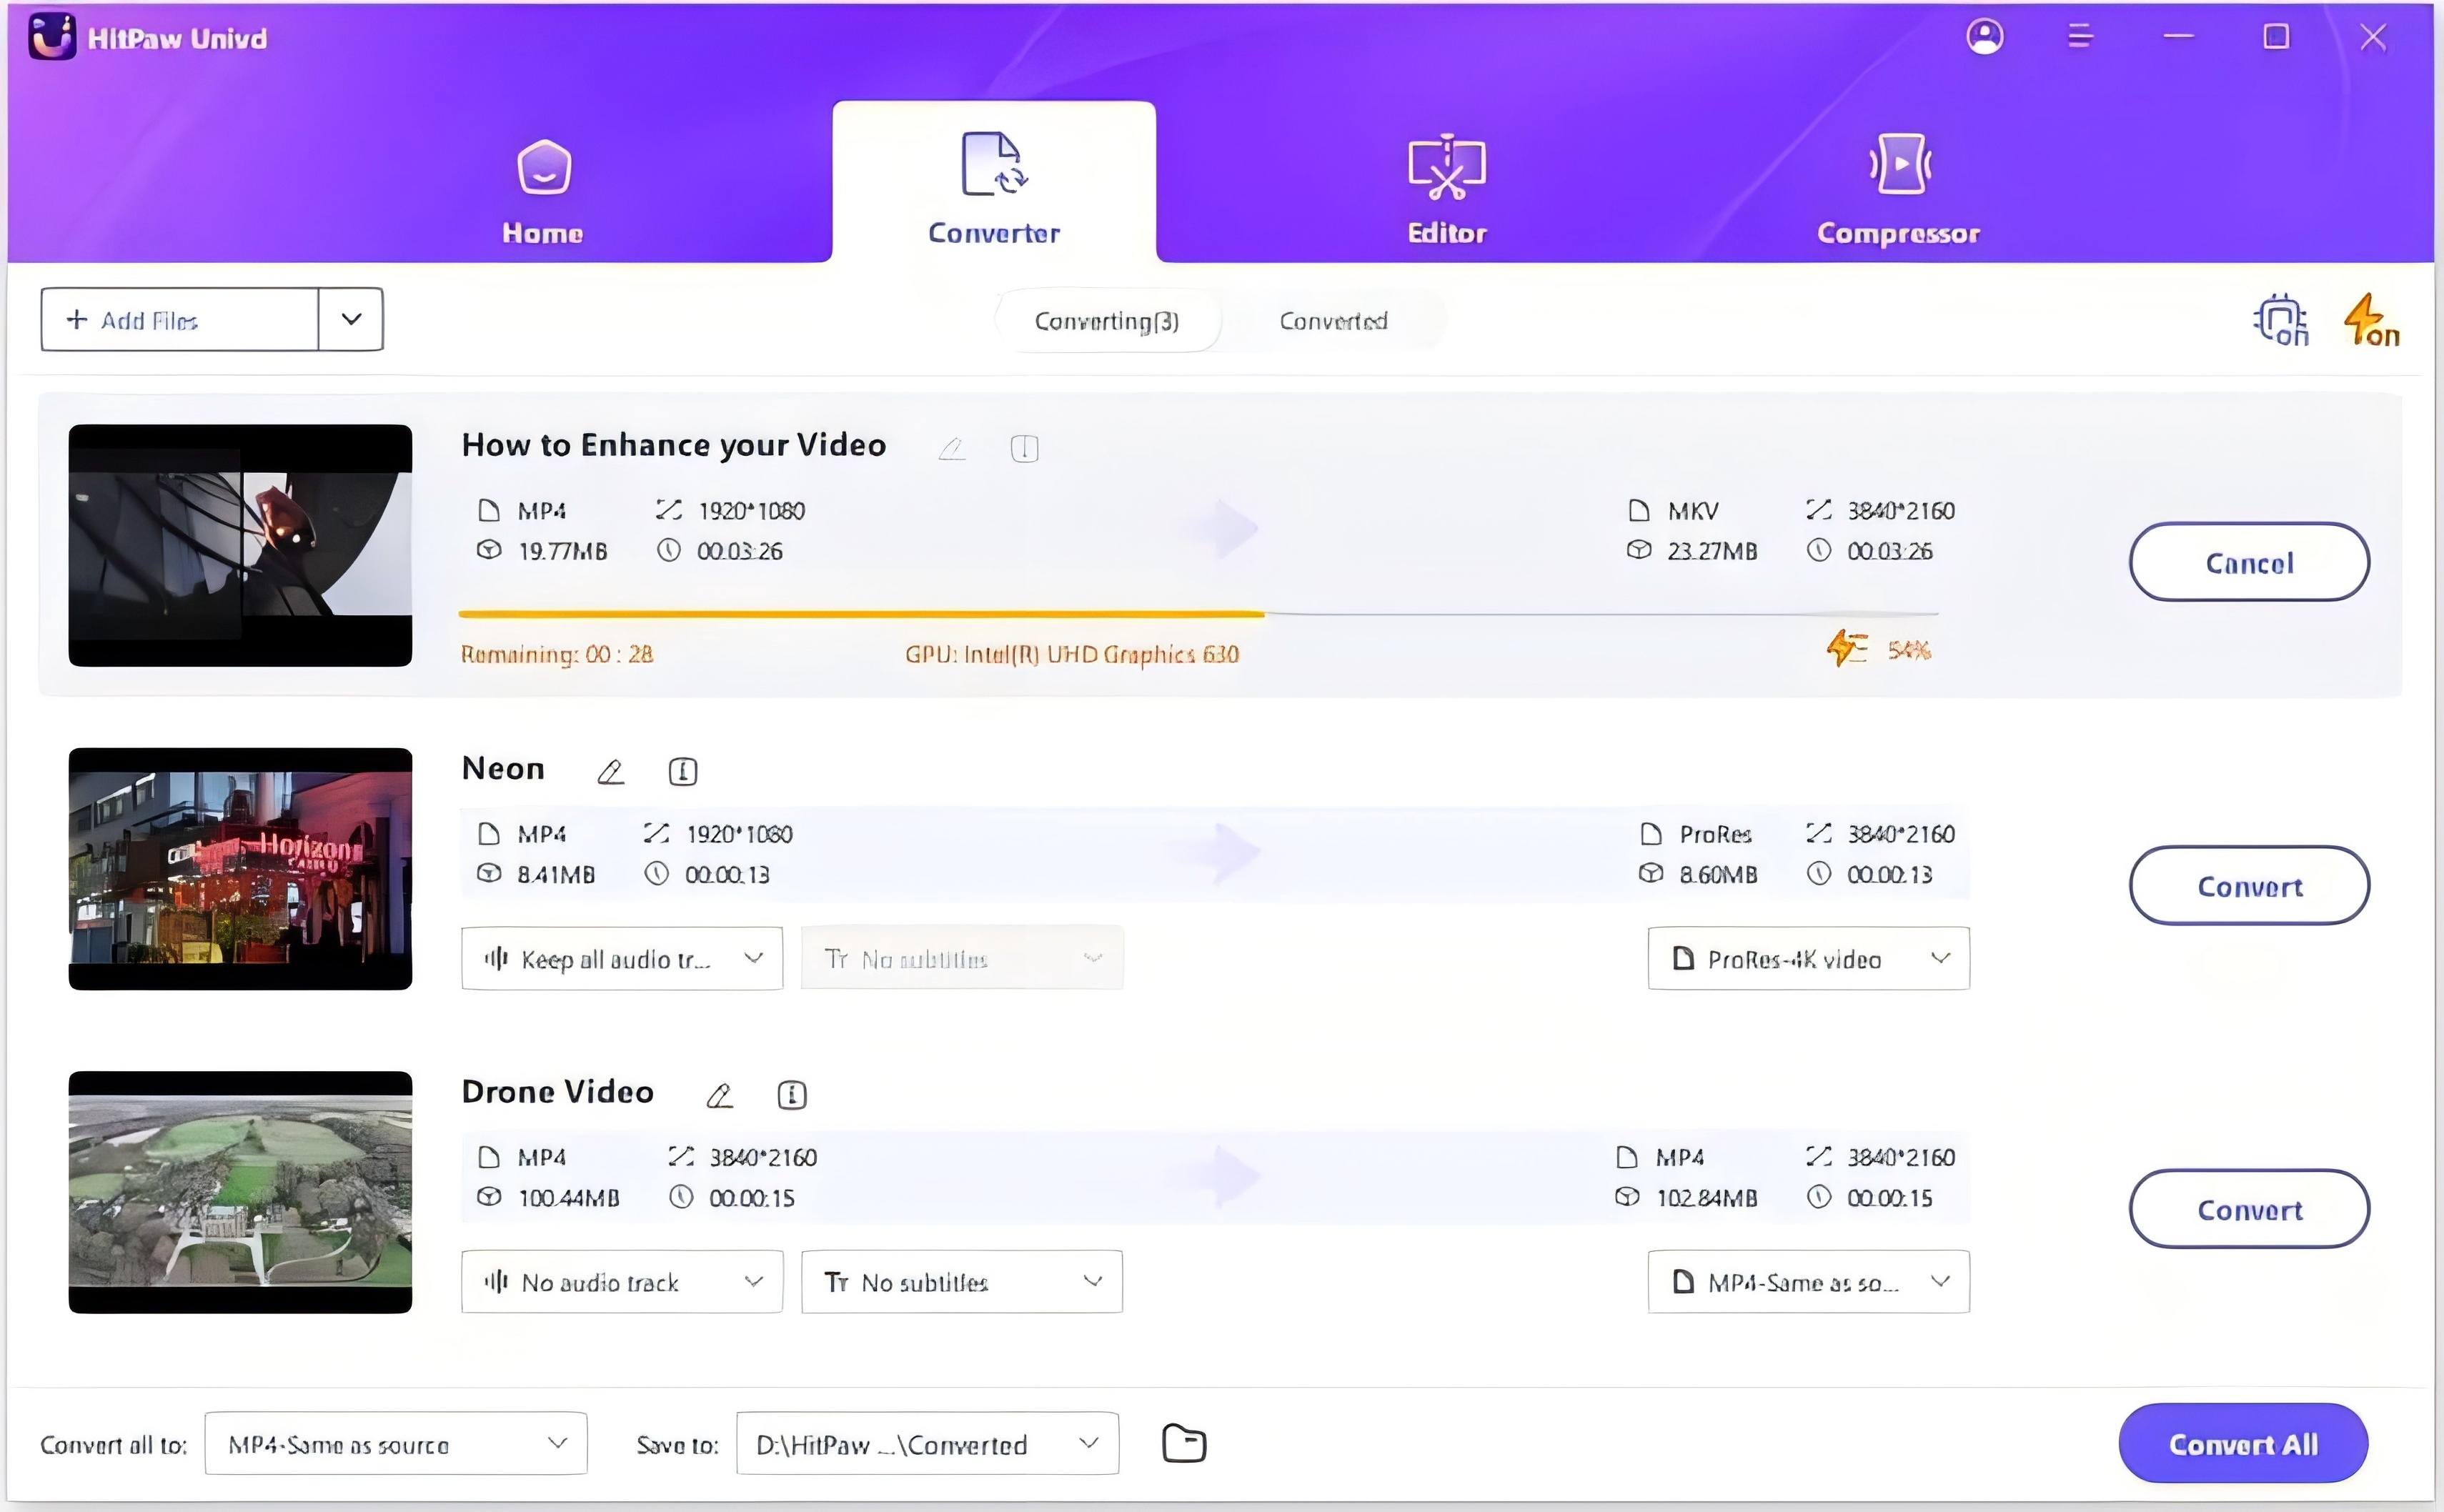
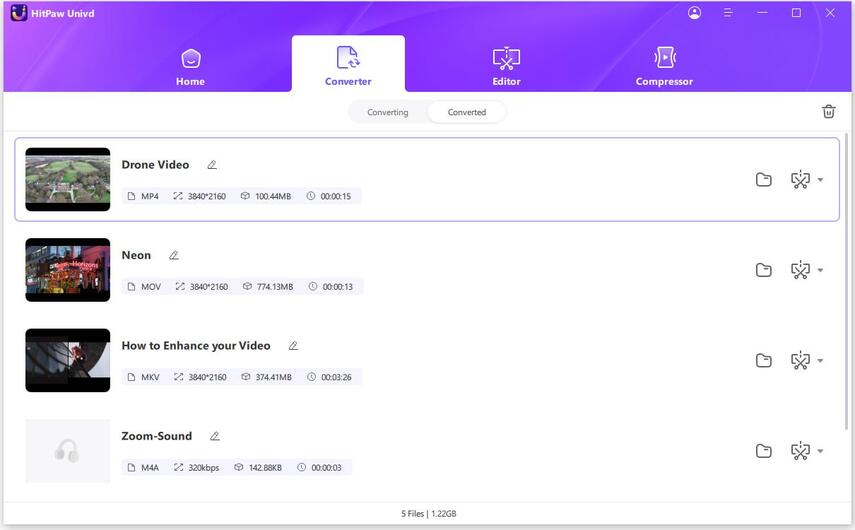
Step 6. Access Converted Files: After conversion, access the files in the "Converted" tab, where you can open the folder or further edit your videos.
Watch the following video to learn more details:
Part 4: Choosing the Right Hardware for VP9 Encoding
Importance of Hardware Acceleration in VP9 Encoding
Hardware acceleration significantly speeds up VP9 encoding processes by offloading tasks from the CPU to specialized hardware components. This not only improves encoding speed but also reduces power consumption, making it an essential feature for efficient video processing.
Overview of VP9 Encoder Hardware Options
Modern hardware, including CPUs, GPUs, and specialized encoding chips, often feature support for VP9 encoding. CPUs with integrated graphics processors (iGPUs) and discrete GPUs from manufacturers like NVIDIA, AMD, and Intel offer VP9 hardware encoding capabilities. Additionally, some dedicated encoding hardware, such as ASICs or FPGAs, provides even faster and more efficient VP9 encoding. This diverse range of VPN encoder hardware ensures optimal performance and efficiency for video processing tasks.
Benefits of Using Dedicated Hardware for VP9 Encoding
- Enhanced Performance: Dedicated hardware is optimized specifically for VP9 encoding tasks, providing faster and more efficient performance compared to general-purpose CPUs or GPUs.
- Improved Power Efficiency: Dedicated encoding hardware consumes less power than traditional computing components, leading to reduced energy consumption and lower operating costs.
- Consistent Quality: Hardware-based encoding ensures consistent video quality and stability, even during high-demand encoding tasks or extended usage periods.
Conclusion
In conclusion, selecting the right hardware for VP9 encoding is crucial for efficient video processing. Hardware acceleration boosts speed and reduces power consumption, with options ranging from integrated graphics to dedicated encoding chips. For seamless conversions, try HitPaw Univd, which harnesses hardware support for optimal performance. Don't miss out—take your video conversions to the next level with HitPaw Univd today!


 HitPaw Edimakor
 HitPaw Watermark Remover
  HitPaw VikPea (Video Enhancer)


Share this article:
Select the product rating:
Daniel Walker
Editor-in-Chief
This post was written by Editor Daniel Walker whose passion lies in bridging the gap between cutting-edge technology and everyday creativity. The content he created inspires audience to embrace digital tools confidently.
View all ArticlesLeave a Comment
Create your review for HitPaw articles