The Ultimate Guide of Handbrake AV1
Introduction
Welcome to the ultimate guide of AV1 Handbrake! In this comprehensive resource, we'll dive into the best tips and tricks for using Handbrake with the AV1 codec. Whether you're looking to enhance video quality or optimize compression, our expert advice will help you get the most out of your Handbrake AV1 experience.
Part 1. What is Handbrake AV1
AV1 Codec:
AV1 is a modern video codec renowned for its exceptional compression efficiency and high-quality output. It excels in reducing file sizes without sacrificing visual fidelity, making it perfect for various applications like online streaming, video conferencing, and more.
Benefits of AV1 Codec:
- Superior compression: Achieves significant reductions in file sizes compared to previous codecs.
- High-quality output: Preserves intricate details and visual fidelity even at lower bitrates.
- Versatility: Suitable for a wide range of applications, including streaming, video conferencing, and online video delivery, making it ideal for various uses, including Handbrake AV1 encode tasks.
Handbrake Software:
Handbrake is a widely-used video transcoding tool appreciated for its simplicity and effectiveness. It supports a wide array of codecs and formats, enabling users to convert their videos effortlessly.
Compatibility of handbrake with AV1:
- Seamless integration: AV1 encoding seamlessly integrated into Handbrake's interface.
- User convenience: Allows users to utilize AV1's benefits without needing to switch to a different software.
- Versatility: Enables users to work with AV1-encoded videos for various applications and platforms supported by Handbrake.
Importance of Handbrake for AV1 Encoding:
- Streamlined workflow: Simplifies the process of encoding videos with AV1 through its user-friendly interface.
- Access to advanced options: Provides users with powerful encoding features and optimizations tailored for AV1.
- Quality and efficiency: Maximizes the quality and efficiency of output videos by leveraging AV1's compression technology within Handbrake's platform.
Part 2. Handbrake AV1 Settings
AV1 Encoding Settings in Handbrake
1.Video Tab Settings:
- Codec: Choose "AV1" from the codec dropdown menu.
- Encoder Preset: Select the desired preset based on your priorities for speed and quality (e.g., Fast, Medium, Slow).
- Constant Quality (RF): Adjust the RF slider to balance between video quality and file size. Lower values result in higher quality but larger files.
2.Audio Tab Settings:
- Codec: Select the audio codec of your choice (e.g., AAC, MP3).
- Bitrate: Adjust the bitrate settings based on your preferences and compatibility requirements.
3.Picture Tab Settings:
- Resolution: Set the desired resolution for the output video.
- Aspect Ratio: Choose the appropriate aspect ratio for your video (e.g., 16:9, 4:3).
- Cropping: Optionally, apply cropping to remove unwanted borders or black bars.
4.Filters Tab Settings:
- Denoise, Deinterlace, Sharpen: Apply filters to enhance video quality if necessary.
- Tune: Experiment with tuning options for specific types of content (e.g., Animation, Film).
5.Video Tab Advanced Settings:
- Tune: Adjust settings like "Film" or "Animation" for different types of content.
- Grain: Fine-tune grain settings to match the original video characteristics.
- GOP Size: Configure the GOP (Group of Pictures) size for optimal compression efficiency.
6.Container and Output Settings:
- Format: Choose the desired container format (e.g., MP4, MKV).
- Chapters, Subtitles, Metadata: Customize additional options as needed.
7.Preview and Test Encoding:
- Utilize the preview window to evaluate the effects of your settings before encoding.
- Perform test encodings with different settings to find the optimal balance between quality and file size.
8.Encoding Queue and Start Encoding:
- Add your video files to the encoding queue.
- Start the encoding process and monitor progress.
By following these comprehensive Handbrake AV1 settings, you can optimize AV1 encoding for your specific requirements, achieving the best balance between video quality and file size.
Step-by-Step Guide to Configuring Handbrake for Optimal AV1 Output:
1. Open Handbrake: Launch Handbrake on your computer.
2. Import Video:Click on "Open Source" to import the video file you want to encode.
3. Select AV1 Codec: Under the "Video" tab, choose "AV1" from the codec dropdown menu.
4. Adjust Encoder Preset and RF: Select the desired encoder preset (e.g., Fast, Medium, Slow) based on your priorities for speed and quality. Adjust the Constant Quality (RF) slider to balance between video quality and file size. Lower values result in higher quality but larger files.
5. Configure Audio Settings: Navigate to the "Audio" tab and select the desired audio codec and bitrate settings.
6. Customize Picture Settings: Go to the "Picture" tab to adjust resolution, aspect ratio, and cropping if needed.
7. Fine-tune Advanced Settings: Explore advanced settings under the "Video" tab for additional customization, such as tuning options and GOP size.
8. Choose Container Format: Under the "Container" tab, select the desired format (e.g., MP4, MKV) for the output file.
9. Preview and Test Encoding: Use the preview window to evaluate the effects of your settings before encoding. Perform test encodings with different settings to find the optimal balance between quality and file size.
10. Add to Queue and Start Encoding: Once satisfied with the settings, add the video to the encoding queue. Start the encoding process and monitor progress.
Tips for Adjusting Settings:
- For higher quality, choose lower RF values, but be prepared for larger file sizes.
- Consider the specific requirements of your project when adjusting settings. For example, animations may benefit from different settings than live-action footage.
- Experiment with different encoder presets to find the right balance between encoding speed and output quality.
Part 3. Handbrake AV1 Support
Overview of Latest Updates:
Handbrake continually improves AV1 support with updates, ensuring compatibility with the latest AV1 specifications and optimizations. Recent updates may include enhanced AV1 encoding performance, bug fixes, and integration of new AV1 features.
Benefits of AV1 for Video Encoding and Playback:
- Superior Compression: AV1 offers better compression efficiency, yielding smaller file sizes without sacrificing quality.
- High-Quality Playback: AV1 preserves intricate details and visual fidelity, delivering superior playback experiences even at lower bitrates.
- Future-Proofing: With expected widespread adoption, encoding videos in AV1 ensures compatibility and future-proofing across streaming platforms and devices.
Troubleshooting Common Issues:
- Compatibility: Ensure your Handbrake version supports AV1 encoding. Update to the latest version if necessary.
- Performance: Adjust encoding settings to optimize performance based on your hardware capabilities and video content.
- Quality vs. Speed: Balance encoding speed and output quality by experimenting with encoder presets and RF settings.
Part 4. How to Convert Videos to Handbrake AV1
HitPaw Univd (HitPaw Video Converter) stands out as the top choice for format conversion, offering seamless and efficient video transcoding. With its intuitive interface and powerful features, HitPaw simplifies the process of converting videos to formats with Handbrake AV1 support. Its versatility and reliability make it the go-to solution for users seeking high-quality conversions with ease.
Features
- Intuitive Interface: Easy-to-use for seamless navigation.
- Efficient Conversion: Quick and effective video transcoding.
- Versatility: Supports Handbrake AV1 format along with a wide range of others.
- Customizable Settings: Allows users to tailor conversion parameters.
- Reliable Performance: Consistently delivers dependable results.
Steps
Steps to Convert Videos to Handbrake AV1 with HitPaw Univd:
1. Open HitPaw and Add Files: Import videos by selecting "Add Video" or dragging files into the program.

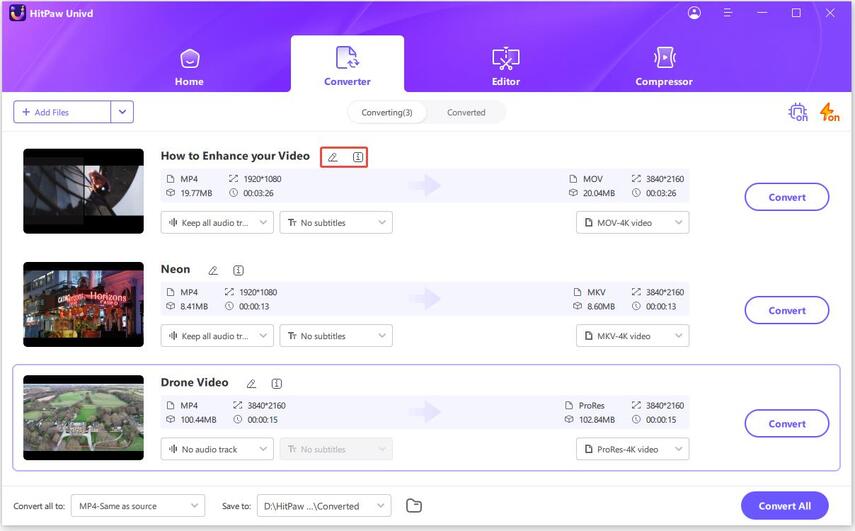
2. Edit Video Info (Optional): Edit the title and metadata by clicking the file name and the pen/info icon.
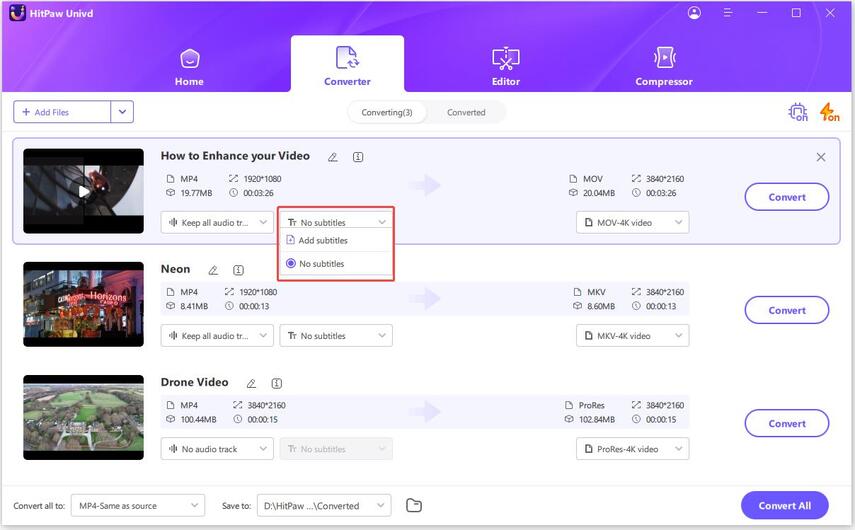
3. Add Subtitles: Add external subtitles (SRT, ASS, VTT, SSA) by clicking “Add subtitles.”
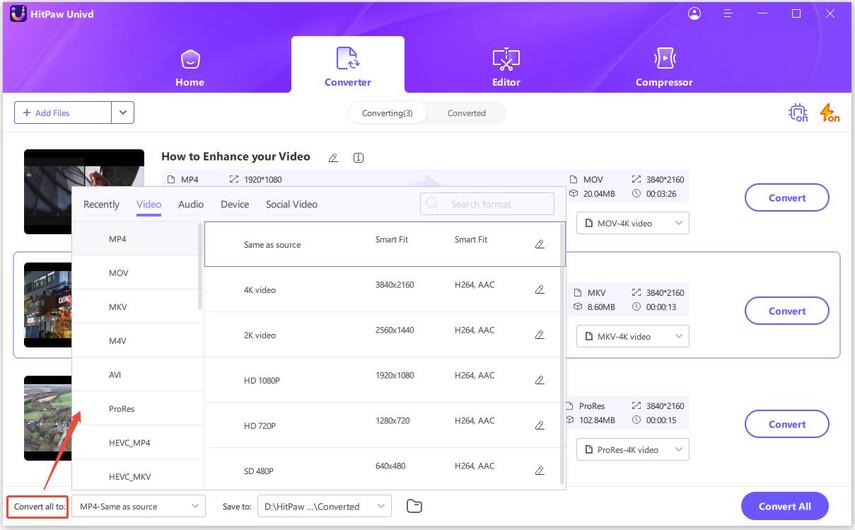
4. Select an Output Format: Choose an output format by clicking the inverted triangle icon or "Convert all to."
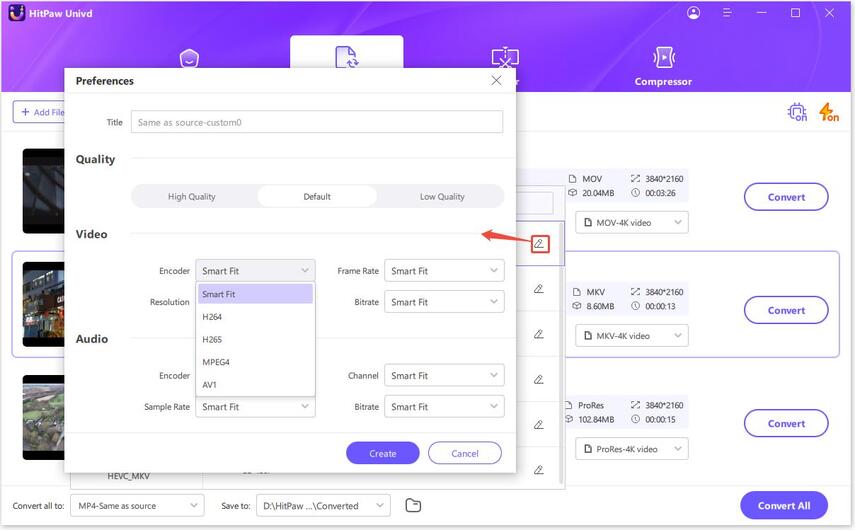
Customize output parameters if needed.
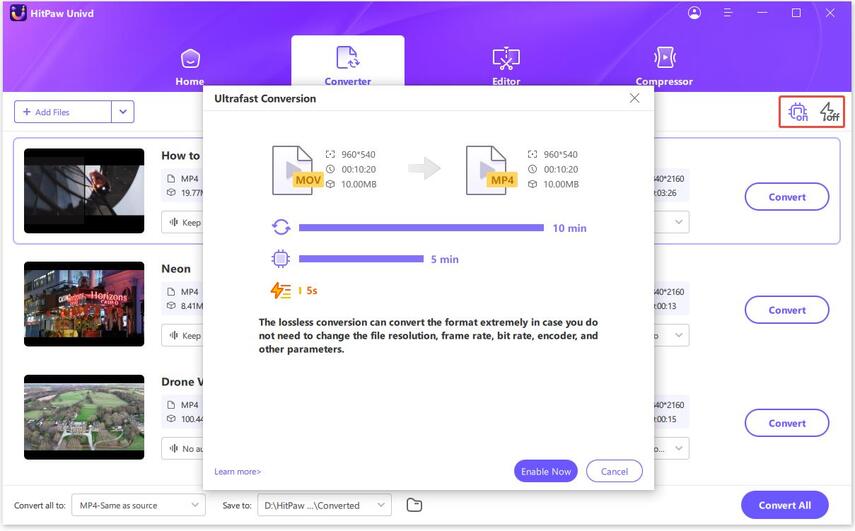
5. Convert the Video: Enable Hardware Acceleration and Lossless Conversion.
Select a target folder and click "Convert" or "Convert All" for batch conversion.
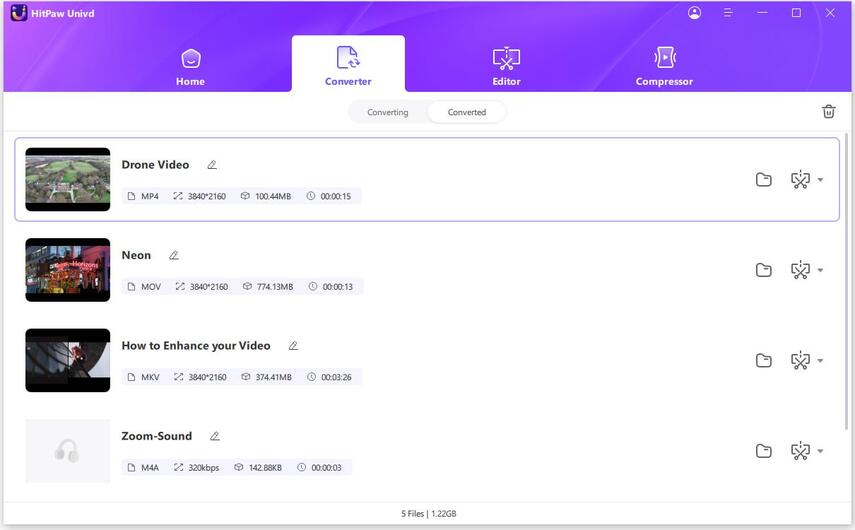
6. Access Converted Files: Find converted files under the "Converted" tab and click "Open Folder" to view them.
Watch the following video to learn more details:
Part 5: FAQs of Handbrake AV1
Q1. What is the AV1 codec in Handbrake?
A1. The AV1 codec in Handbrake is a high-efficiency video codec designed to provide superior compression and video quality, reducing file sizes while maintaining visual fidelity.
Q2. How do I enable AV1 encoding in Handbrake?
A2. To enable AV1 encoding, select "AV1" in the Video tab's codec dropdown, adjust the encoder preset and RF settings, and customize other options as needed.
Q3. Why use Handbrake for AV1 encoding?
A3. Handbrake is a user-friendly tool with robust features, supporting AV1 encoding for high-quality video compression and regular updates for optimal performance.
Conclusion
Mastering AV1 encoding with Handbrake can significantly enhance your video quality and compression efficiency. By following the expert tips and tricks outlined in this guide, you can achieve optimal results with Handbrake SVT AV1. For an even more streamlined experience, consider using HitPaw Univd for its intuitive interface and robust features, making it the perfect companion for your video conversion needs.


 HitPaw Edimakor
 HitPaw VikPea (Video Enhancer)


Share this article:
Select the product rating:
Daniel Walker
Editor-in-Chief
My passion lies in bridging the gap between cutting-edge technology and everyday creativity. With years of hands-on experience, I create content that not only informs but inspires our audience to embrace digital tools confidently.
View all ArticlesLeave a Comment
Create your review for HitPaw articles