The Ultimate Guide of FFmpeg Extract Audio from Video
Extracting audio from video files is a common need for various tasks, such as creating podcasts, isolating soundtracks, or repurposing content. FFmpeg, a robust multimedia program, is widely used due to its flexibility and robust features.
This guide will teach you everything about how FFmpeg extract audio from video. You'll learn to install FFmpeg, execute basic and advanced audio extraction commands, and troubleshoot common issues.
Part 1. What is FFmpeg for Audio Extraction
FFmpeg is an open-source multimedia framework that can decode, encode, transcode, demux, mux, stream, filter, and play almost anything humans and machines have created. It supports the ancient formats up to the cutting edge. It is used for video editing, format conversion, and audio extraction.
Here is the step-by-step guide on installing FFmpeg on Windows:
- Download the FFmpeg executable from the official FFmpeg website. Select "Windows builds from gyan.dev," redirecting you to the "gyan.dev" site. Choose "ffmpeg-git-full.7z."
- Once downloaded, right-click the FFmpeg folder and choose "Extract files." Open the extracted folder and copy all the "EXE" files from the bin directory to the root folder of your hard drive. For example, create a separate folder for these files on the Local "Disk (C:)."

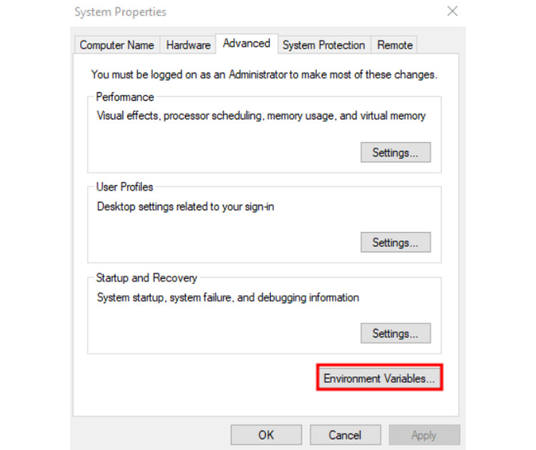
- Search for "environment properties" in the search bar and click Open. In the "System Properties" window, open the "Advanced" tab and select "Environment Variables."
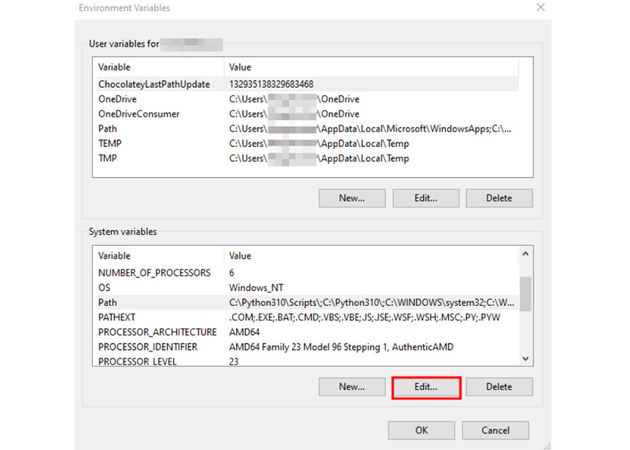
- In the "System variables" section, select "Path" from the list and tap "Edit."
- Click "New" and add the path of the FFmpeg folder you created to store the "EXE files."
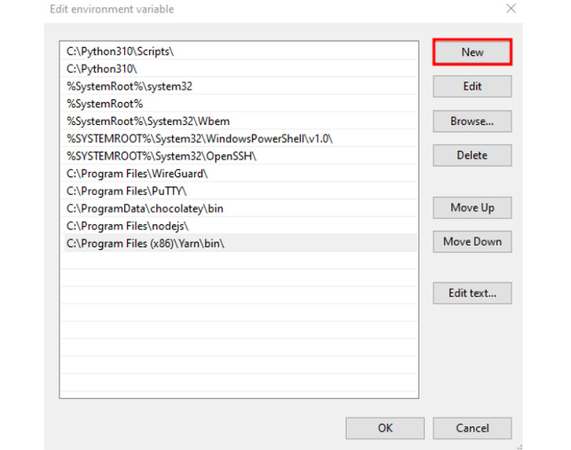
- Click "OK" to save your changes, closing the "Edit Environment Variable" window. Tap "OK" to close the "Environment Variables" window, then click "OK" again to close "System Properties."
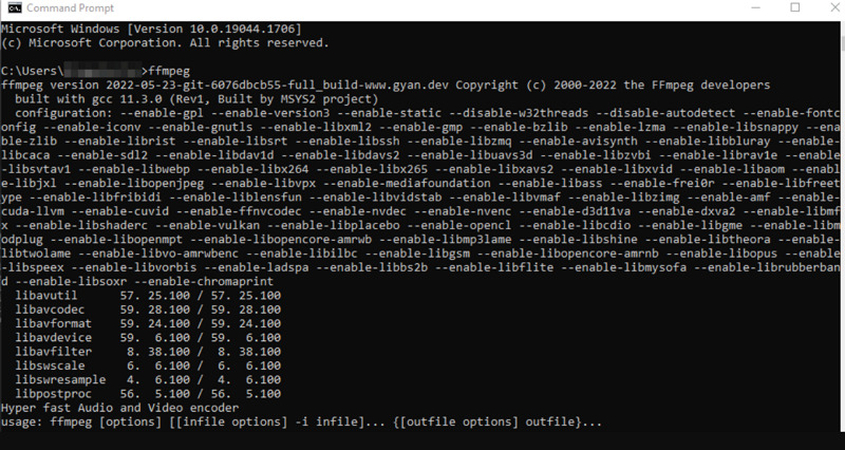
- Open "Command Prompt" and run the command ffmpeg to verify the installation. You should see an output displaying the FFmpeg version and default configuration settings.
Let's follow the tutorial for installing FFmpeg on macOS:
- After downloading the FFmpeg package from the official website, select "Static builds for macOS 64-bit," which will redirect you to the "evermeet.cx" site. Choose the "ffmpeg-5.0.1" version.
- Open the downloaded file to extract it using the "Archive Utility," creating an executable FFmpeg file.

- Open "Finder" and use the keyboard shortcut "CMD + Shift + H" or click the Go button and select "Home" to access the Home folder. Create a new " audio-orchestrator-ffmpeg " folder and press "Return" to confirm.
- Inside this new folder, create another folder labeled bin. Shift the FFmpeg file from "Downloads" to the bin folder. Double-click the "FFmpeg file." If a message appears saying it can't be opened because it is from an unidentified developer, press "OK."
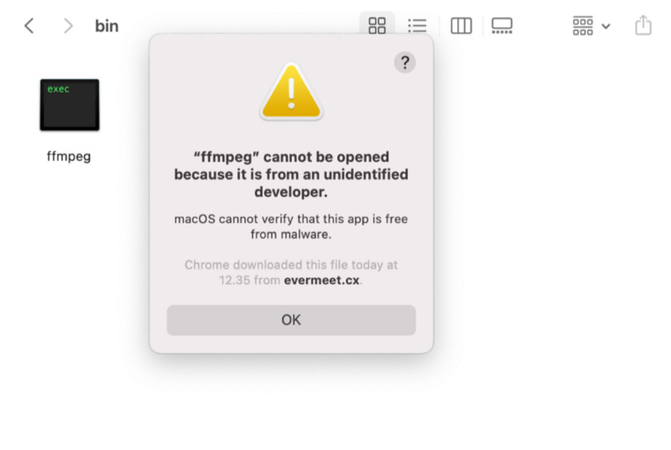
- Go to "System Preferences," select "Security and Privacy," and choose "General." When a new error message appears, hit "Open Anyway."
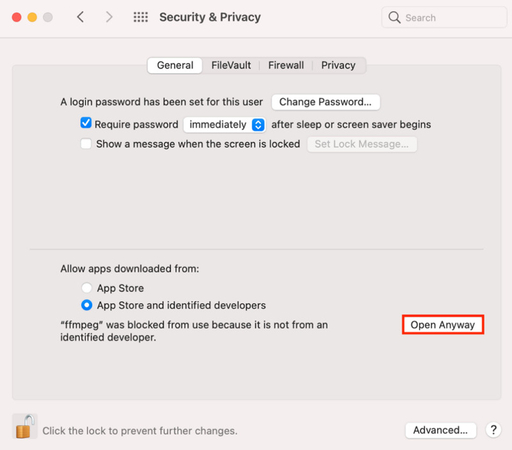
- Confirm by clicking Open on the pop-up stating that "macOS cannot verify the developer of ffmpeg."
- Double-click the FFmpeg file again to open a new "Terminal" window. Once the process is complete, close it.

Here is the complete guide on installing FFmpeg on Linux, i.e., Ubuntu and Fedora:
Open Terminal and access via root user.
1. For Ubuntu
Update the system and the packages installed by running these two commands.
sudo apt update
sudo apt upgrade
To install the FFmpeg app, run the command:
sudo apt install ffmpeg
2. For Red Hat-based distributions (like Fedora), run:
sudo dnf update
To add the RPM fusion repository, run the following:
sudo dnf install https://download1.rpmfusion.org/free/fedora/rpmfusion-free-release-$(rpm -E %fedora).noarch.rpm https://download.rpmfusion.org/nonfree/fedora/rpmfusion-nonfree-release-$(rpm -E %fedora).noarch.rpm
Update the system to make sure the changes:
sudo dnf update
Next, install the FFmpeg with this command:
sudo dnf install ffmpeg ffmpeg-devel
You can use a simple command prompt to extract audio from a video file via FFmpeg. Here's a basic example:
ffmpeg -i input_video.mp4 -q:a 0 -map a output_audio.mp3
-i input_video.mp4: For the input video file.
-q:a 0: Ensures the highest audio quality.
-map a: Maps the audio stream.
output_audio.mp3: The name of the output audio file.
This command extracts the audio stream from the input video and saves it as an MP3 file with the best possible quality.
Part 2. How to Use FFmpeg to Extract Audio from Video
Let's follow the detailed instructions on how to extract audio from video files using FFmpeg:
Step 1. Open your command-line interface:
On Windows, open Command Prompt.
On macOS, open Terminal.
On Linux, open your terminal application.
Step 2. Navigate to the directory containing your video file:
Use the cd command to change directories. For example:
cd path/to/your/video
Step 3. Run the FFmpeg command tailored to your needs:
To extract audio without re-encoding, use:
ffmpeg -i input_video.mp4 -vn -acodec copy output_audio.aac
-vn: Ignores the video stream.
-acodec copy: Copies the audio stream without re-encoding.
Step 4. Extract and convert audio to MP3:
If you want to convert the audio to MP3 format, use:
ffmpeg -i input_video.mp4 -q:a 0 -map a output_audio.mp3
Here are some tips and tricks for optimizing the audio extraction process:
Control the audio quality and file size by adjusting the bitrate. For example:
ffmpeg -i input_video.mp4 -b:a 192k output_audio.mp3
-b:a 192k: Sets the audio bitrate to 192 kbps.
Use -ss and -t to specify the start time and duration:
ffmpeg -ss 00:01:00 -i input_video.mp4 -t 00:00:30 -q:a 0 -map a output_audio.mp3
-ss 00:01:00: Start time at 1 minute.
-t 00:00:30: Duration of 30 seconds.
Use the volume filter to increase/decrease the volume:
ffmpeg -i input_video.mp4 -filter:a "volume=1.5" output_audio.mp3
-filter:a "volume=1.5": Increases the volume by 50%.
Let's look at some common errors and how to troubleshoot them:
Unrecognized option 'vn'."
Ensure you are using the right version of FFmpeg and that it is correctly installed.
No such file or directory."
Check the file path and ensure the input video file exists in the specified location. Use absolute paths if necessary.
"At least one output file must be specified."
Ensure you have specified the output file correctly in the command.
"Invalid argument for option 'b'."
Verify that the bitrate value is correctly specified and supported by the used codec.
Part 3. Best Alternative to Extract Audio from Video with FFmpeg
HitPaw Univd (HitPaw Video Converter) is a highly recommended tool for those seeking a user-friendly alternative to FFmpeg. It helps you convert the videos to the audio format if needed. You can access various features beyond audio extraction, making it a versatile multimedia toolkit. It also lets you change the parameters such as quality, resolution, frame rate, encoder, etc. You can even edit and preview the output before exporting.
Main Features:
- Convert between various photo and video formats
- Download videos from over 10,000 sites
- Download music from popular platforms
- Use additional tools like video compressor, screen recording, etc.
Let's comply with the given steps on how to convert videos to audio using the HitPaw Univd:
Step 1. Add Videos

The first step is to launch the HitPaw AI Voice Changer and open the "Convert" section. Click the "Add Files" tab to import the video file.
Step 2. Edit Info
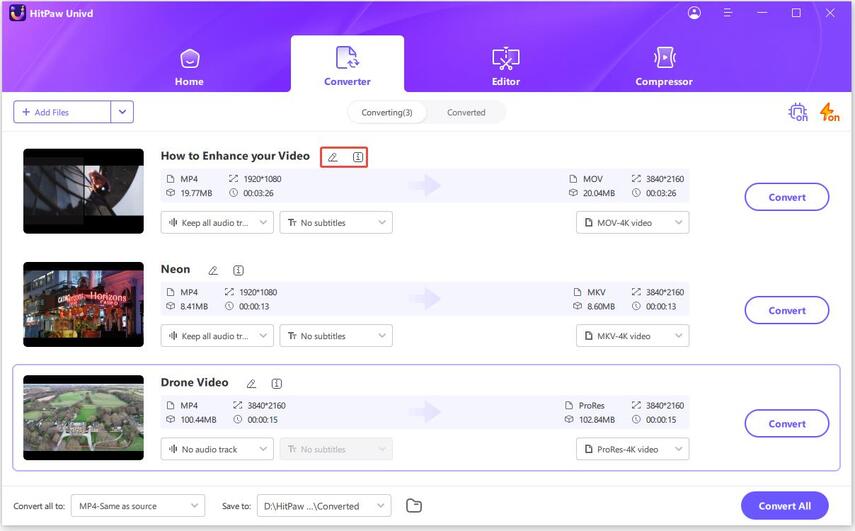
You also have the option to tap the pen or info icon to edit the metadata, such as title, artist, genre, album, etc.
Step 3. Add Subtitles
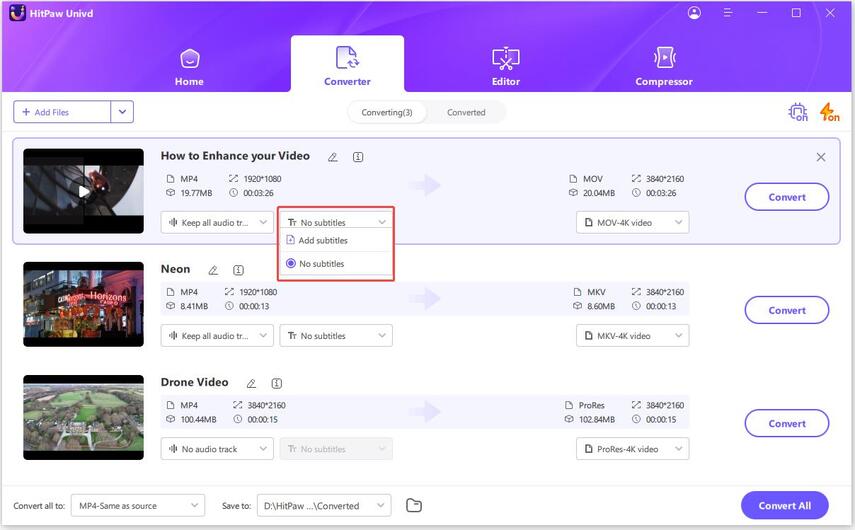
Now, expand the subtitles drop-down menu and choose the "Add subtitles," "No subtitles," or "Keep all subtitles" options.
Step 4. Select Output Format
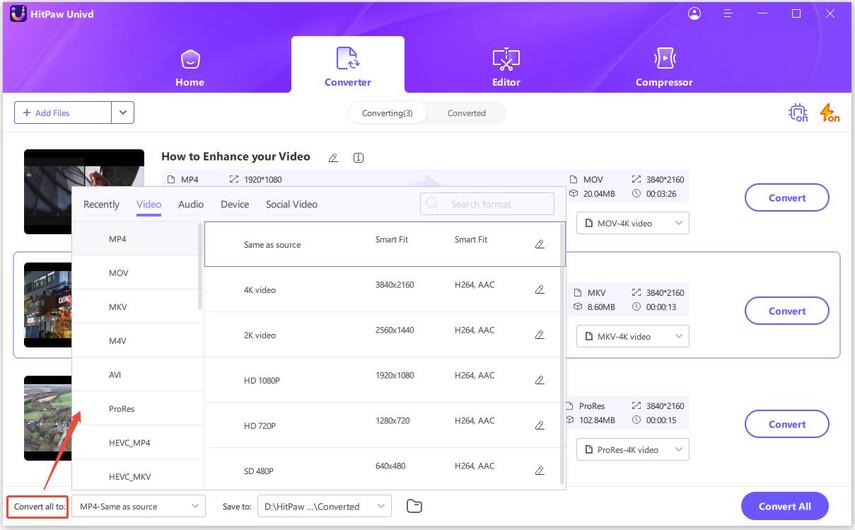
It's time to press the small rectangle icon for the file format to select the audio format under the "Audio" section. Also, choose the quality and click "Create."
Step 5. Converting Videos
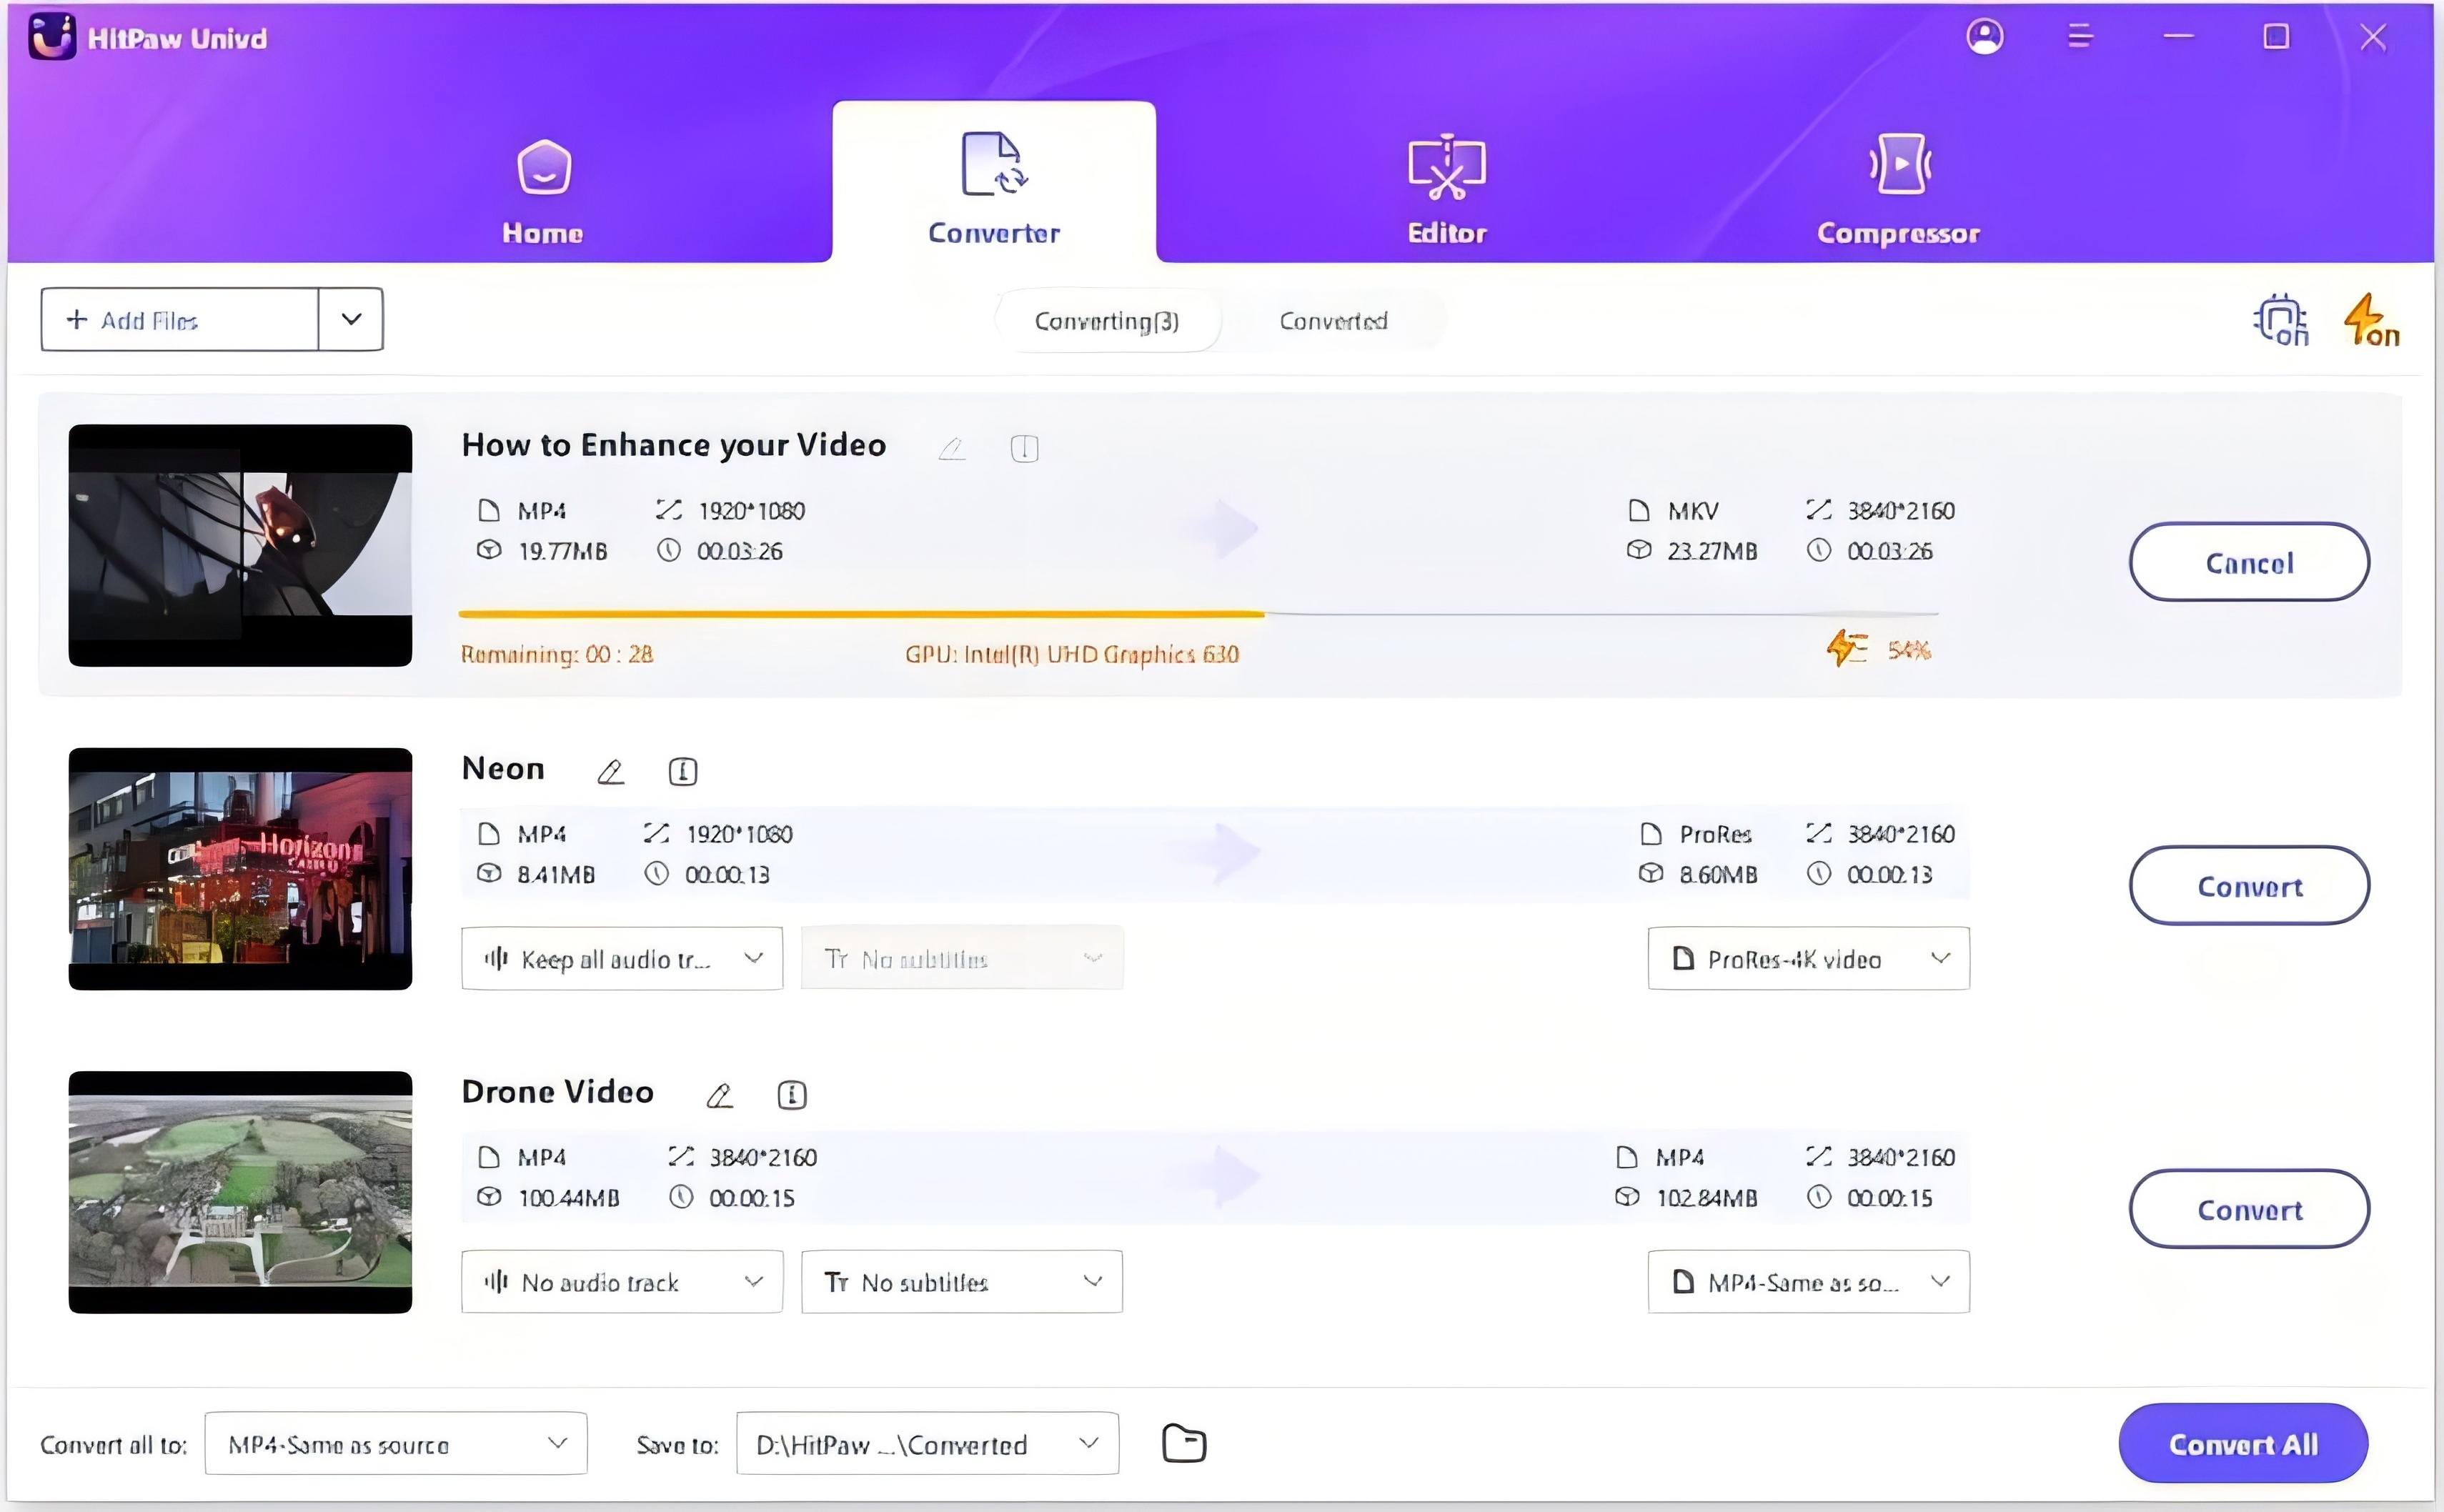
Enable or disable this feature from the "Hardware Acceleration Detection" window for lossless or speedy conversion. Next, hit the "Convert" or "Convert all" button.
Step 6. Access the Converted Videos
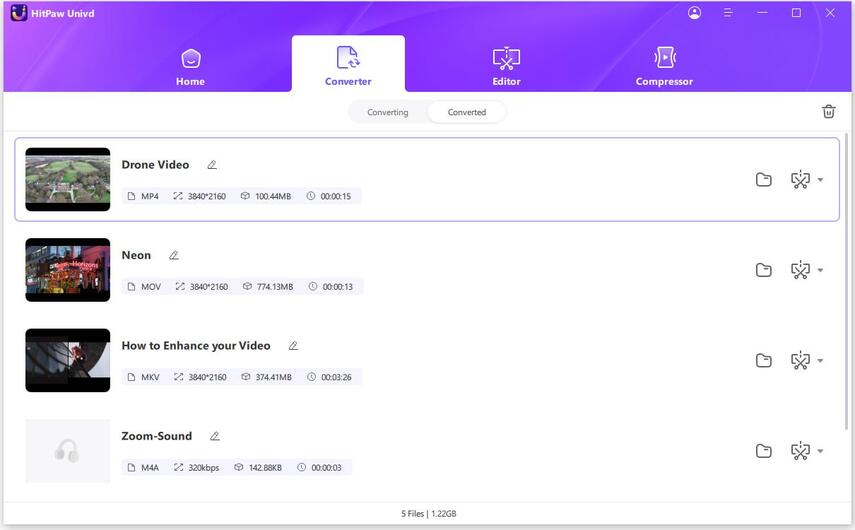
Watch the following video to learn more details:
Part 4. Advanced Techniques for Audio Extraction with FFmpeg
FFmpeg provides a variety of options and filters to fine-tune the audio extraction process:
- Change the volume of the extracted audio:
- “ffmpeg -i input_video.mp4 -filter:a "volume=2.0" output_audio.mp3”
- volume=2.0: Doubles the volume.
Change the sample rate of the audio:
- “ffmpeg -i input_video.mp4 -ar 44100 output_audio.wav”
- -ar 44100: Adjust the audio sample rate to 44.1 kHz.
Convert stereo audio to mono:
- “ffmpeg -i input_video.mp4 -ac 1 output_audio.wav”
- -ac 1: Sets the audio to mono.
FFmpeg allows for extensive customization of the output audio format and quality:
Control the audio bitrate to manage quality and file size:
- “ffmpeg -i input_video.mp4 -b:a 320k output_audio.mp3”
- -b:a 320k: Sets the audio bitrate to 320 kbps for high-quality audio.
Specify the audio codec to be used:
- “ffmpeg -i input_video.mp4 -acodec flac output_audio.flac”
- -acodec flac: Uses the FLAC codec for lossless audio.
Employ presets to balance quality and encoding speed:
- “ffmpeg -i input_video.mp4 -q:a 2 output_audio.mp3”
- -q:a 2: Sets the audio quality, where a lower number means better quality (0 is best).
To handle various files at once, you can use batch processing with FFmpeg:
1. Using a Script: Create a simple script to process all video files in a directory. For example, in a Unix-like system (Linux, macOS), create a script called batch_extract.sh:
"#!/bin/bash
for f in *.mp4; do
ffmpeg -i "$f" -q:a 0 -map a "${f%.mp4}.mp3"
done"
This script iterates over all .mp4 files in the directory, extracting the audio and saving it as an MP3 file with the same base name.
2. Windows Batch File: Create a batch file batch_extract.bat:
“@echo off
for %%f in (*.mp4) do (
ffmpeg -i "%%f" -q:a 0 -map a "%%~nf.mp3"
)"
This batch file performs the same function as the Unix script, iterating over .mp4 files and extracting audio.
Part 5. FAQs of FFmpeg Extract Audio from Video
Q1. How do I extract audio from a specific video part?
A1. Use the -ss and -t options to specify the start time and duration: "ffmpeg -i input_video.mp4 -ss 00:01:00 -t 00:00:30 -q:a 0 -map a output_audio.mp3."
Q2. Can FFmpeg extract audio from YouTube video?
A2. Yes, you can use FFmpeg with youtube-dl to download and extract audio: "youtube-dl -x --audio-format mp3 <YouTube URL>."
Q3. What is the best audio format to use when extracting audio?
A3. The best format depends on your needs. MP3 is widely supported, AAC offers better quality at lower bitrates, and WAV is lossless.
Bottom Line
Extracting audio from video using FFmpeg is a powerful and versatile solution for advanced needs. From simple commands to complex batch processing, FFmpeg offers extensive customization and control. However, for those seeking a simple and user-friendly alternative for audio extraction, the HitPaw Univd is highly recommended.
With an intuitive interface and diverse features, including format conversion, video downloading, and editing tools, HitPaw Univd provides a comprehensive solution for all your multimedia needs.


 HitPaw Edimakor
 HitPaw VikPea (Video Enhancer)


Share this article:
Select the product rating:
Daniel Walker
Editor-in-Chief
My passion lies in bridging the gap between cutting-edge technology and everyday creativity. With years of hands-on experience, I create content that not only informs but inspires our audience to embrace digital tools confidently.
View all ArticlesLeave a Comment
Create your review for HitPaw articles