A Step-By-Step Guide for Reducing MP4 File Size on Mac 2025
Storing high-resolution videos is the priority of most Mac users to ensure they feel free from getting bored seeing blurry or low-resolution videos. However, several instances suggest you to reduce MP4 file size Mac.
For instance, you may want to share the video with friends through social media or email, but the big video prevents you from doing so. Also, compress the videos to ensure your Mac doesn't run out of storage. If you feel like reducing MP4 file size Mac, you must keep reading this post.
Part 1. The Quickest Way to Reduce MP4 on Mac (Newly macOS 10.14 Supported)
Finding quicker and more reliable ways to reduce MP4 file size Mac isn't simple, but things happen quickly when there is a HitPaw Univd (HitPaw Video Converter) for Mac around the corner. It is a sublime tool that, apart from offering mind-blowing video conversion features, video downloading credentials enable you to compress the MP4 video. HitPaw Univd comes up with an effortless user interface, and another noticeable thing is that it doesn't tinker with video resolution when compressing it.
Some features of HitPaw Univd for Mac:
- Allows you to edit the video, including compressing the video
- Convert DVD files, audio, and videos to 1000+ formats
- Download the videos from 10000 online websites
- Compress the multiple videos simultaneously
- Offers the 120X real-time conversion
- 100% safe for your Mac
- Convert the images, video, and Spotify music files quickly
How to reduce mp4 file size without losing quality on Mac:
Step 1.All you need to do is download the software and install it on your Mac. Next, you shouldn't waste any time before launching the software. Next, launch the HitPaw Univd and select the Choose Video/Image Compressor icon to begin the proceeding.

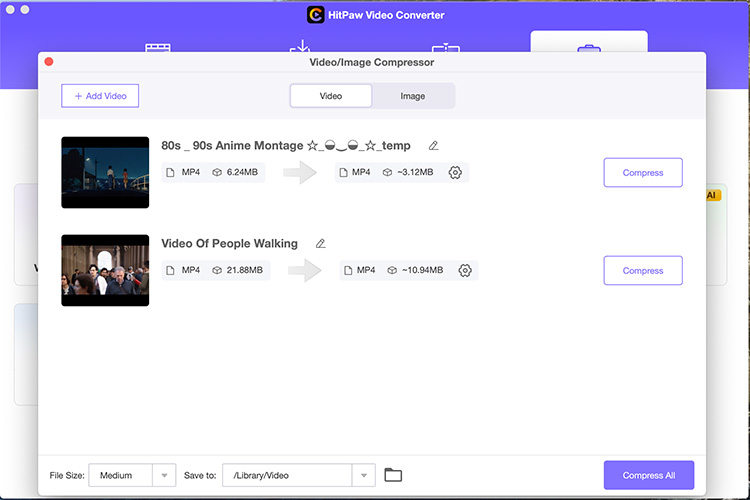
Step 2.Tap on the '' Add Video'' icon and import the video you'd like to compress. You can also rename your video by hitting the pen icon.

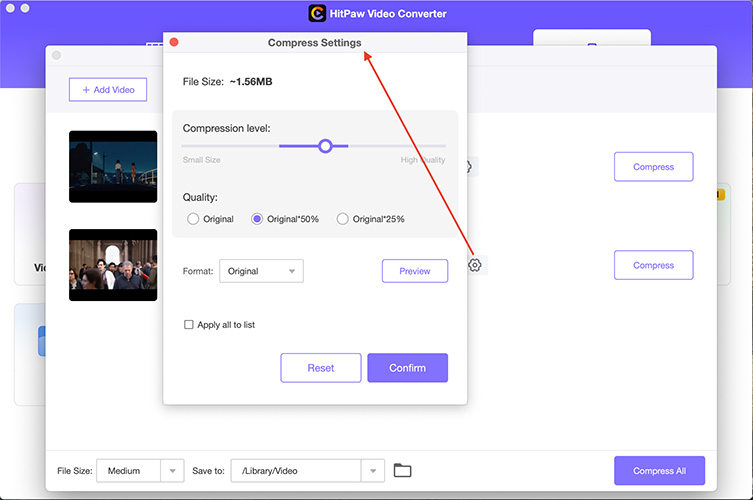
Step 3.After hitting the gear icon, you'll need to select quality and compression for that file. Now, you'll be able to see the MP4 and Original option Next, you tap on the ''Preview'' icon to preview your compression effect. Save the settings by hitting the ''Confirm'' icon.

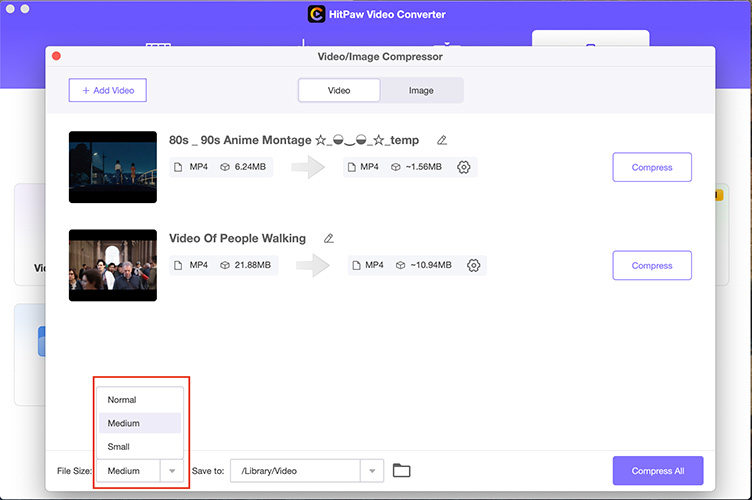
Step 4.Once you select a compression level, it will be applied to all the files in your list. You can set the compression level as medium and see the size of your video after and before in the file list.

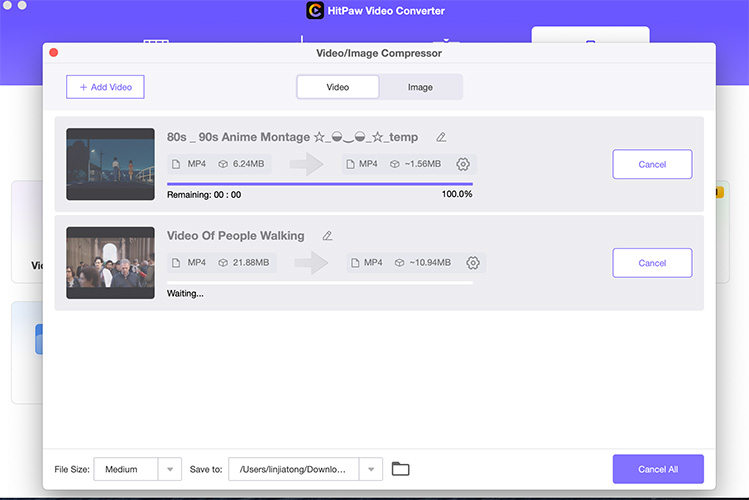
Step 5.Tap on the ''Compress'' icon to start compressing the video you've uploaded.

Part 2. How to Reduce Video File Size on Mac using iMovie
iMovie makes reducing MP4 file size Mac pretty simple as it is a brilliant video editing tool introduced by Apple. So, if you intend to reduce MP4 file size Mac, opting for the iMovie will be a good idea.
Here's how to reduce MP4 file size on Mac through iMovie.
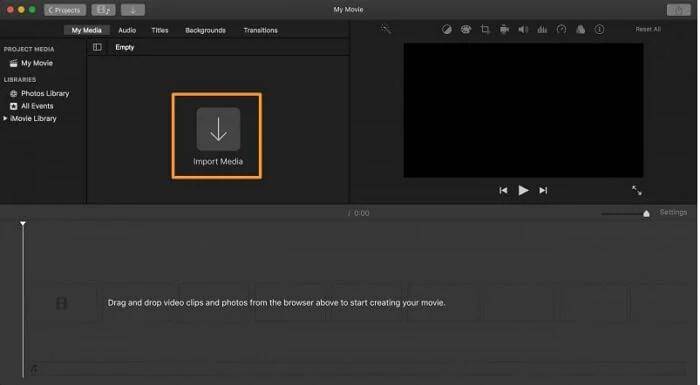
Step 1.Install the iMovie on the Mac PC and click on the ''Import Media'' icon to upload the MP4 video you'd like to compress.

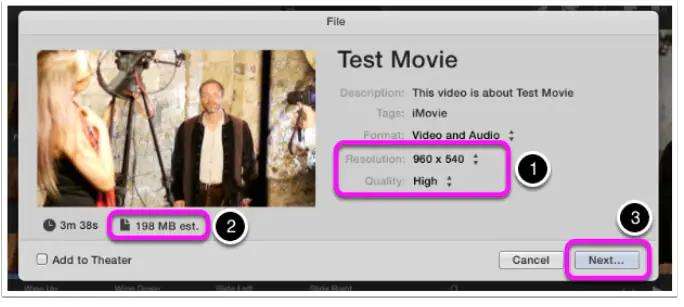
Step 2.Once the MP4 file is added, you'll be able to see the details about tags, descriptions, quality, format, and resolution. Now, you can compress the file by changing the quality and resolution of your video using the arrows. Proceed ahead by tapping the '' Next'' icon.

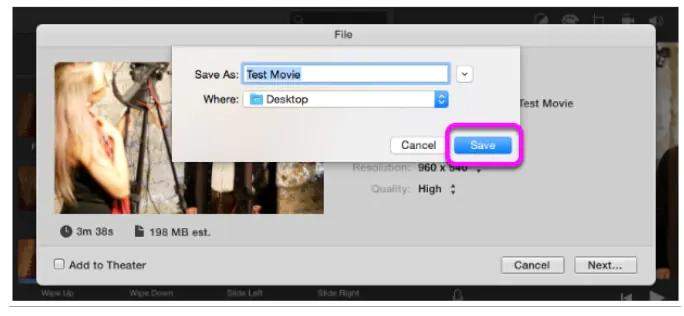
Step 3.Rename your video and tap on the ''Save'' icon to export the video to your desired location.

Part 3. How to Compress a Video on Mac with QuickTime Player
QuickTime Player is a remarkable built-in media player that empowers you to play videos on your Mac PC. Besides playing videos, QuickTime also offers the credentials to reduce MP4 file size Mac.
IUnlike iMovie, QuickTime Player doesn't allow you to compress your video by altering the bitrate, resolution, or video format. Instead, it asks you to export the video at a lower resolution to shorten it.
How to reduce MP4 file size on Mac using QuickTime Player?
Step 1.Launch the QuickTime on your Mac and hit the Import icon to upload the MP4 video.
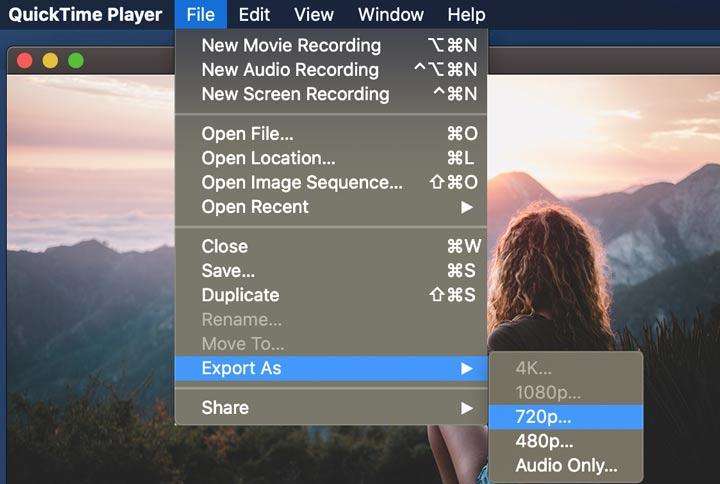
Step 2.Tap on the File>Export icon to get the 5 most common resolutions, including 480p,720p, 1080p,4K, and audio only. If your video file is 4K, select the 720p or 1080p
Step 3.If you select 1080p or 4K, you should choose the HEVC as your destination format. Next, enter the name of your compressed video file and click on the ''Save'' icon to begin downloading it to your preferred location on your Mac PC.

Part 4. How to Reduce MP4 File Size on Mac with VLC
VLC is another media player that also holds the ability of reducing MP4 file size Mac. Besides helping you play and edit the video, VLC also empowers you to reduce MP4 video size Mac. It supports multiple video formats and gives you better control of your video's file properties than QuickTime. For instance, you can customize the bitrate, codecs, and audio channel courtesy of the VLC.
Here's how to reduce MP4 file size on Mac via VLC.
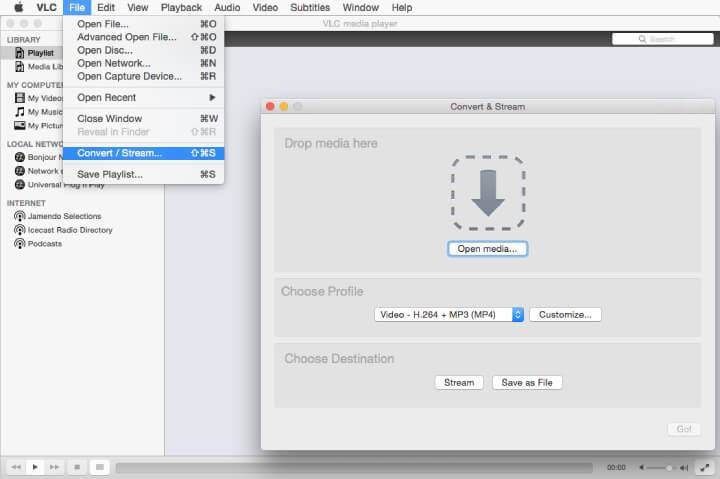
Step 1.Launch the VLC Media Player on your Mac, tap the File icon, and select the Convert/Stream icon.
Step 2.Click on the '' Open media'' icon and select the video you'd like to compress the size of Choose -H.264+AAC after navigating to the ''Choose Profile'' icon.
Step 3.Choose the target output file folder after visiting the '' Choose Destination section'' icon.
Step 4.Start reducing MP4 file size Mac by hitting the '' Save'' icon.

Part 5. How to Reduce Videos Size on Mac with Handbrake
After using all the tools mentioned above to reduce video size on Mac, you can also try out the Handbrake to do the same. Handbrake is a brilliant video transcoder that comes up with various features to tinker with the settings of your video.
So, reducing MP4 file size Mac is pretty much possible, and all you need to do is follow the guide below to know how to reduce video file size on Mac through Handbrake.
Step 1.After loading the video into Handbrake, you'll need to launch the dropdown menu after finding the Presets. Now, you can see multiple profiles for Production, Matroska, Devices, and Web. You can make your video size smaller by choosing a smaller profile, including Web > Gmail having a lower resolution.
Step 2.Choose the H.265 as your video Codec after hitting the Video tab. You can select H.264 as your output codec if you face an issue setting the H.264 codec.
Step 3.Select an output folder after hitting the Browse icon. Next, start compressing the video file by hitting the ''Start Encode'' icon.
Final Words
If you need to learn about the ways of reducing MP4 file size Mac, you can take notes from this guide. Out of all the ways we've revealed in this guide to reduce MP4 file size Mac, HitPaw Univd for Mac is considered the best, most recommended, and most reliable option. Apart from assisting you to reduce video size on Mac without tinkering with video quality, HitPaw Univd also offers a simple user interface.



 HitPaw Univd (Video Converter)
  HitPaw Edimakor
 HitPaw VikPea (Video Enhancer)


Share this article:
Select the product rating:
Daniel Walker
Editor-in-Chief
My passion lies in bridging the gap between cutting-edge technology and everyday creativity. With years of hands-on experience, I create content that not only informs but inspires our audience to embrace digital tools confidently.
View all ArticlesLeave a Comment
Create your review for HitPaw articles