FFmpeg Compress Video: How to Compress Video with FFmpeg
In today's digital age, video content has become a crucial part of our daily lives, be it for entertainment, education, or professional purposes. However, high-quality videos often come with large file sizes, making it challenging to store, share, or stream them efficiently. Fortunately, video compression tools like FFmpeg offer a solution to this problem, allowing you to reduce the file size without compromising quality. In this guide, we'll explore the art of FFmpeg compress video and introduce you to an alternative that simplifies the process.
Part 1. FFmpeg Compress Video: An Introduction to Video Compression
FFmpeg is a powerful, open-source multimedia framework that can encode, decode, transcode, and stream audio and video files. It supports a wide range of codecs and file formats, making it an indispensable tool for video professionals and enthusiasts alike.
While FFmpeg compress video is incredibly versatile, its command-line interface can be daunting for beginners, which is where user-friendly alternatives like HitPaw Video Converter come into play.
Benefits of using FFmpeg for Video Compression
- Cross-platform compatibility (Windows, macOS, Linux)
- Support for a vast array of codecs and file formats
- Highly customizable with advanced settings
- Free and open-source software
The Steps to Compress Video in FFmpeg
Step 1:Download the FFmpeg ZIP file from the official FFmpeg website. This powerful, open-source tool is the key to unlocking efficient video compression.
Step 2:Once the download is complete, extract the ZIP file and save it to a location of your choice on your computer. Alternatively, if you prefer a more streamlined approach, you can utilize package managers like Chocolatey to install FFmpeg directly through the command window.

Step 3:Now, Open the PowerShell or Command Prompt on your PC and prepare to follow these instructions carefully. The command line we'll discuss is the default command line for any conversion process.
- The first line simply invokes FFmpeg itself.
- Next, specify the input file you wish to compress, including its name and format (e.g., MP4, AVI, H.264, H.265).
- Finally, determine the name and format of your output file - this is where your compressed masterpiece will reside.

Step 4:For basic compression tasks, these command lines should suffice, as they handle both compression and conversion internally. However, if you're aiming for the best possible quality compression, you'll need to delve a little deeper by selecting a suitable container, compression codec, low bitrate, and frame rate. The commands to fine-tune these video parameters are:
- c:v: Specifies the video codec
- b:v: Adjusts the video bitrate
- c:a: Select the audio codec
- b:a: Modifies the audio bitrate
- f: Determines the container format (e.g., f avi, f mp4, f mp3)
Step 5:Now, let's put theory into practice with a couple of examples that demonstrate how to convert and compress video files from one format to another.
Example 1: Compressing and Converting AVI to MP4
ffmpeg -i input.avi -vcodec libx265 -crf 28 output.mp4
Example 2: Compressing and Converting H.264 to H.265
ffmpeg -i input.mp4 -vcodec libx265 -crf 24 -fps 30 output.mp4
In these examples, libx265 is a library file specifically designed for video compression within FFmpeg.
For a deeper understanding of command lines and advanced compression techniques, we recommend consulting the official FFmpeg documentation. This resource will equip you with the knowledge to tackle even the most intricate video compression challenges.
Furthermore, if you're proficient in coding languages like Python, you can explore the exciting world of FFmpeg packages, opening up new possibilities for compressing videos through programming.
While this basic command works for most cases, FFmpeg offers a wide range of advanced options and settings to fine-tune the compression process. However, for those seeking a more user-friendly approach, alternatives like HitPaw Video Converter provide a seamless and intuitive experience.
Part 2. Best Alternative to Compress Video Without Quality Loss
HitPaw Video Compressor is a comprehensive multimedia solution that offers a user-friendly alternative to command-line tools like FFmpeg. With its intuitive interface and powerful features, this Converter simplifies the video compression process, ensuring you can reduce file sizes without sacrificing quality.
Features of HitPaw Video Compressor
- Lossless compression: HitPaw Video Converter utilizes advanced algorithms to compress videos while preserving the original quality, ensuring your content remains crisp and vibrant.
- Support for 1000+ formats: Whether you're working with MP4, AVI, MKV, or any other popular video format, HitPaw Video Converter has you covered.
- Batch processing: Save time by compressing multiple videos simultaneously with HitPaw Video Converter's batch processing capabilities.
- GPU acceleration: Take advantage of your computer's graphics processing unit (GPU) to speed up the compression process, making it faster and more efficient.
- Built-in video editor: Enhance your videos with HitPaw Video Converter's built-in editor, which allows you to trim, crop, rotate, and apply filters to your content.
- Device optimization: Compress videos specifically for your preferred devices, such as smartphones, tablets, or smart TVs, ensuring optimal playback and compatibility.
Step-by-Step Guide to Compress Video
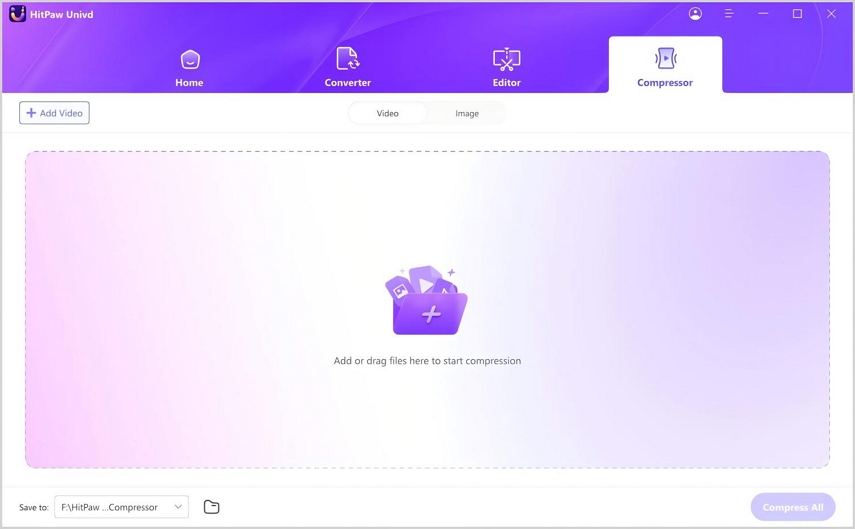
Step 1:Download and install the HitPaw Video Converter on your computer. Launch the software and select the "Video Compressor" feature from the Toolbox.

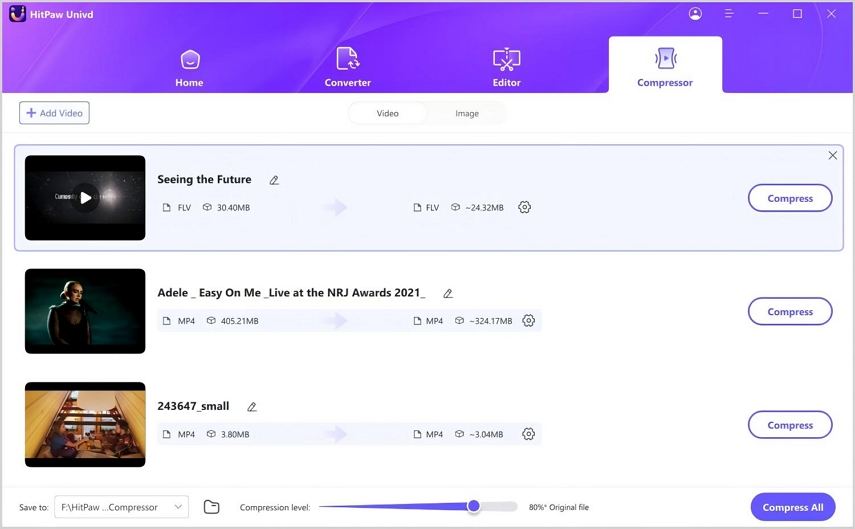
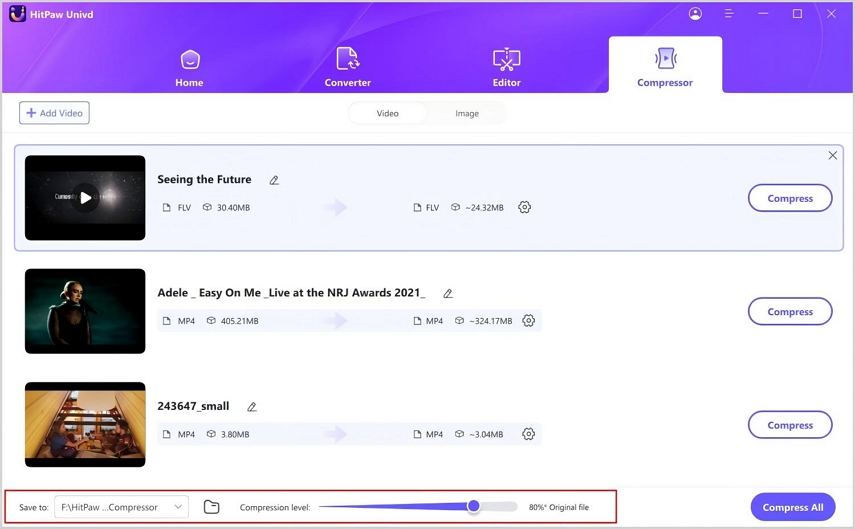
Step 2:Click "Add Video" to import the video files you want to compress. You can add multiple files simultaneously.

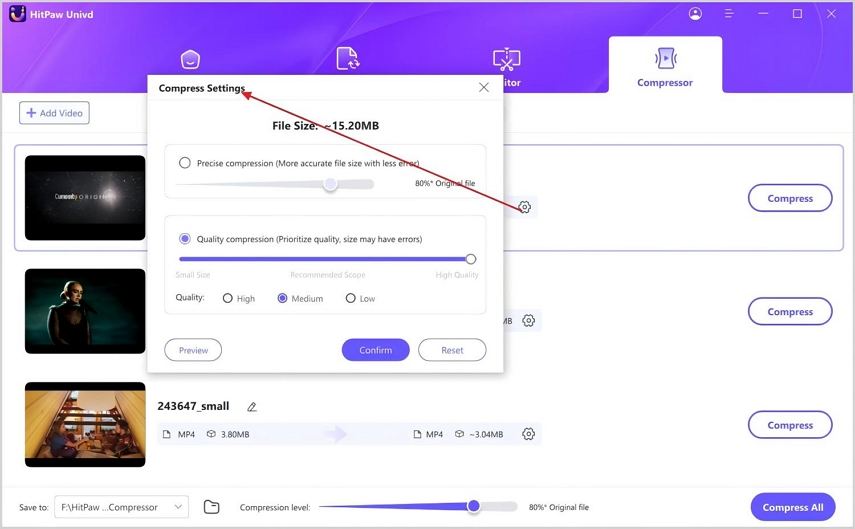
Step 3:Once the videos are loaded, click the gear icon next to each file to adjust the compression settings. You can choose the desired compression level, output format, and other options. You can see the “Preview” button, by clicking on the preview button you can see video with compression effects.

When you select a compression level from the lower left corner, it will be applied to all files listed. We suggest using the medium compression level. You can observe the size of the video before and after compression in the file list.

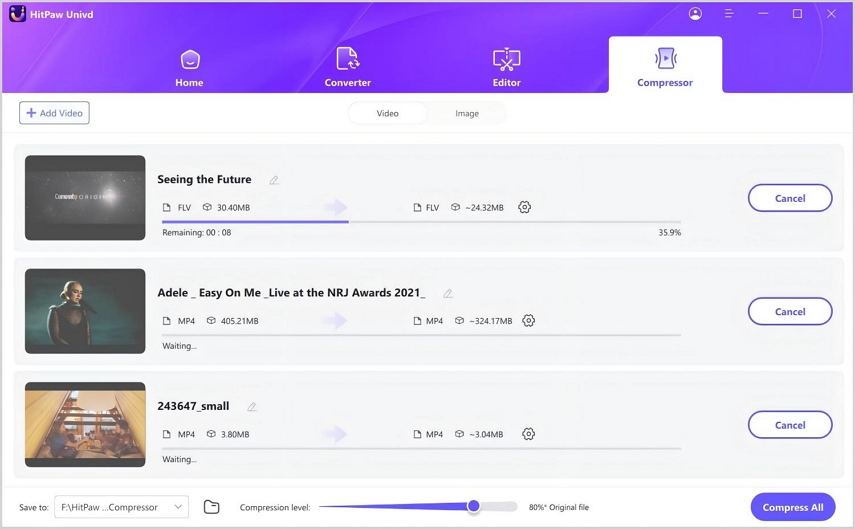
Step 4:After configuring the settings, click the "Compress" button to start the compression process for a single file, or "Compress All" to compress multiple files simultaneously.

Step 5:HitPaw Video Converter will display the compression progress. Once completed, you can access the compressed video files in the specified output folder.
By following these simple steps, you can effortlessly compress your videos without compromising quality, saving valuable storage space and ensuring seamless sharing and streaming.
Conclusion
In the ever-evolving world of digital media, the ability to FFmpeg compress videos efficiently while maintaining quality is an invaluable skill. Whether you're an avid video enthusiast, a professional content creator, or simply looking to optimize your storage space, tools like FFmpeg and HitPaw Video Compressor offer powerful solutions.
With FFmpeg's versatility and command-line precision, or HitPaw Video Compressor's user-friendly interface and advanced features, you can now confidently tackle any video compression task, ensuring your content remains visually stunning while occupying minimal storage space.



 HitPaw VikPea
 HitPaw Watermark Remover


Share this article:
Select the product rating:
Joshua Hill
Editor-in-Chief
I have been working as a freelancer for more than five years. It always impresses me when I find new things and the latest knowledge. I think life is boundless but I know no bounds.
View all ArticlesLeave a Comment
Create your review for HitPaw articles