How to Compress Video Without Quality Loss on PC/Mac/Online
How to compress video without losing quality? Optimizing video quality while reducing files size is essential to attract viewers attention, reduce upload time, and cut expenses. While this may not be an easy feat to achieve, there are compression guidelines and tips to let you know how to compress video files without losing quality. This article shall highlight the several ways and suitable tools to shrink video file size and maintain it's quality.
Part 1. The Top Choice to Compress Video without Losing Quality on PC & Mac
Univd Video Compressor delivers lossless video compression for MP4, MOV, MKV, and 1000+ formats on Windows and Mac. Our cutting-edge lossless compressor is engineered to reduce 4K/8K file sizes without sacrificing quality using AI-powered H.265 encoding. Also, it provides a batch compression feature that can elevate the video compression workflow. Ideal for compressing social media clips, professional footage, and large archives while retaining original quality. Whether a content creator or a professional videographer, you can reduce video size to meet all your needs. Also, it provides a batch compression feature that can elevate the video compression workflow.
What Makes Univd the Best Lossless Video Compressor?
- H.265/HEVC encoding slashes file sizes without compromising 4K/HD clarity.
- Batch compression processes 500+ videos simultaneously for workflow efficiency.
- Smart bitrate control auto-adjusts settings for optimal quality-to-size ratios.
- Reduce video size for Discord, Email, YouTube, and other social media.
- Frame-by-frame preview ensures zero quality loss before exporting.
- Local processing guarantees data privacy with no cloud uploads required.
- All-in-one media toolbox: Video Converter, Video Editor, Video Noise Remover, Image Compressor, etc.
Steps to Compress Videos without Losing Quality on Windows
To compress video file without losing quality in HitPaw Univd, you just need to perform several clicks.
-
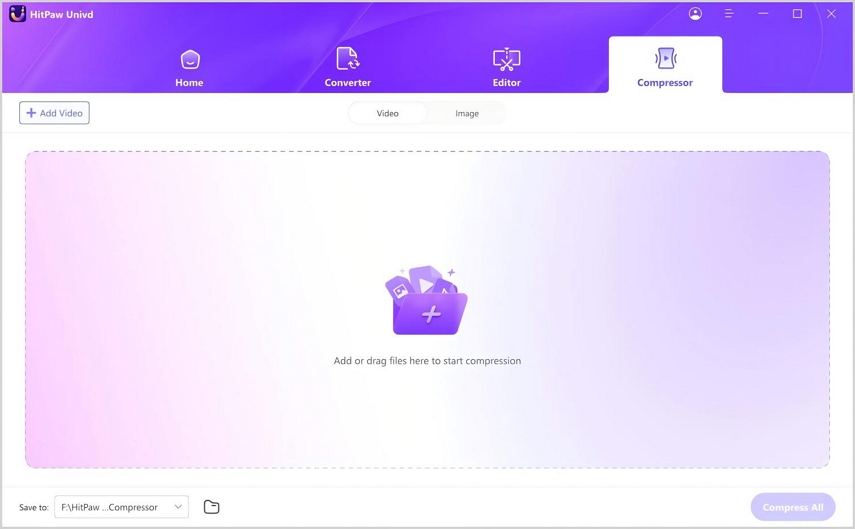
Step 1.Free Download and install HitPaw Univd to a computer, and go to the Compressor section.

-
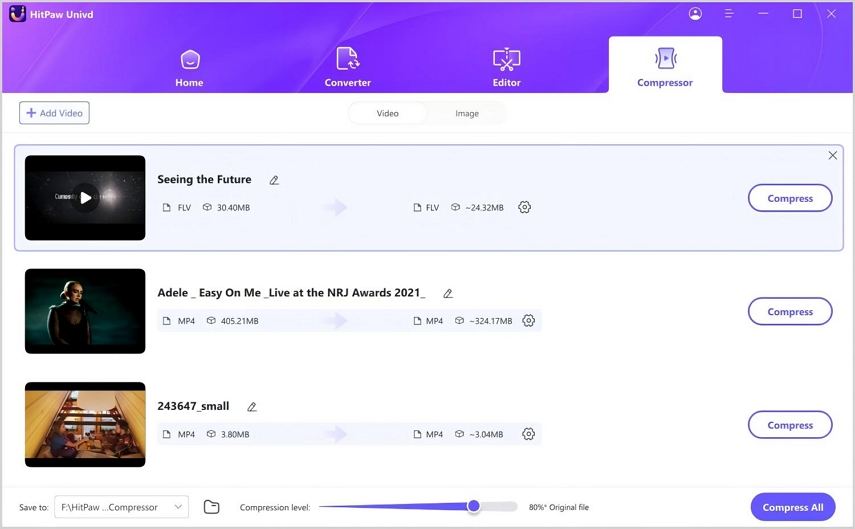
Step 2.Click Add Video to import your files. Here we will import MP4 files to see how to compress mp4 without losing quality.

-
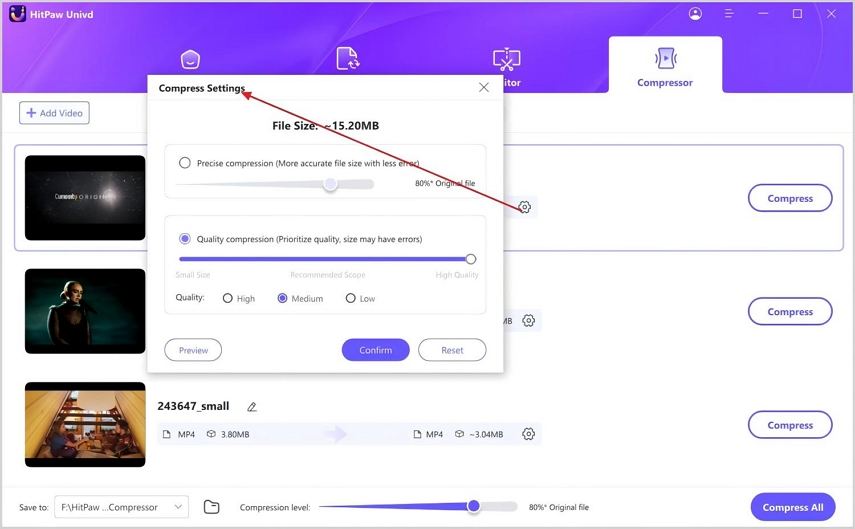
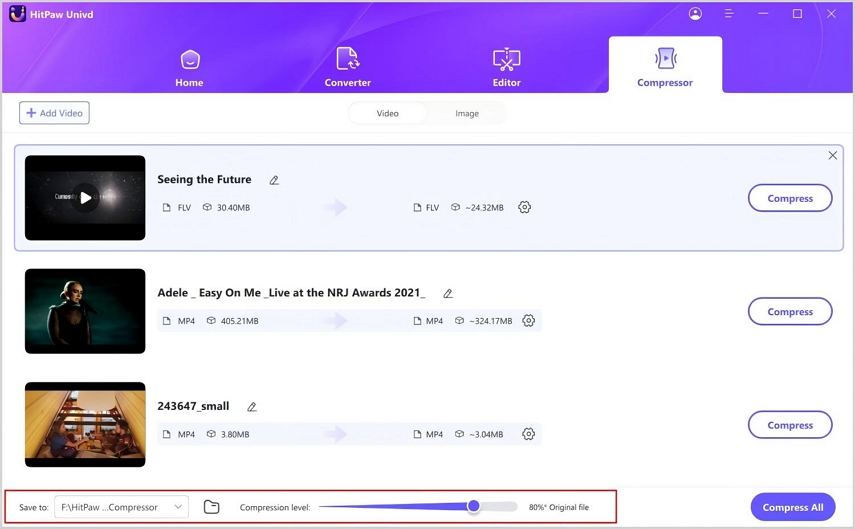
Step 3.Now, we can click the gear icon to choose an appropriate compression level and quality for that file. Precise Compression allows you to shrink videos to exact target sizes, ideal for meeting strict size limits on social media platforms and email attachments. Quality Compression reduces file sizes without compromising visual fidelity, perfect for marketing teams and content creators needing high-quality videos with minimal storage or bandwidth demands. You can use the Preview feature to make sure the quality and size are both to achieve your needs.

If you want to compress multiple videos with the same compres ratio, you can choose a compression level from the bottom.

-
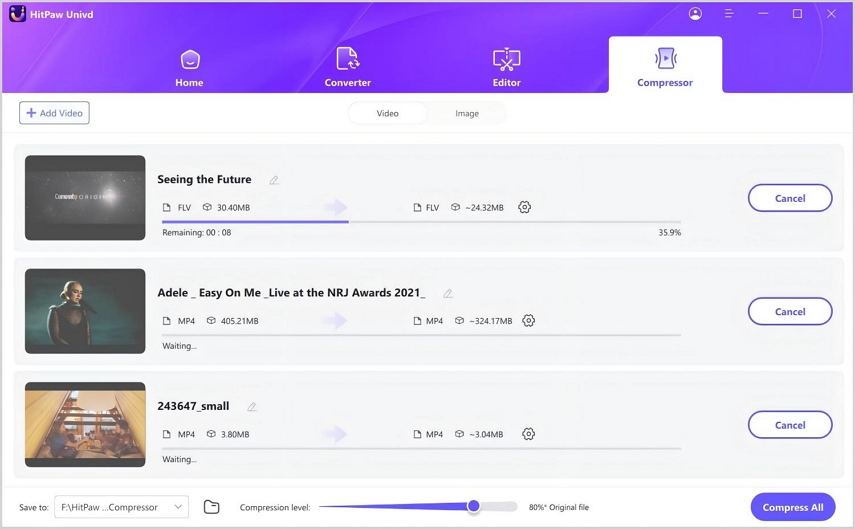
Step 4.Lastly, click the Compress or Compress All button to start reducing video file size without losing quality.

That is it. You have successfully compressed videos without losing quality with HitPaw Univd.
Part 2. Free Ways to Compress Video with No Quality Loss
There are other ways to compress and reduce video size free.
Way 1. Compress Video Using VLC
VLC is a video and audio media player that performs video compression functions. VLC offers accessible tasks on how to compress files without losing quality.
1. How to Compress Videos with VLC on Windwos
-
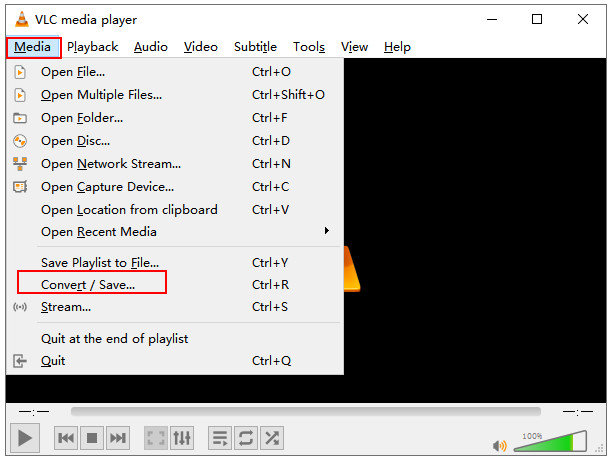
Step 1.Install and then open VLC, click on Media, Convert/Save.

-
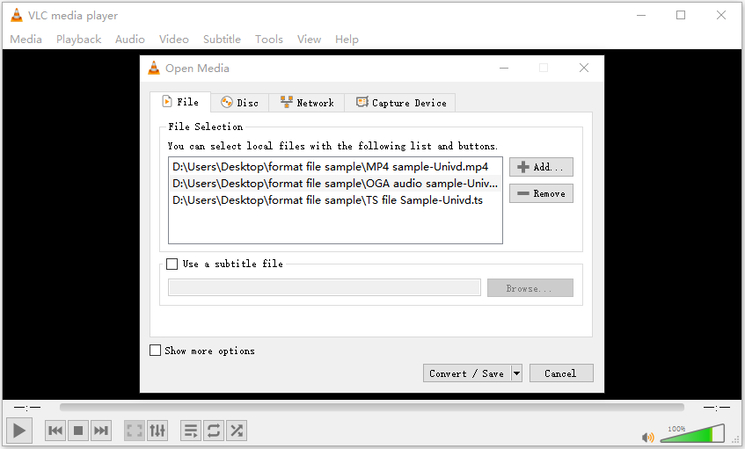
Step 2.Under the File option, click Add to upload your video. Click on Convert/Save.

-
Step 3.Select the video format you want to convert to.
-
Step 4.Click the wrench icon beside the format.
-
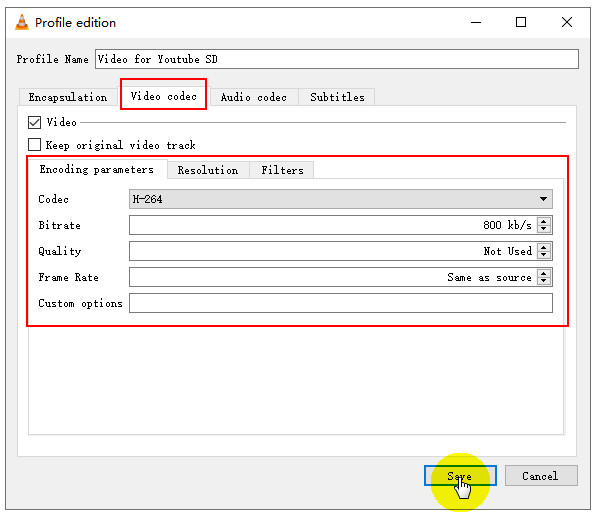
Step 5.Click video codec,change the encoding parameters and resolution.

-
Step 6.Click Save, choose a destination and click start to compress your video.
2. How to Compress Videos with VLC on Mac
- Install and launch the VLC application on your device.
- Open the app, click on files, convert stream, click open media and select a video file.
- Choose a preset.
- Click on customize.
- Go to the Video codec page.
- Reset bit rate (don't go below 1000 bit rates per second).
- Click save as file.
- Select browse, choose a name for the file, and choose a destination folder and click save.

Pros and Cons of Compressing Videos Using VLC
Pros
- No cost, and no need for third-party software.
- Works on Windows, macOS, and Linux.
- Compresses MP4, AVI, MKV, and more.
Cons
- VLC lacks advanced AI-based compression, so quality loss may occur.
- Cannot efficiently compress multiple videos at once.
- Compression can be time-consuming, especially for large files.
- No real-time preview of compressed output before saving.
- Doesn’t offer deep optimization like professional video editors or AI-powered tools.
Way 2. How to Reduce Video File Size Using Zip
Zipping a file refers to the reduction of the file size while maintaining the quality. Although the file size may not be significantly reduced, the file contents are not lost, and the file can be effectively shared.
There are different steps for zipping files for Mac Operating System and Windows Operating System.
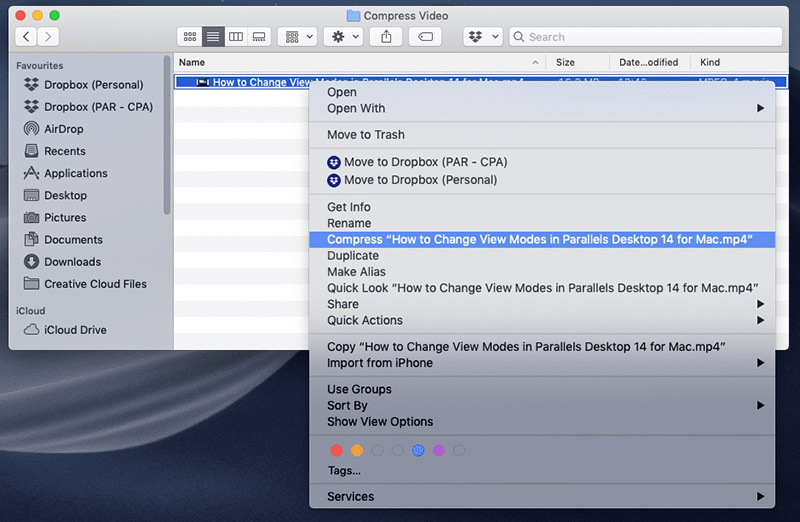
1. How to Compress Video Files on Mac Using Zip
- On the video file, right-click.
- Select Compress file.
- Follow the laid out steps.
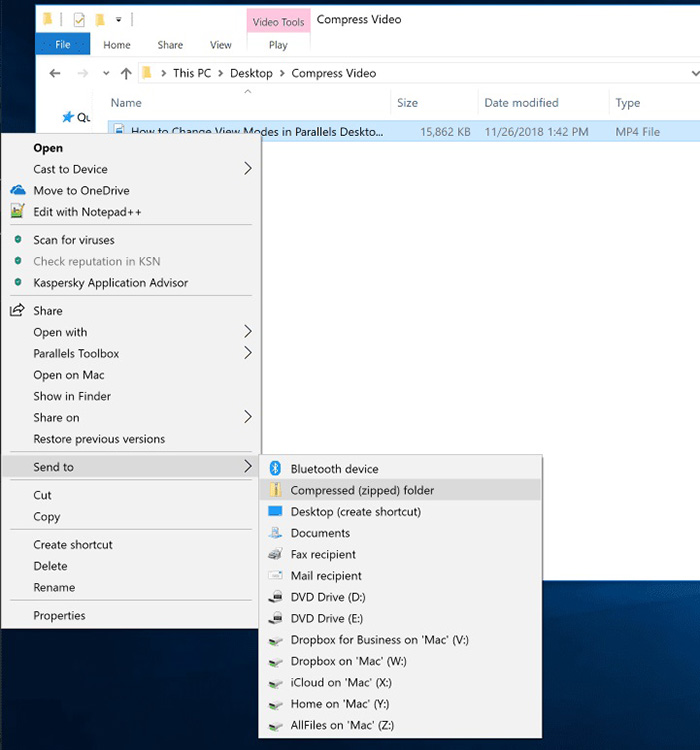
2. How to Ccompress Video Using Zip on Windows
- On the video file, right-click.
- Click on 'Send to.'
- Select Zipped compressed folder.
Benefits and Drawbacks of using Zip Compress Video
Pros
- Simple right-click compression without needing extra software.
- Can reduce file size, though not significantly for videos.
- ZIP files can be password-protected for added security.
- Multiple videos can be compressed into one ZIP folder.
Cons
- Videos are already compressed formats (e.g., MP4, MKV), so ZIP often reduces size by only a few percent.
- The recipient must unzip the file before watching, adding an extra step.
- Large files may still be too big for email or online sharing.
- If you need to watch or edit the video often, unzipping each time is inconvenient.
Way 3. How to Compress a Video File with Cloud Service
Video Files can be compressed without losing quality with cloud services like Google Drive and Dropbox.
1. Compressing Videos using Dropbox
Dropbox is a video storage cloud service that supports the sending and storage of large video files. This tool allows Dropbox account holders to transfer video files through links for sharing, stream, and download. In Dropbox, file size sure is limited to the subscribed plan.
To share compressed video files on Dropbox without losing quality, follow these steps;
- Search dropbox.com on any browser.
- Click on the website.
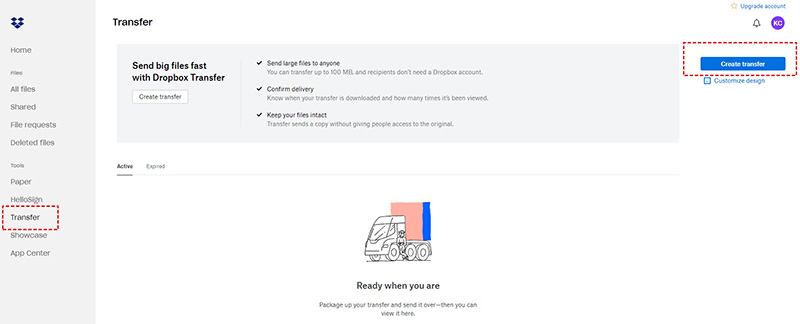
- On the top left corner of the screen, click on the grid icon.
- On the menu, select Transfer.
- Choose the 'Create transfer' option.
- Add files to the transfer option by selecting 'add from Dropbox', dragging abs dropping the files' or clicking on the plus icon.
- Enter a new name for the transferred file by clicking on the edit icon.
- Set an expiration date by clicking on the gear icon.
- Select the create transfer option.
- Select 'send transfer' and choose your option. You can select with mail or copy link.
2. Compressing Files on Google Drive
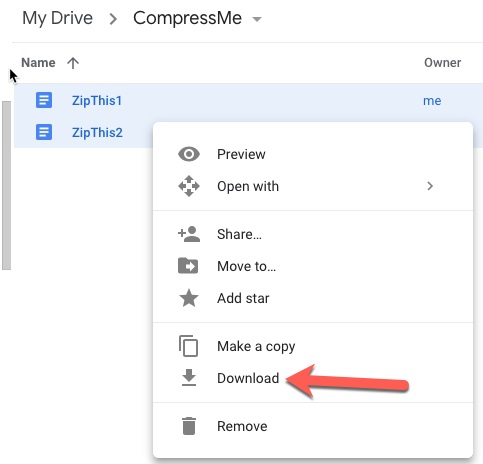
Multiple or single files can be compressed on Google Drive. To compress files:
- Open Google Drive.
- Select the file or file ( folders can also be selected).
- On the file, right-click.
- Press Download.
- Allow the file to download and access the compressed file.
Pros & Cons of Cloud Services to Reduce File Size
Pros
- Compress videos for smooth online playback without requiring manual compression.
- No need to install third-party compression tools; simply upload and share.
- Access videos from any device and share them via a simple link.
- If backed up to Google Photos, videos can be automatically resized to save space.
Cons
- Users cannot customize compression settings like bitrate, resolution, or format.
- Free Google Drive accounts have a 15GB total storage limit, and large videos may require additional storage.
- Uploading and downloading large videos can be slow and require a stable internet connection.
- Uploaded videos are stored on Google’s servers, raising potential data privacy issues.
Way 4. Free Compress Video Files on Mac Using QuickTime
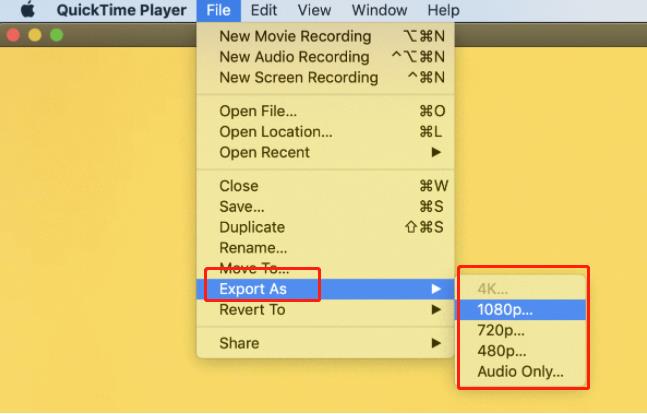
QuickTime Player is an editing/video compressing tool that defaults on Mac Operating System. To Compress videos in QuickTime:
- Open the QuickTime app.
- Click on file.
- Load the video by opening the file.
- Click in the file of your choice.
- Click on Export As.
- Select the resolution of your choice from the list.
- Rename the video.
- Choose the new file destination.
- Click on save.
Pros and Cons of QuickTime to Shrink File Size
Pros
- No need to install third-party software if you're a Mac user.
- Easy-to-use interface with basic export options for compression.
- Allows exporting videos in lower resolutions (e.g., 720p, 480p) to reduce file size.
- Unlike some free online compressors, QuickTime doesn’t add watermarks.
Cons
- No ability to adjust bitrate, codec, or advanced settings.
- Not available for Windows users (latest versions).
- Cannot compress multiple videos at once.
- Compression is mainly done by lowering resolution, which can affect visual clarity.
- Primarily supports MOV and MP4 formats, lacking broader codec options.
Part 4. How to Compress Video Without Losing Quality Online
Online video compressing sites offers guidelines on how to compress video without losing quality online to any format without requiring the download or installation of any application to your device. The software works directly with a browser, reduces file size, and maintains video qualities, allowing users to preview and download the compressed file into their device.
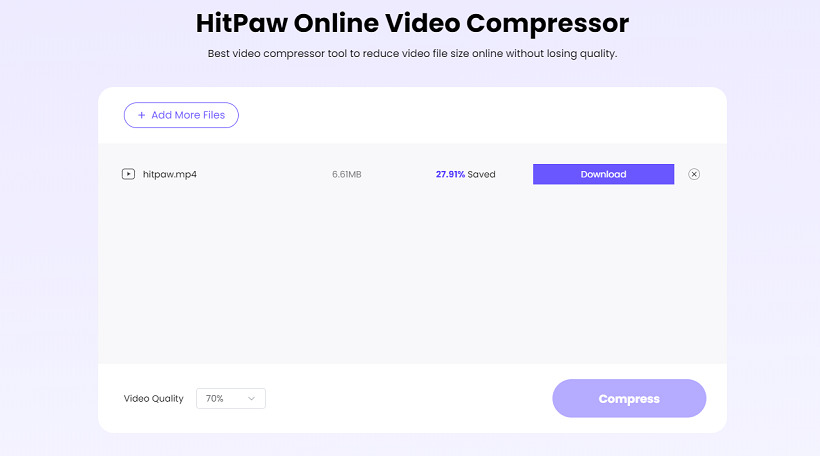
An example of such tools to compress video size without losing quality is the HitPaw Online Video Compressor. It is a free file reduction tool compatible with Android, iPhone, Windows, and Mac Operating System.
How to Compress Video Files With HitPaw Online Video Compressor
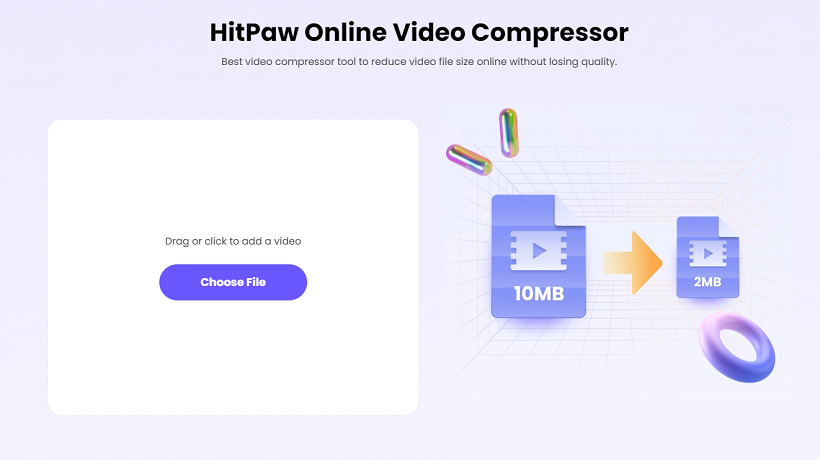
1.Access to HitPaw Online Video Compressor on your web browser.

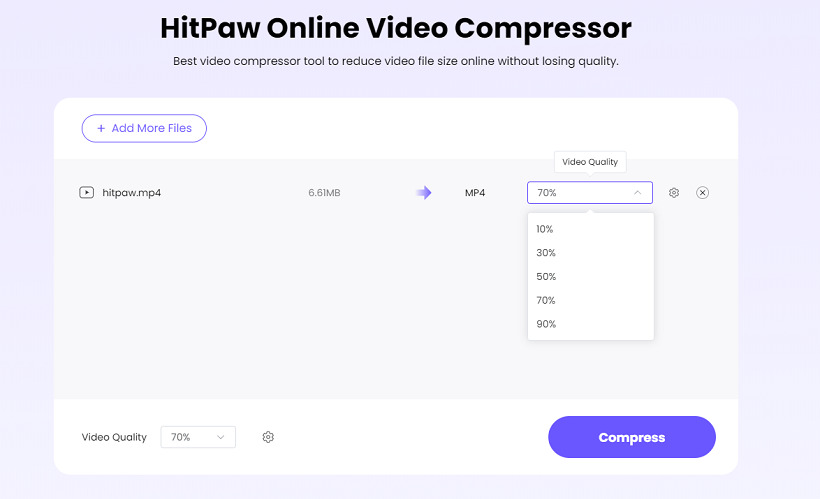
2.Import the video files for free video compression online, and choose the compress settings for the video to a desired fize size.

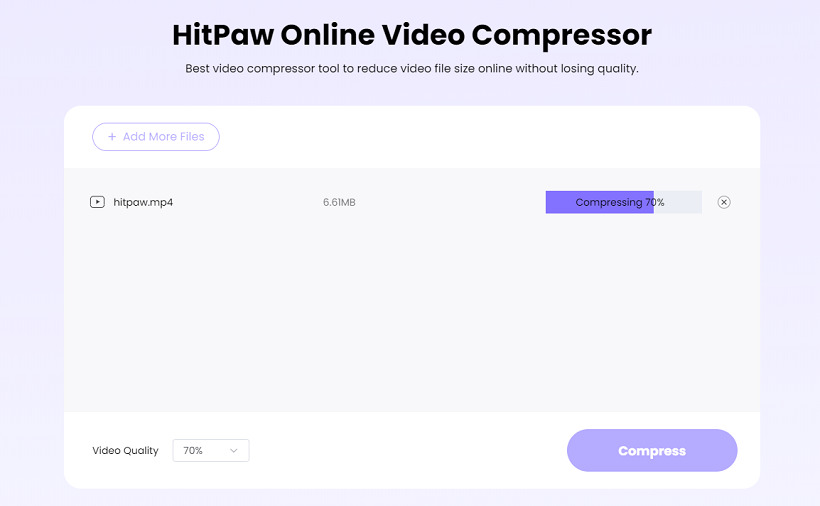
3.Click the Compress button to start reducing the video file size.

4.After the compression is finished, you can click the Download button to save the compressed videos.

FAQs about Compress Video Without Losing Quality
Q1. What's the Most Recommended Resolution and Video Quality?
A1.The video resolution entails the amount of data contained in the frame. The quality of the video is significantly related to the screen; hence higher resolutions may not be sacrosanct.
- For smaller web content, a 720p resolution is acceptable.
- But a more satisfactory video resolution is the 1080p. The 1080p is a clear HD video resolution with reduced storage space and is suitable for smartphones and YouTube videos.
Q2. How to Decrease File Size?
A2. HitPaw Univd is the best choice for you to decrease the video, audio and photo files without losing quanlity.
The Bottom Line
This article provides guidelines on how to reduce video file size without losing quality on applications and software. Video files can be compressed and retain quality using tools like the VLC application, zip, QuickTime Player, the top recommended HitPaw Univd for batch compress. Also, the 1080p is a very suitable video resolution when uploading video files on social media platforms like YouTube.



 HitPaw VikPea
 HitPaw Edimakor


Share this article:
Select the product rating:
Daniel Walker
Editor-in-Chief
My passion lies in bridging the gap between cutting-edge technology and everyday creativity. With years of hands-on experience, I create content that not only informs but inspires our audience to embrace digital tools confidently.
View all ArticlesLeave a Comment
Create your review for HitPaw articles