How to Effectively Remove Background in Camtasia
If you want your videos to look more appealing and professional, it is important to remove background. A clear background makes your subject stand out and focuses your audience's attention on the important things, whether you're a teacher, content provider or business professional.
You're lucky if you use Camtasia. With the help of this robust video editing tool, replacing or removing backgrounds is simple and doesn't require complex knowledge. In this detailed guide, i will guide you step-by-step through the process so you can produce amazing videos. Let's get started to know how Catmasia remove background.
Part 1. Understanding Background Removal in Camtasia
A. Importance of Background removal in video editing
It is very important to remove the background for professional-looking videos, because when you remove the background you will have certain advantages:
- Professional Look: Your material will appear clean and professional if distracting or unnecessary backdrops are removed.
- Enhanced Focus: Assists in bringing the subject into focus and clarifies your message.
- Creative Freedom: It’s the ability to change the background to anything you like, such as a branded color, an eye-catching image, or a virtual environment.
- Versatility: Ideal for marketing films, product demos, online courses, and other situations where backdrop clarity is important.
B. Overview of camtasia capabilities
Camtasia is a user-friendly video editing tool that makes background removal quite easy and simple. Here's a quick view of what it offers:
- Green Screen Effect: This allows you to use the chroma key technology which removes the green or blue backgrounds effectively.
- Customizable Settings: Change tolerance and softness to create a strong integration to the background.
- Ease of Use: With an intuitive interface, even beginners can achieve professional results without a steep learning curve.
- All-in-one Solution: It's not merely a background removal tool, though. Camtasia has an all-in-one solution with the ability to record screens, trim videos, apply transitions, and add annotations.
Part 2. The Basics of Removing Backgrounds in Camtasia
A. Explanation of the features that Facilitate Background Removal
Camtasia is a simple tool to make background removal process simple and easy. Here are the features of Camtasia that facilitate background removal. Because of these features, Camtasia is a flexible choice for content producers who want to add expert effects to their videos.
- Remove a Color (Chroma Key): With a few clicks, you can get rid of a solid-colored background like blue or green.
- Tolerance Adjustment: For cleaner results, adjust the amount of color removal.
- Edge Softness: To provide a smooth transition between the subject and the new background, smooth out any sharp edges.
- Opacity Controls: If necessary, apply transparency to particular areas of your video.
B. Step-by-step guide on how to remove background in Camtasia
Here’s a step-by-step guide to remove background in Catmasia:
1. Import Your Media: Open Camtasia and import the video you want to edit. Drag the video to the timeline.
2. Add the "Remove a Color" Effect: Go to the Visual Effects tab in the toolbar and drag the Remove a Color effect onto your video clip on the timeline.
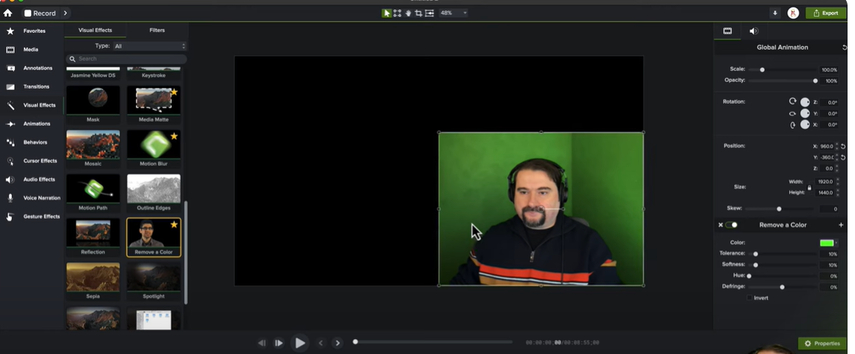
3. Select Background Color: Open the Properties Panel, if not visible, enable it via the View menu and use the Color Picker to select the background color you want to remove, usually green or blue.
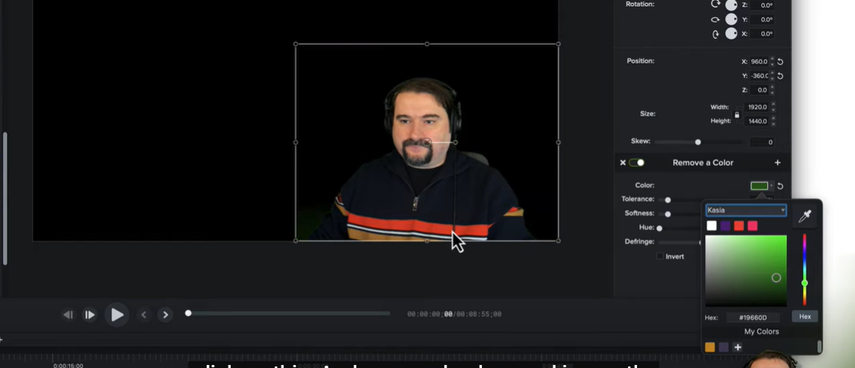
4. Adjust Settings for Precision
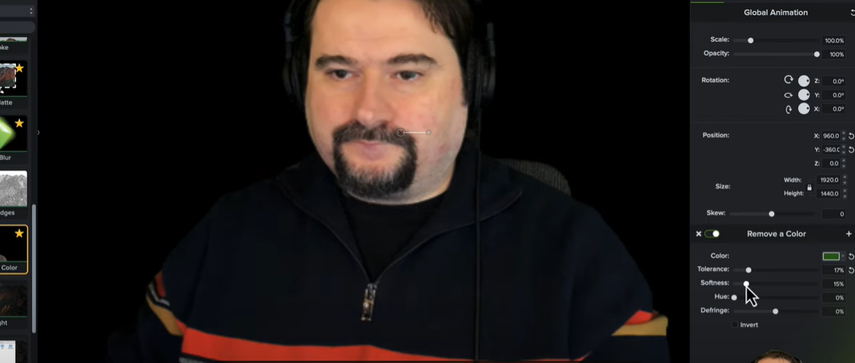
- Tolerance: Adjust this slider to fine-tune how much of the selected color is removed.
- Softness: Smooth the edges of the subject for a cleaner look.
- Opacity: Modify transparency if necessary to avoid any remaining background shadows.
5. Replace the Background: Drag your desired background image or video to the timeline below your primary clip. Adjust its position and size to fit the scene seamlessly.
6. Preview and Export: Play the video to ensure everything looks good. Once satisfied, export your video.
C. Tips for Achieving Optimal Results Without a Green Screen
Are you facing a green screen issue? Don’t worry. Here I will provide you the tips to camtasia remove background without green screen to get optimal results:
- Maintain Consistent Lighting: Background removal is much easier by even lighting, which lessens shadows.
- Use a Plain Background: An alternative to a green screen is a solid-colored background, like a blank wall.
- Avoid Clothing Conflicts: To avoid having portions of your subject eliminated, make sure they aren't wearing a color that matches the background.
- Improve in Post-Production: To fine-tune the removal, play around with Camtasia's tolerance and softness settings.
Part 3. Advanced Techniques: Camtasia Remove Background Without Green Screen
A. Techniques for effective background removal without a green screen
Removing a background without the green screen requires great planning and attention to detail. Here's how to make the best of it:
- Use a Solid-Color Background: Choose a simple, unpatterned background with simple colors to easily separate background from subject.
- Proper Lighting: Lighting can be consistent, even without causing shadows or reflections that interfere with the background removal
- Contrasting Wearing Colour: Avoid clothes that bear colours close to the backgrounds so parts of your subjects will not accidentally be taken off.
- Reduce Motion Blur: Maintain steady movements, since abrupt movements are hard for Camtasia to distinguish between the subject and background.
B. Utilizing Camtasia’s Built-in Tools for better results
Camtasia offers Built-in tools to achieve clean background removal without a green or blue screen:
- Color Picker and Tolerance Adjustments: Use the Remove a Color tool and make a fine-tune to the Tolerance slider in order to isolate the color even though it is not green or blue.
- Edge Softness and Opacity Settings: Apply fine-tuning on the Softness slider for softer blends on edges, such as with hair or fine details.
- Overlay Techniques: If there are still background elements, overlay shapes or images to hide imperfections.
- Multi-Layer Editing: Use multiple clips on the timeline to mask or layer portions of the video to get a better result.
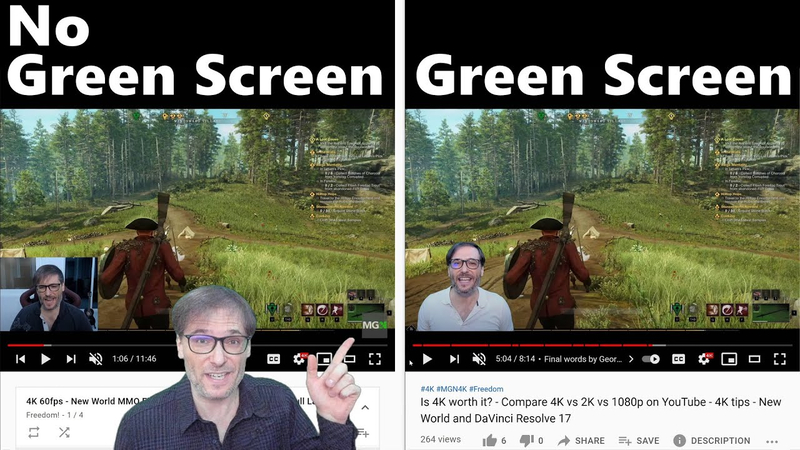
C. Comparison of results: Green Screen vs Non Green Screen
| Aspect | With Green Screen | Without Green Screen |
|---|---|---|
| Ease of Background Removal | Highly efficient and precise | More challenging and requires adjustments |
| Edge Clarity | Clean and seamless | May have visible artifacts |
| Lighting Sensitivity | Moderate | Shadows can impact results |
| Final Output | Professional-looking and polished | May require additional refinement |
Part 4. Exploring Alternatives: The Best Video Background Replacement Tool
While Camtasia is an effective application for video editing and background removal, alternatives such as HitPaw VikPea (formerly HitPaw Video Enhancer) provide more simplified options for video background replacement and editing.
HitPaw VikPea is a versatile and easy-to-use software for removing and replacing background images. It is aimed for creators who want fast, high-quality outcomes without the need for advanced editing skills.
Features
- Video backgrounds are automatically detected and removed without the need for a green screen.
- Includes options such as translucent backdrop, blur, and configurable fill with solid colors.
- Simple drag-and-drop capability allows for effortless video editing.
- Maintains quality, resulting in crisp and sharp images after editing.
- Perfect for e-commerce, presentations, and creative video projects.
Steps to Remove Background
Step 1. Download and install: To download the software, go to the official HitPaw VikPea website. Install it onto your computer.
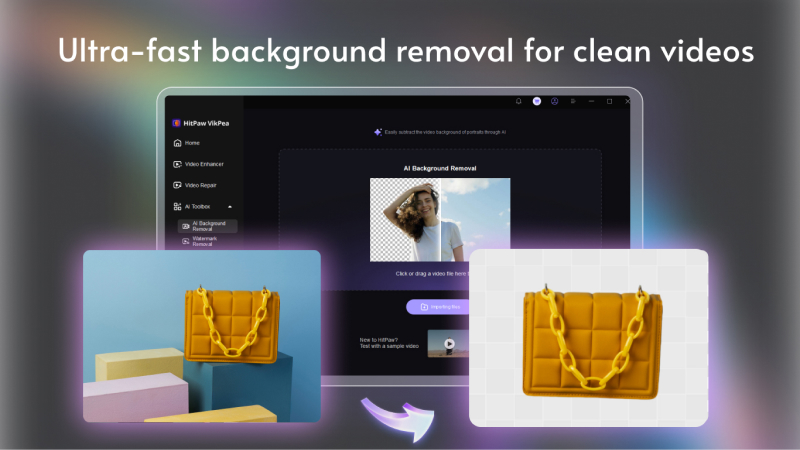
Step 2. Import your video: Open the software and go to the AI Background Removal module. Drag and drag your video file or select the Import Video File option.
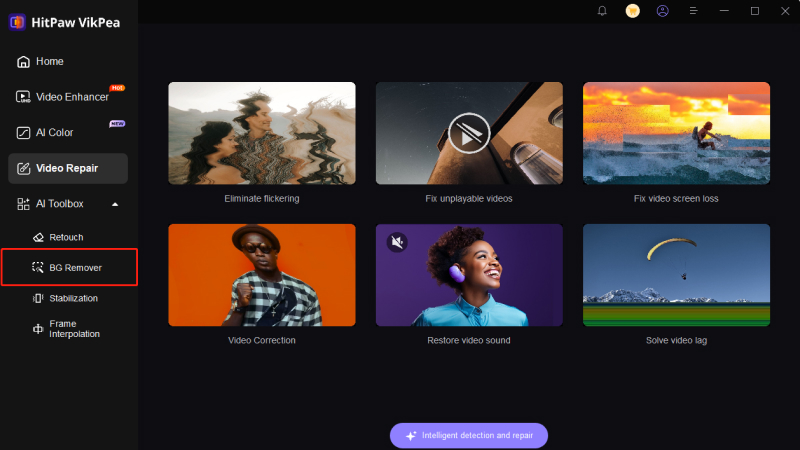
Step 3. Select Background Mode:
Choose one of three backdrop removal modes: select transparent background, blur background, background fill
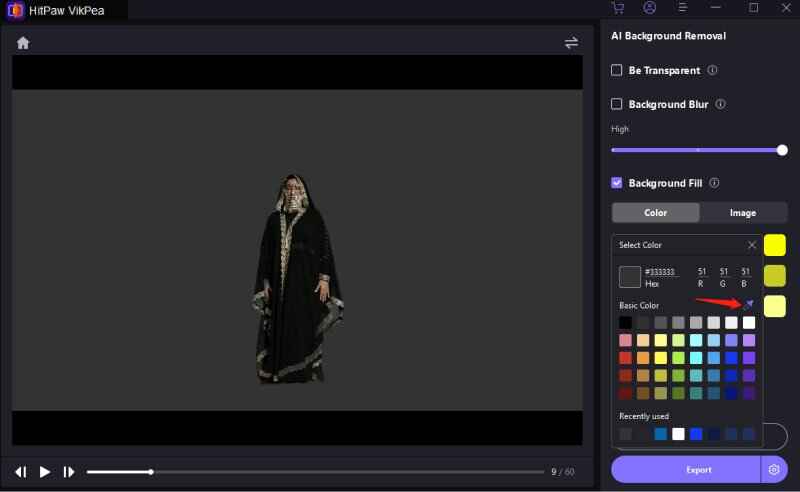
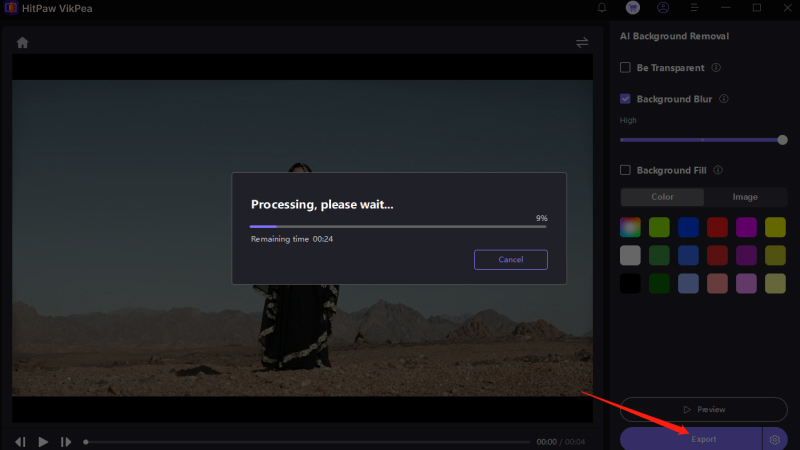
Step 4. Preview & Export: Check the adjustments to check that the background removal is satisfactory. Once completed, save the edited movie to your device.
Learn More about HitPaw VikPea Video Enhancer
Conclusion
Removing video backdrops is essential for creating polished, professional footage. Camtasia provides capabilities for green screens such as chroma keying, but HitPaw VikPea offers AI-powered background removal, which is ideal for non-green screen settings. Its user-friendly interface, configurable options, and high-quality results make it an excellent alternative for those who want to edit their backgrounds quickly and efficiently.


 HitPaw Edimakor
 HitPaw FotorPea
 HitPaw Univd (Video Converter)


Share this article:
Select the product rating:
Daniel Walker
Editor-in-Chief
My passion lies in bridging the gap between cutting-edge technology and everyday creativity. With years of hands-on experience, I create content that not only informs but inspires our audience to embrace digital tools confidently.
View all ArticlesLeave a Comment
Create your review for HitPaw articles