Effortlessly Convert SVG to PNG Using GIMP: Your Ultimate Guide
Web developers, graphic designers, and any other digital artists need to convert SVG files to PNGs. There is an efficient, free, open-source solution called GIMP, Image Manipulation Program that performs SVG to PNG conversion in excellent quality without loss of the original format. We will guide you through all these steps on how to convert SVG to PNG in GIMP easily.
Part 1: What are SVG and PNG?
Understand the need for conversion from PNG to SVG with the knowledge of their difference.
What is SVG?
SVG is known as Scalable Vector Graphics format. SVG graphics are produced with two-dimensional graphics using file descriptions based on lines, shapes, and color. This means SVG graphics can be resized to whatever dimension without loss in image quality. It's useful for logos, icons, and illustrations for the web and mobile apps.
What is PNG?
The PNG graphics format is good for those images often containing transparency. The problem with the PNG Image, unlike SVG, is that the image is pixel based and as such, being scaled won't produce a perfect image. PNG is heavily used for web graphics as they support an big channel.
Part 2: Step-by-Step Guide on How to Convert SVG to PNG Using GIMP
Converting a file SVG to PNG, GIMP is a vast tool with some powerful features. When working with PNG to SVG file cricut projects, tools like GIMP ensure precision and quality Follow these simple steps for a successful conversion:
1. Open the SVG File in GIMP
The first step is to open your SVG file in GIMP. Here's how:
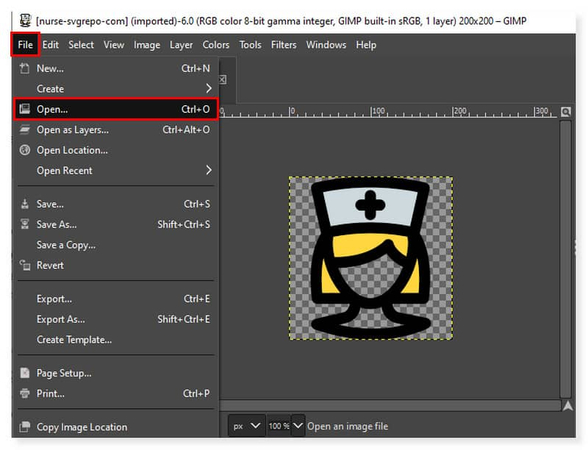
- Launch GIMP and go to File > Open.
- Browse to the location where your SVG file is stored and select it.
- GIMP will import the SVG file automatically, and you may be prompted toadjust the image resolution or size. Click OK to continue.
2. Adjust the Image Size
SVG files are resolution-independent, you may want to adjust the size of your image to match your desired output for PNG.
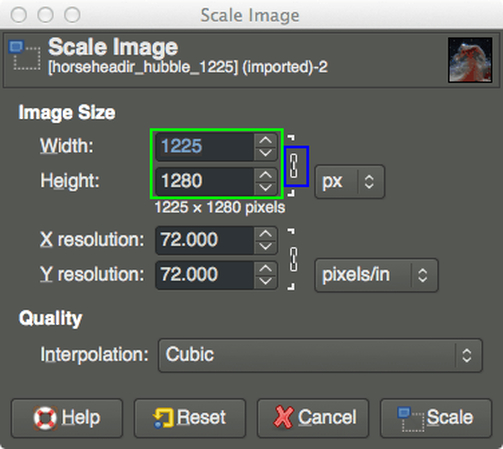
- Go to Image > Scale Image.
- In the pop-up window, set the image's Width and Height to whatever you want.
- Lock the width to height ratio so that the aspect ratio will not be distorted by unchecking the chain icon next to the width and height boxes.
3. Ensure Transparency
If your SVG file contains transparency that you need to preserve in the PNG file. Check for this:
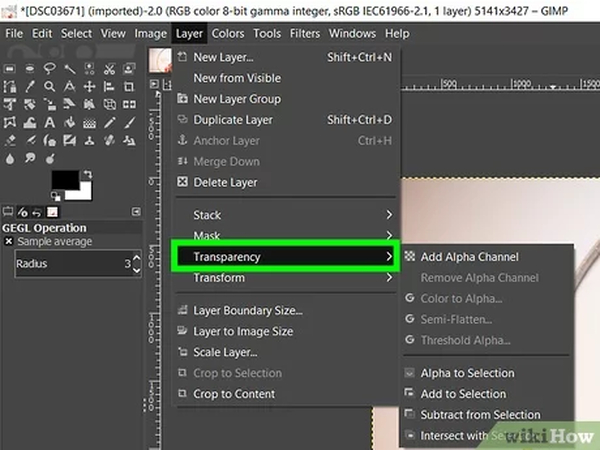
- Click inside the Layers panel to right click a layer. Now, it is done for you since Layers by default automatically adds the alpha channel for you in Photoshop CS.
- If necessary, delete unwanted background and remove by Color Tool highlighting the area you wish to delete.
4. Export as PNG
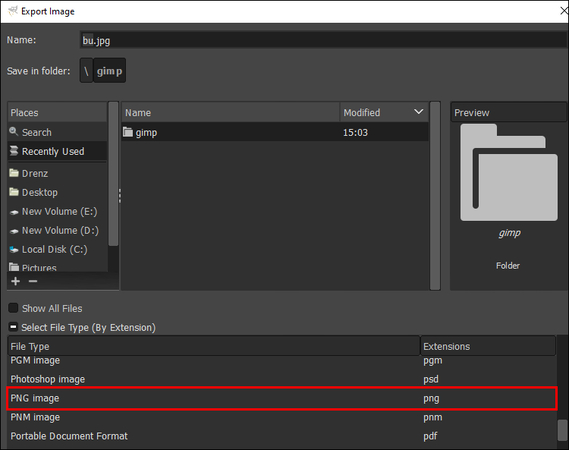
After having resized and confirmed your transparency, let's now save your picture as a PNG file, starting by following File > Export As.
- Select PNG as image format from the drop-down list and choose the destination folder.
- Click Export.
5. Configure Export Settings
GIMP will display the PNG export options. You can change the settings as follows:
- Compression Level: Select compression level from 0 (no compression) to 9 (maximum compression). Higher compression reduces file size but may affect image quality.
- Save Color Values from Transparent Pixels: This option is helpful if you want to keep the original color of transparent regions.
- Interlacing: If you want your image to load progressively on the web, then interlacing must be enabled.
Once you have selected the settings, click on Export to save the PNG file.
Part 3: Common Issues When Converting SVG to PNG in GIMP
GIMP allows the conversion of files from SVG to PNG format. Sometimes, common errors arise during the process if you are searching on how to convert SVG to PNG in GIMP. Let's explore these errors and ways of fixing them.
- Resolution Loss: While the SVG file is not based on resolution, changing its format to PNG loses its resolution if not checked.
- Color Shifts: Color shifts might happen if the color profile is not correctly set. Make sure that both the SVG and PNG files have the same color profile. Compare both the color profiles of the source SVG and PNG export settings
- Transparency Issues: When exploring how to convert PNG to SVG, loss of transparency may result due to an improper handling of the alpha channel while exporting. Make sure that the image includes an Alpha Channel using Layer > Transparency > Add Alpha Channel
Part 4: Bonus Tip: Effortless SVG to PNG Conversion with HitPaw
GIMP is a great way to convert SVG to PNG but some users prefer a more straightforward tool to just do that. If you are wondering how to convert SVG to PNG with GIMP, HitPaw Univd (HitPaw Video Converter) is a best alternative to do conversion without any effort, you are also able to easily and seamlessly convert images and keep the quality. Either a beginner user or an experienced user of HitPaw always gets seamless, intuitive support to get anything done with less effort with a few simple clicks.
Watch this Video Guide to Learn More
Key Features
HitPaw Univd - All-in-one Video Solutions for Win & Mac
Secure Verified. 254,145 people have downloaded it.
- Bulk Conversion: Easily convert multiple SVG files to PNG in batch mode.
- Lossless Quality: HitPaw maintains the original quality of the image, ensuring that no details are lost during conversion.
- Easy Interface: Even a novice user can easily convert SVG to PNG with only a few clicks.
- Fast Speed of Conversion: Enjoy conversion at speed without waiting.
- Wide Format Support: In addition to SVG and PNG, HitPaw supports a variety of other image and video formats, making it a versatile tool.
Secure Verified. 254,145 people have downloaded it.
How to Convert SVG to PNG in HitPaw Univd?
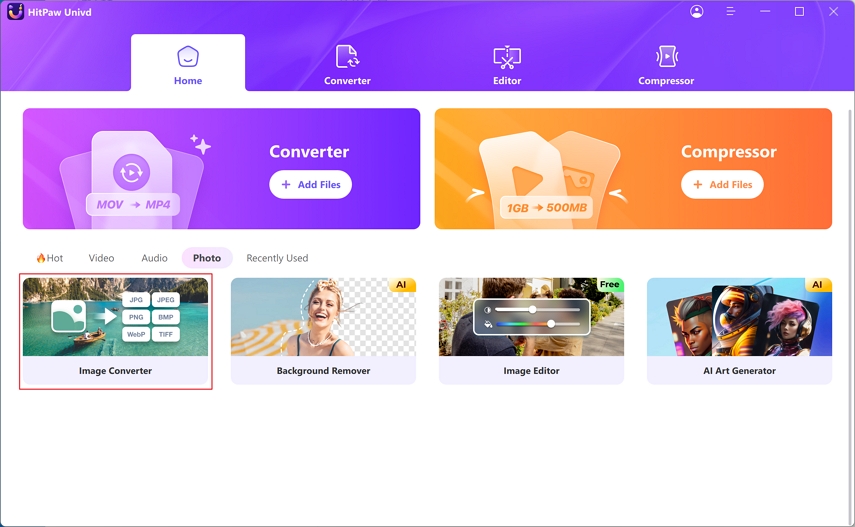
Step 1:Start HitPaw Univd, select the Image Converter feature in the Toolbox tab, and import your SVG images.

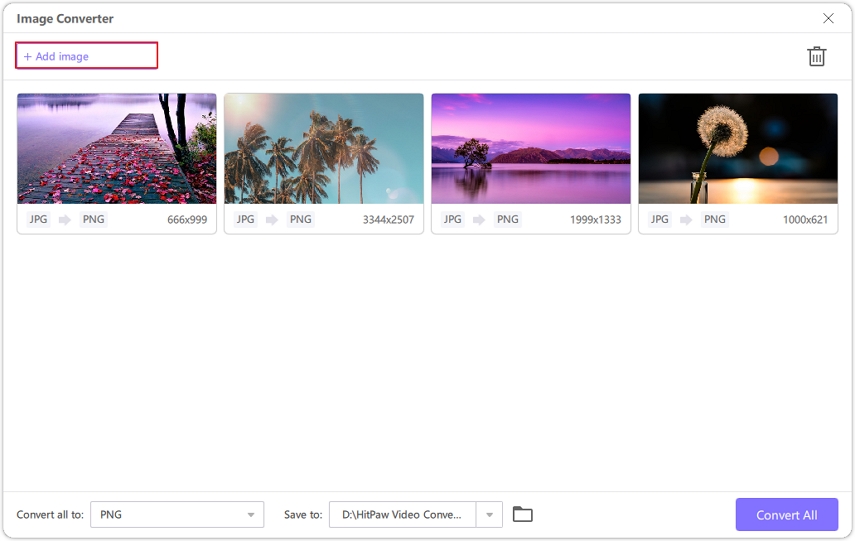
Step 2:Preview your images by clicking on them. You can add more files if needed and delete them individually or all at once.

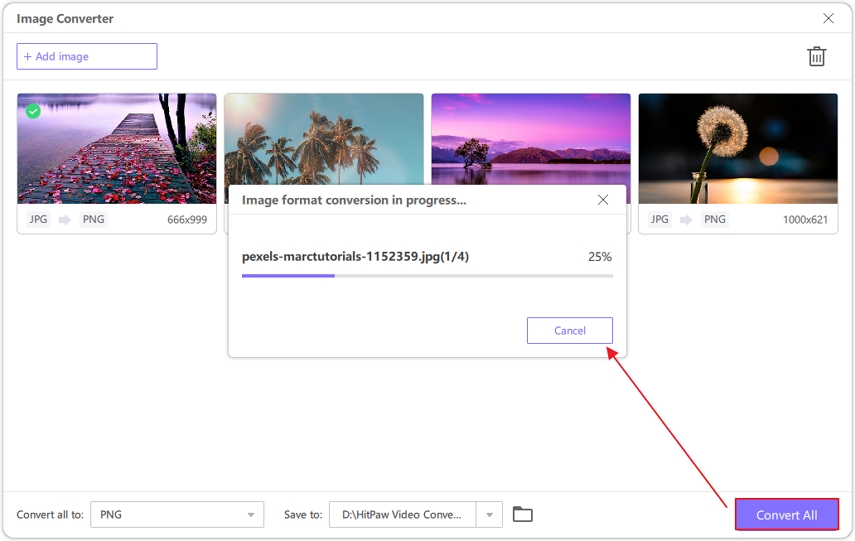
Step 3:Choose PNG as your output format for all images and select the output directory.
Note: HitPaw Univd also supports converting SVG files into many other formats, including JPG, WEBP, BMP, TIFF, and JPEG.

Step 4:Click "Convert All" to quickly batch convert your SVG images to PNG.

Part 5. FAQs About Converting SVG to PNG in GIMP
Q1. How can I adjust the resolution when converting SVG to PNG in GIMP?
A1. Resolution from the SVG file may be changed in GIMP. Go to Image > Scale Image and set DPI from the Resolution section just before export.
Q2. Can I convert multiple SVG files to PNG in bulk using GIMP?
A2. No, GIMP does not support bulk conversions. However, if you're looking for how to convert SVG to PNG, you can try using a batch processing script that is easily used or other conversion tools like HitPaw will easily convert multiple SVG files to PNG at one time.
Q3. Does GIMP preserve the transparent background when converting SVG to PNG?
A3. Yes, GIMP maintains the transparency of SVGs in PNG. Just make sure to check that the image has an Alpha Channel, and that Alpha is set correctly during export too.
Conclusion
If you're searching for how to convert SVG to PNG in GIMP, you'll find that GIMP is not so difficult but can't do bulk conversion so there is a best alternative known as HitPaw Univd. It retains the quality, resolution, and transparency needed for a project, making it smooth and efficient for the process of conversion whether you're working on a website, app, or graphic design. HitPaw Univd is a very easy, no quality loss solution if you want to do batch conversion. You are ready to go and work your way with SVG to PNG conversion.





 HitPaw VoicePea
  HitPaw VikPea (Video Enhancer)
 HitPaw FotorPea


Share this article:
Select the product rating:
Daniel Walker
Editor-in-Chief
My passion lies in bridging the gap between cutting-edge technology and everyday creativity. With years of hands-on experience, I create content that not only informs but inspires our audience to embrace digital tools confidently.
View all ArticlesLeave a Comment
Create your review for HitPaw articles