Add DaVinci Resolve Subtitles to Videos in 3 Effective Methods (2024)
Whenever you create video content, it is consider optimal to add captions to gain audience's attention. These texts are also useful in increasing the accessibility of the video content for a wider audience. One of the resources that provides the feature of incorporating auto caption texts to your videos is the famous DaVinci Resolve editor. In this article, we will go through the most convenient methods to add DaVinci Resolve subtitles to your videos.
Part 1. How to Add Auto Subtitles in DaVinci Resolve
Including subtitles in your videos can become effortless by utilizing the right tools. DaVinci Resolve is a complete suite that offers professional-grade video editing. One of the utilities provided by this extensive tool is automatic subtitle generation. Provided next are the steps to add automatic subtitles DaVinci Resolve:
Step 1.After you have successfully imported your video by pressing Import File under the File menu on the DaVinci interface, drag the video to the editing timeline to begin the subtitling process.

Step 2.Select the specific part by dragging the cursor or entire video if you want to add captions to the complete video. Go to the Timeline tab on the toolbar and press Create Subtitle from Audio… option. A small window will appear, select the Language and choose the subtitling style from the Caption Preset drop-down menu.

Step 3.Once all the options are selected, click the Create option and wait for it to generate automated subtitles. After it's done, all the subtitles will appear in the timeline above the video track.

Part 2. How to Create Subtitles with DaVinci Resolve
With this video editor, you can create captions with ease for your videos and can also make edits to them. This powerful video editing software provides an array of features for creating and editing subtitles. Let us explore the steps to create subtitles DaVinci Resolve:
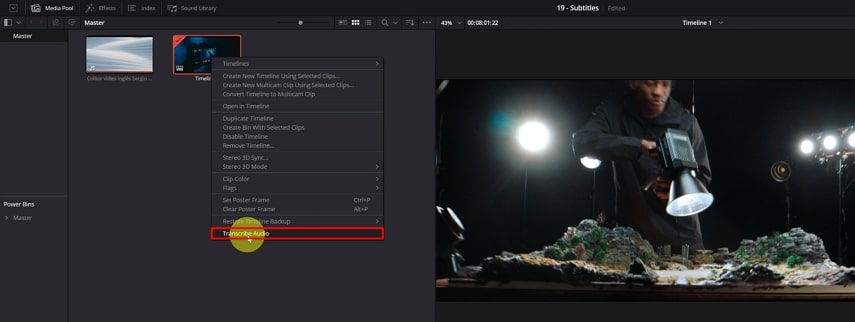
Step 1.To create subtitles, import your media and drag it to the timeline. Now, head to the media panel and right-click the video to find the Transcribe Audio option.

Step 2.After clicking it, the tool will analyze your audio and generate written text for the spoken words in your video in a new window. You can also look for specific words and phrases conveniently by typing in the search bar on the top of the transcript window provided. Export your subtitles in TXT format by using the Export icon on the top-right corner of the text window.

Part 3. How to Add Subtitles Manually in DaVinci Resolve
Along with auto subtitling, DaVinci Resolve lets you manually add captions to your video by typing in. Here is the step-by-step guide to add subtitles DaVinci Resolve manually for your visual content:
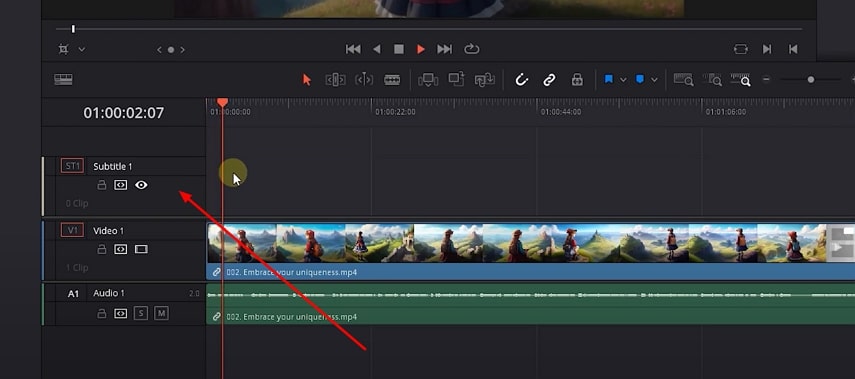
Step 1.After uploading your media to the tool, right-click on the empty space above the video track and choose the Add Subtitle Track option. To play the audio for typing, press the Space button.

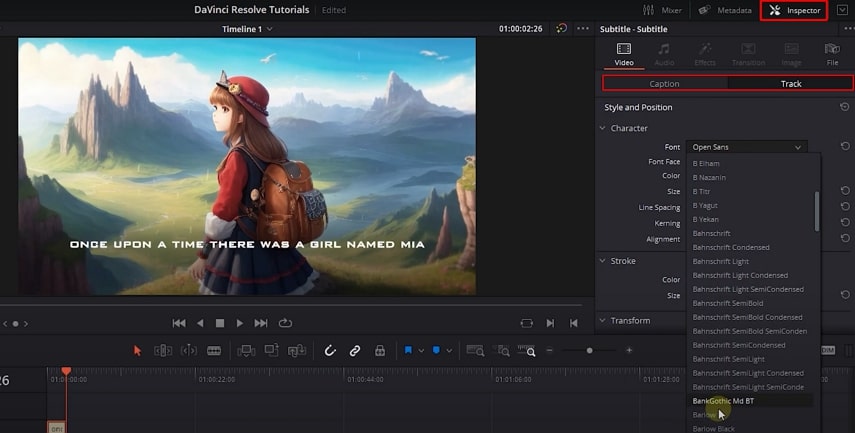
Step 2.Right-click on the track to select the Add Subtitle option and add an empty element. Select the empty subtitle and open the Inspector panel on the right side of the interface. Moving forward, type the text in the input text field under the Caption tab. To change the font family, size, and position for your subtitle, access the Track tab next to the Caption tab.

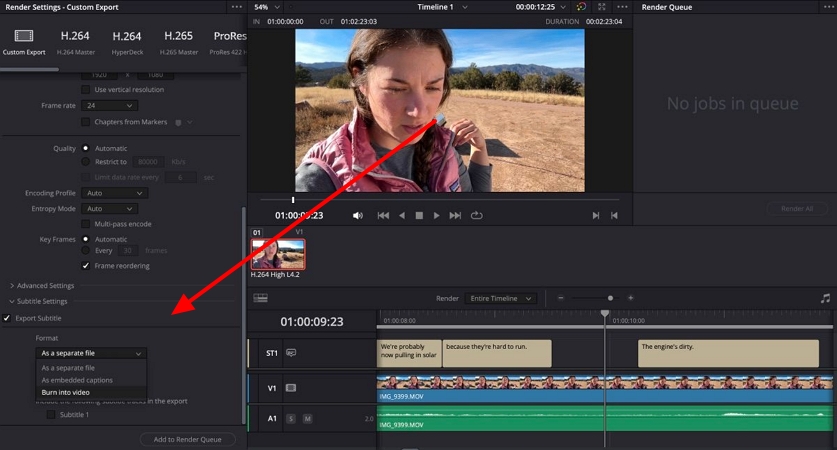
Step 3.When all the captions are added, head to the Deliver page and scroll through to find Subtitle Settings. Now tick the Export Subtitle checkbox and select the file format after defining the subtitle Format as a separate file. Next, click the Add to Render Queue button to render the video. Finally, right-click the rendered video and select the file location to save the subtitles you generated.

Part 4. Best Alternative to DaVinci Resolve to Add Auto Subtitles to Videos
If you are looking for an alternative that generates high-quality subtitles with 100% accuracy, try utilizing HitPaw Edimakor. This extensive tool offers a complete set of tools to meet all your DaVinci Resolve subtitle needs. The tool provides many basic and advanced video editing features to create an immersive visual experience for the viewers.
One of the standout features of Edimakor is auto subtitling. Whether generating with AI or typing your text, you can conveniently add captions to your video with this intuitive tool.
Provided next are the steps to add auto subtitles to your videos with the Edimakor tool:
Step 1. Import Your Video After Selecting Subtitle Maker
Start the process by launching Edimakor on your computer and selecting Subtitle Maker from the main interface. Next, on the editing interface, add your video using the Import Files button available on the editing timeline.
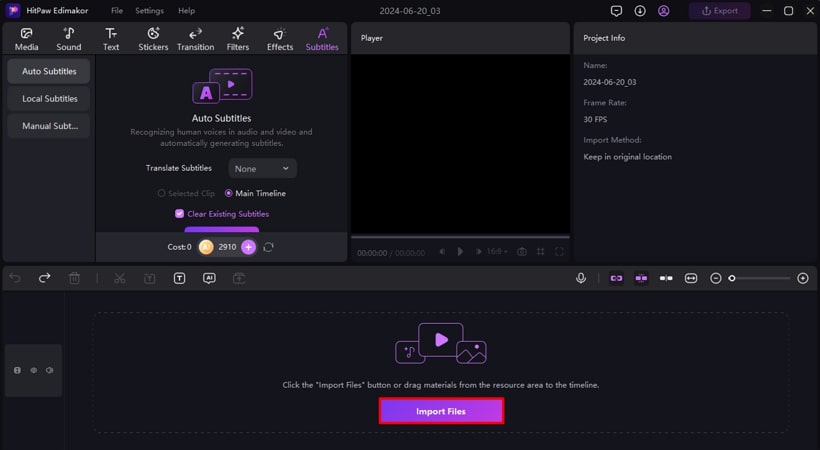
Step 2. Generate Automatic Subtitles For Your Video
Locate the Subtitle option on the toolbar and choose the Auto Subtitles section. Select the Auto Subtitling button and let Edimakor automatically convert your spoken words into text. You can refine the transcribed subtitle using the Text settings window.
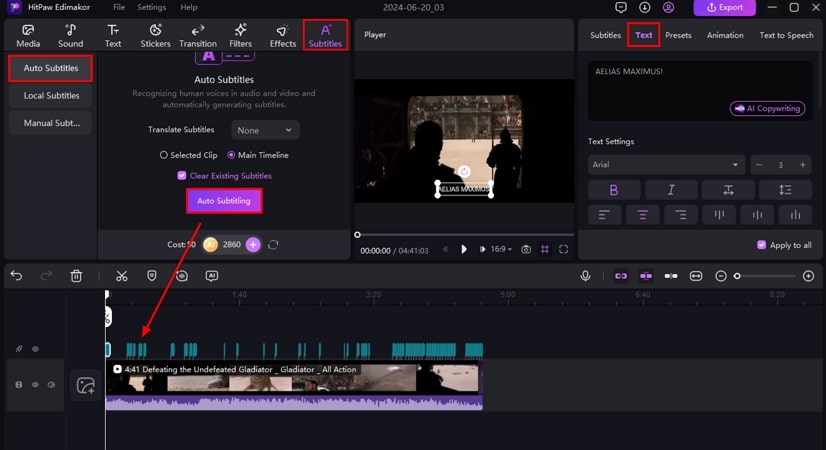
Step 3. Export Your Subtitled Video
Once you are done with editing the subtitles, head to the top right corner and press Export. After this, you can define the export format, file name and destination folder for your final video. When everything is done, click the Export button to save the generated video to your computer device.
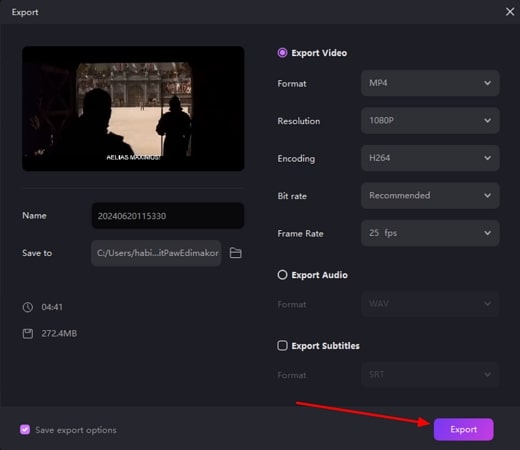
Part 5. How to Fix DaVinci Resolve Subtitles Not Showing Issue
Although DaVinci Resolve is a complete suite for multimedia needs, users might find it challenging to handle some of the errors occurring while using this tool. To ensure a complete subtitle creation process, read the fixes below for the DaVinci Resolve subtitles not showing up:
Solution 1. Make Sure the Subtitle Track is Visible
One of the main reasons for subtitles not showing up is because the captions are not visible within the tool. Follow the instructions mentioned next to resolve this problem.
Instructions. Access the editing timeline of the tool's interface and locate the text track for your subtitles. Find the Eye icon on the empty space next to the title track and make sure it is enabled. If not, click the icon to enable it and make your subtitles visible on the preview window.
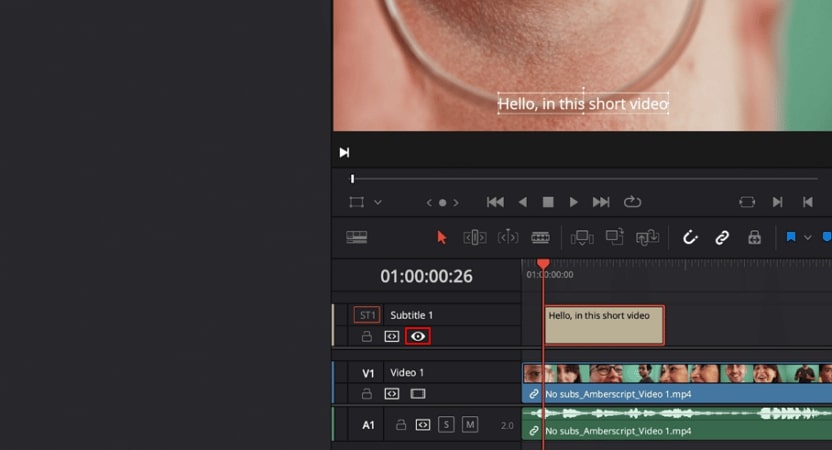
Solution 2. Configure Subtitle Track Settings
The captions only show up if the settings are configured correctly. To make your DaVinci auto subtitle visible on the video, make sure that the subtitle track is set to Show and not Mute in its settings.
Solution 3. Confirm the Compatibility of Subtitle Files
To make your subtitle DaVinci Resolve visible on the screen, make sure your imported file is compatible with the tool. If you want to add an already existing subtitle file to integrate with your video, make sure that the format is supported by this video editor.
Solution 4. Enable Subtitle Export in Delivery Settings
Once you have generated the subtitles and they are still not showing up on the preview window, it might be possible that the export subtitle settings are not correctly configured. To fix this problem, follow the instructions mentioned below.
Instructions. Access the tool's Deliver page, locate the Subtitles setting, and tick the Export Settings checkbox to enable the subtitle view.
Part 6. FAQs on DaVinci Resolve Subtitles
Q1. How do I get different subtitles on DaVinci Resolve?
A1. You can add different DaVinci Resolve automatic subtitles to your videos by adding a separate subtitle file to the tool, as this editor does not provide multiple subtitling.
Q2. How do I add subtitles to the DaVinci Resolve background?
A2. This extensive tool provides the utility of adding subtitles to your video background. Simply access the Timeline tab on the toolbar and opt for Create Subtitle; an automated caption text track will be generated for you.
Q3. Why are subtitles not rendering in DaVinci Resolve?
A3. There can be multiple issues that can lead to DaVinci Resolve auto subtitles not rendering. Make sure that the visibility of captions is enabled and the Export Settings are ticked to perform successful rendering of your subtitles.
Conclusion
With accurate subtitles that are completely synced with the audiovisuals, the accessibility of your content increases. There are many resources which allow the auto subtitling process, where one such tool is DaVinci Resolve auto subtitles that provides automated captions. However, if you are looking for a solution that has an easy interface and delivers high-quality results, choose HitPaw Edimakor.





 HitPaw Univd (Video Converter)
  HitPaw Screen Recorder
 HitPaw VikPea (Video Enhancer)
Share this article:
Select the product rating:
Daniel Walker
Editor-in-Chief
My passion lies in bridging the gap between cutting-edge technology and everyday creativity. With years of hands-on experience, I create content that not only informs but inspires our audience to embrace digital tools confidently.
View all ArticlesLeave a Comment
Create your review for HitPaw articles