Fix Sony Vegas Pro Not Adding Audio to Video: 2 Proven Solutions
"My Vegas Pro 14 work nomally with regular MP4 files but today when I try to import some specific MP4 it show only the video but no sound in the audio track." - A question from forum
Sony Vegas Pro is a powerful video editing tool used by creators worldwide. However, one common issue many users face is Vegas Pro not adding audio to video, which can disrupt workflow and cause frustration.
This blog provides effective solutions to resolve this issue, ensuring your projects stay on track. By the end of this guide, you'll learn how to fix this problem quickly and enhance your editing experience.
Part 1. Why Does Sony Vegas Pro Not Add Audio to Video?
The issue of Vegas audio not showing or syncing correctly can stem from various causes. Understanding these reasons is crucial to finding a solution:
- Incompatible Codecs: Some videos are encoded with codecs that Sony Vegas Pro doesn't support, such as HEVC or VP9. These codecs may require additional plugins or software updates to work correctly.
- Variable Frame Rate (VFR): Videos recorded with software like OBS often use VFR, which is not ideal for Sony Vegas. This frame rate inconsistency can lead to syncing errors or missing tracks.
- Improper File Conversion: Converting videos using tools that don't ensure compatibility can lead to missing audio tracks. Ensuring the correct conversion process is essential.
- Corrupted Files: Damaged or incomplete video files can cause syncing issues. Always verify file integrity before importing them.
- Installation Issues: Missing plugins or misconfigured settings in Sony Vegas Pro might also be responsible. Reinstalling or updating the software can sometimes resolve these problems.
Method 1: Convert Video to Vegas Pro Compatible Codec
One of the best ways to resolve Vegas Pro not adding audio to video is to convert your video files into a codec that the software supports. We recommend using the HitPaw Univd (HitPaw Video Converter) for this task. A compatible codec ensures smooth playback and prevents further issues during editing.
Features of HitPaw Univd
HitPaw Univd - All-in-one Video Solutions for Win & Mac
Secure Verified. 254,145 people have downloaded it.
- Supports over 1,000 video and audio file formats.
- Supportsadvanced encoders H265, VP9, AV1 and other HD video formats.
- Features powerful editing tools to fine-tune videos before export.
- Enables seamless batch processing of multiple files.
- Simplifies adding subtitles and metadata with quick options.
- Compresses files effectively while preserving high-quality output.
Secure Verified. 254,145 people have downloaded it.
Step-by-Step Guide to Convert Video to Vegas Pro Compatible Codec
Follow this tutorial to convert videos to Vegas Pro Compatible Codec on Windows and Mac with HitPaw Univd
Step 1: Open HitPaw Univd and Add Files
Download and install the HitPaw Univd. Once installed, open the software and click on "Add Video" to import your files, or simply drag the video(s) directly into the program.
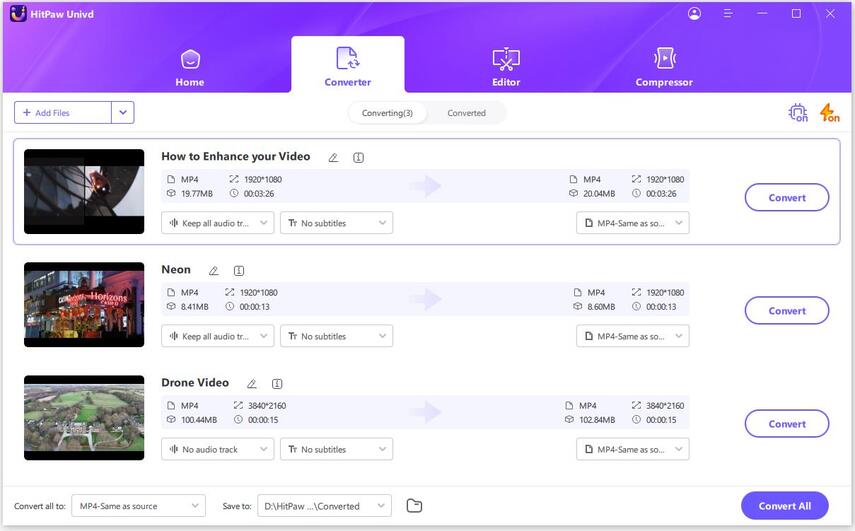
This step helps organize your project files, especially if working with multiple clips.
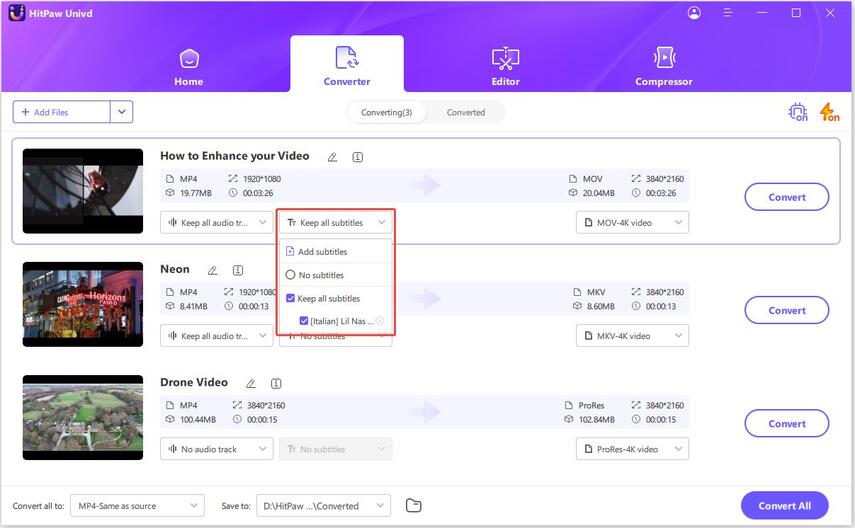
Step 2: Add Subtitles (Optional)
Step 3: Select an Output Format
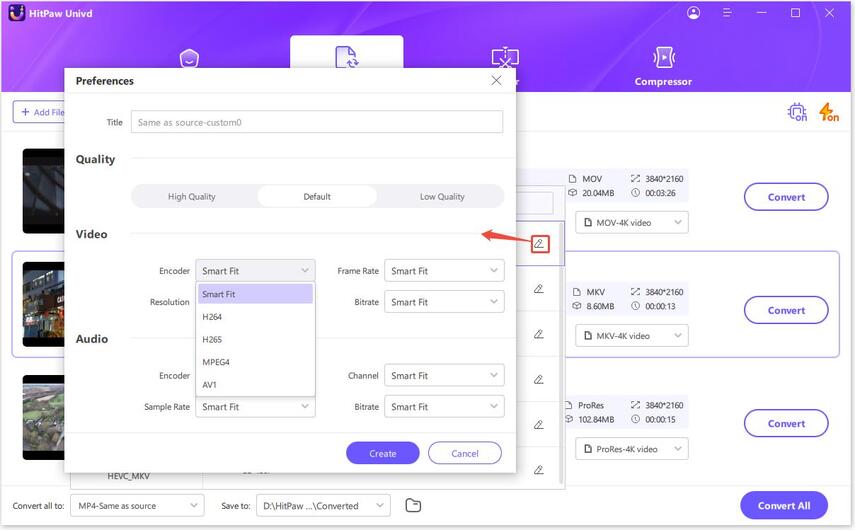
Click the output format dropdown icon to choose MP4 (H264 codec) as the target format. For projects involving multiple files, you can select a unified output format by clicking on "Convert All to."
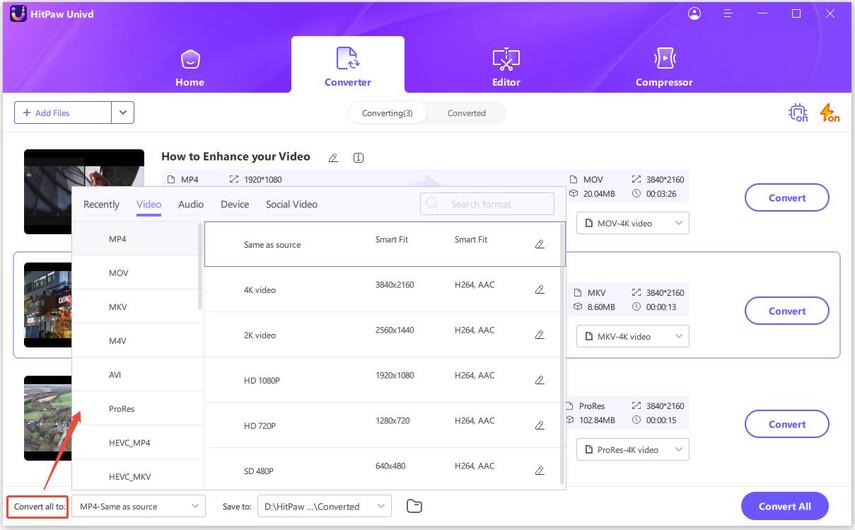
Additionally, you can adjust output settings such as resolution, quality, and frame rate by clicking on the edit icon.
Step 4: Convert the Video
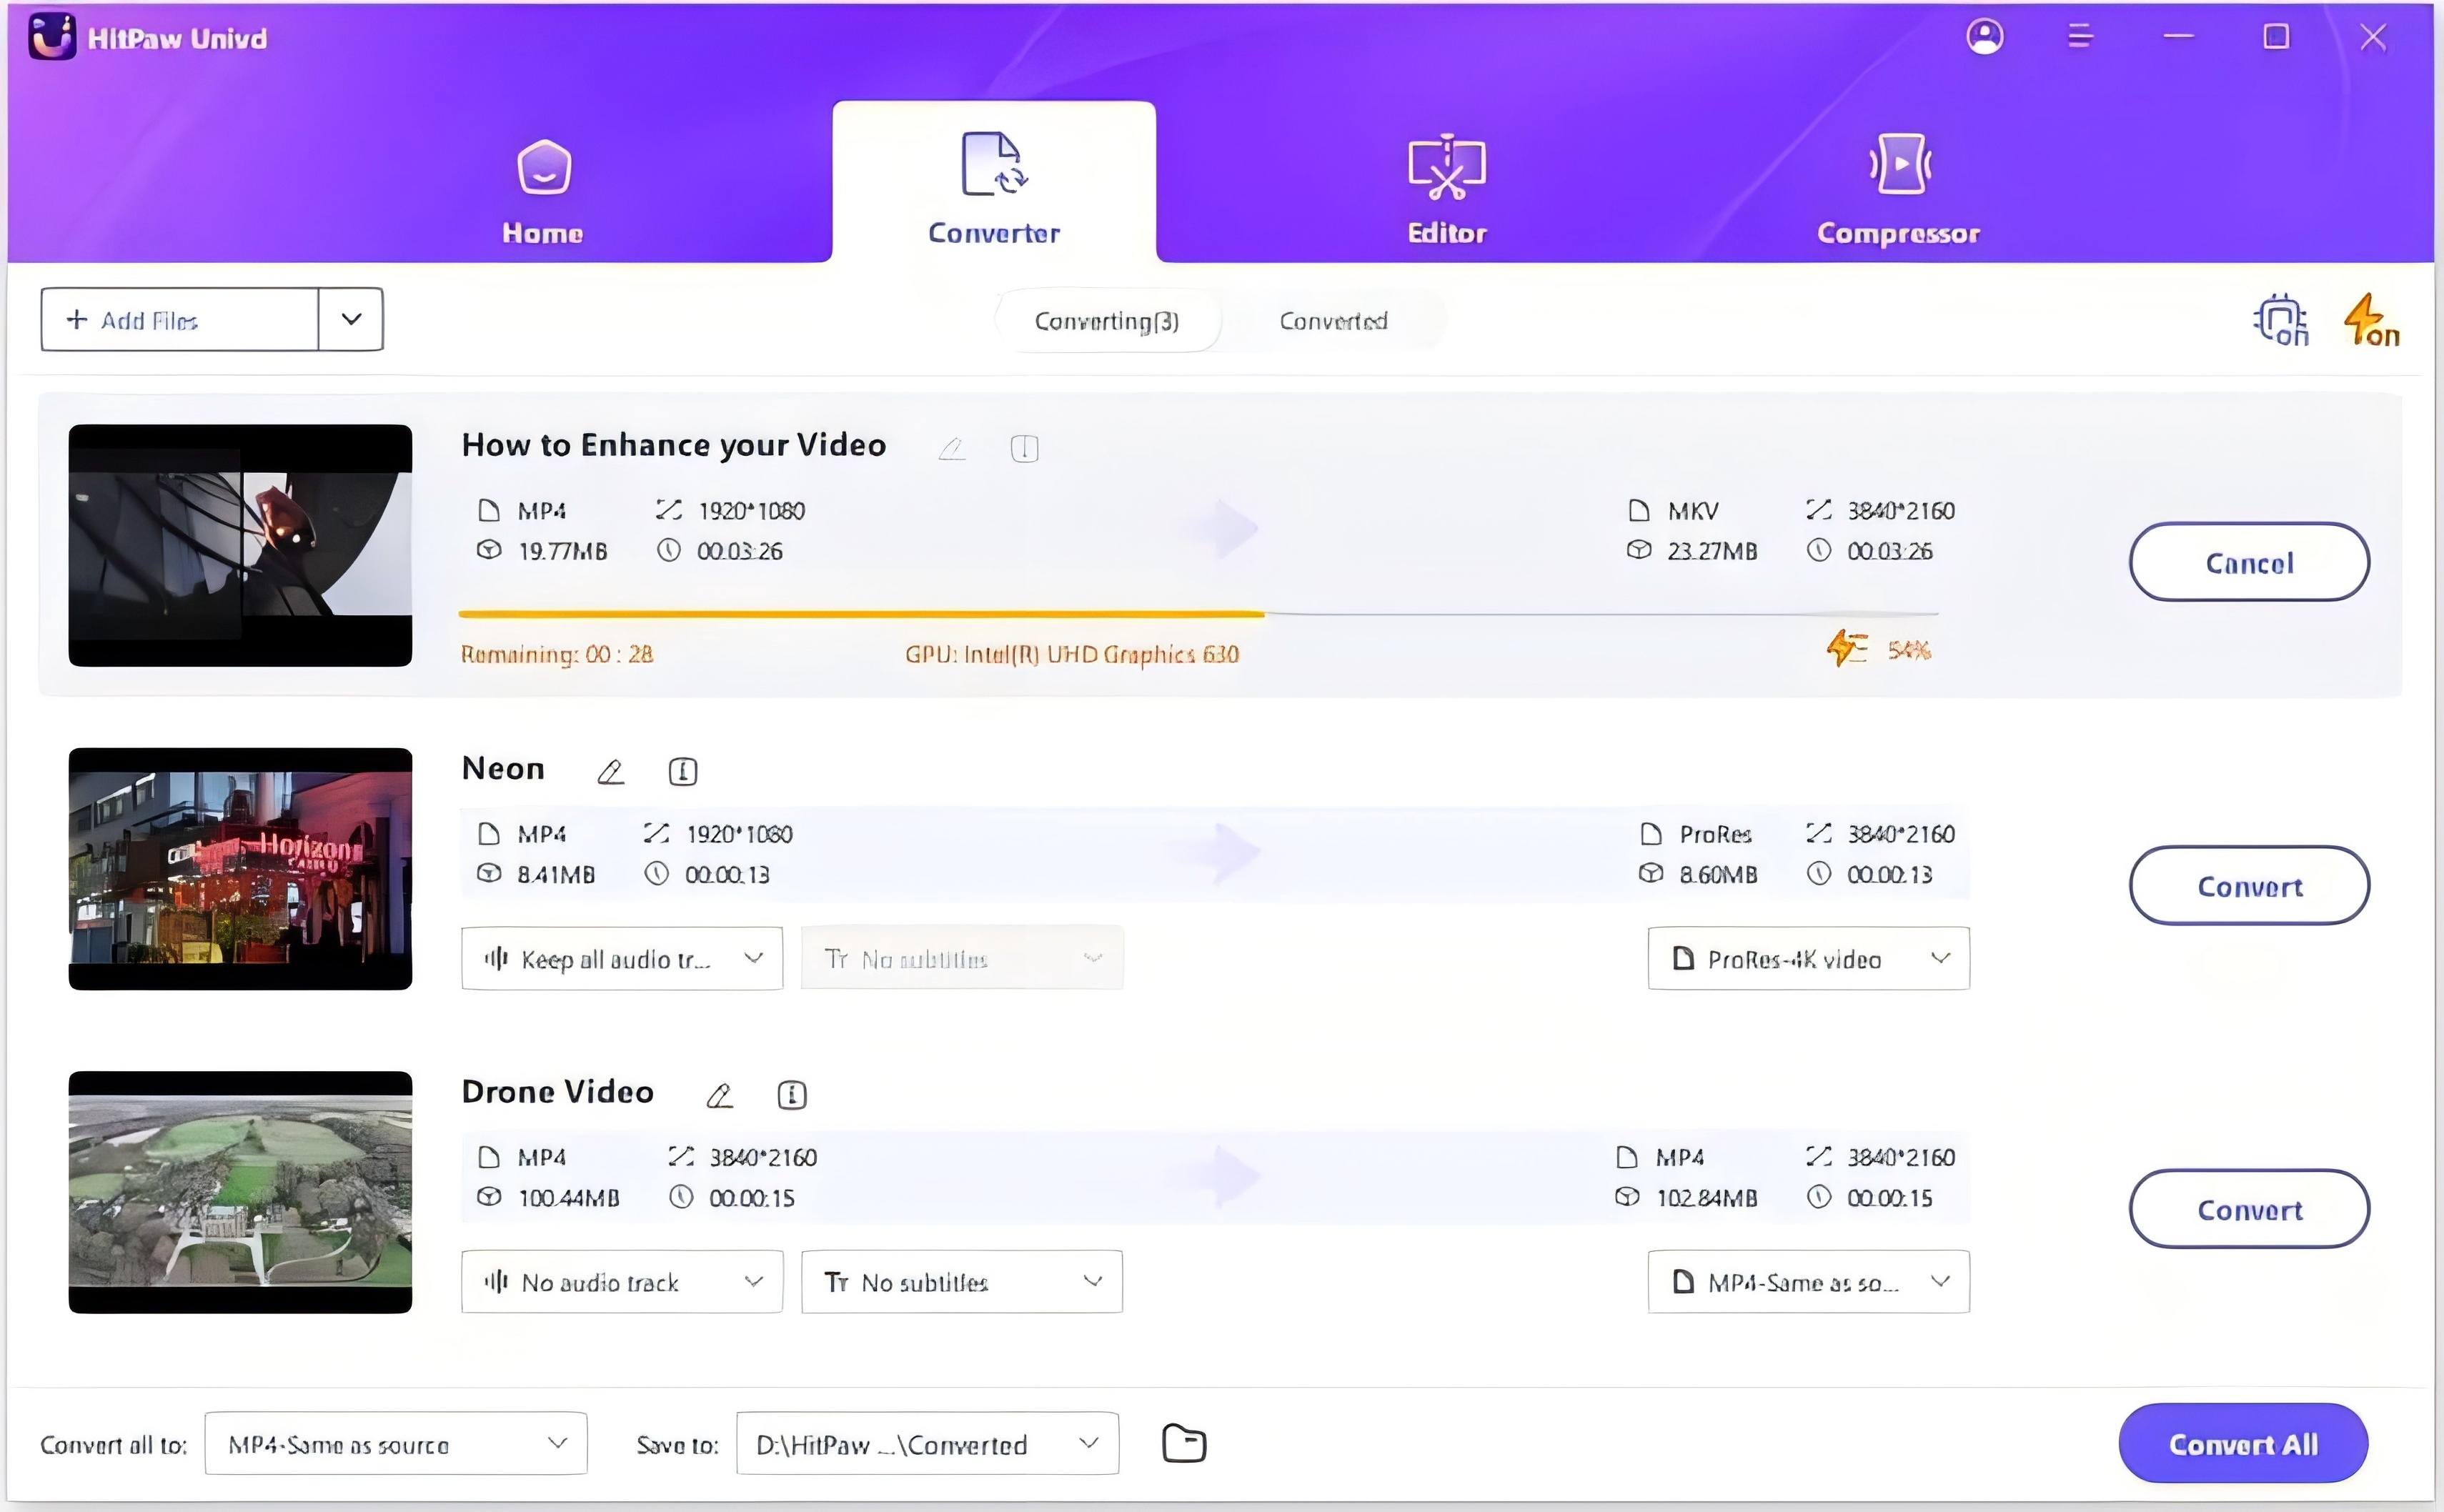
Click the Convert All button to start batch converting video to Sony Vegas compatible format.
Step 5: Access the Converted Files
Once the conversion is complete, navigate to the "Converted" tab at the top of the interface. From here, you can preview your files, open the containing folder, or re-edit if necessary.
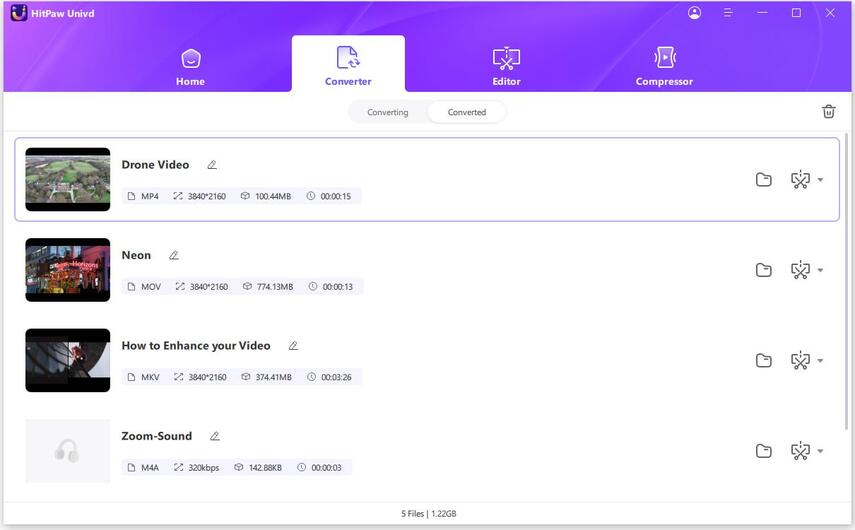
Your videos are now ready to be imported into Sony Vegas Pro, with both video and audio tracks functioning seamlessly.
Method 2: Convert VFR to CFR Video to Resolve Vegas No Audio Track
Another common issue is the use of Variable Frame Rate (VFR) videos, which can cause syncing problems in Sony Vegas Pro. VFR videos are often produced by screen recording software or mobile devices, leading to mismatches during playback or editing.
The solution is to convert VFR to Constant Frame Rate (CFR) using the HitPaw Univd. This simple adjustment can resolve most frame rate-related issues, ensuring both video and audio tracks align properly.
After adding the video to HitPaw Univd, in the output format list, choose a target format. In most cases, MP4 with H.264 is the preferred choice. This ready-to-use profile converts the video to a constant frame rate (CFR) in the .mp4 format, encoded with the H.264 (AVC) codec. You can access to the format preferences to edit the frame rate.

Click the "Convert" button to initiate the process. Once the process finishes, go to the "Converted" tab. From here, you can preview the video, open the output folder, or re-edit if necessary.
Additional Tip to Fix Missing Audio Track in Sony Vegas Pro
If you're experiencing missing audio tracks when importing MP4 videos into Sony Vegas, here's a quick and effective solution by renaming a specific folder:
Step 1: Backup Your Project
Before proceeding, save and back up your Sony Vegas project to avoid losing any data.
Step 2: Locate the compoundplug Folder
Find the compoundplug folder in the Sony Vegas installation directory. Here's how:
- Standard Installation: Navigate to the main Vegas folder, then follow this path:
FileIO Plug-Ins > compoundplug - Steam Version: If you are using the Steam version of Sony Vegas, the path may look like this:
...\steamapps\common\Vegas Pro [Version]\FileIO Plug-Ins\compoundplug
(Replace [Version] with your specific version number, such as 14.0.)
Step 3: Rename the Folder
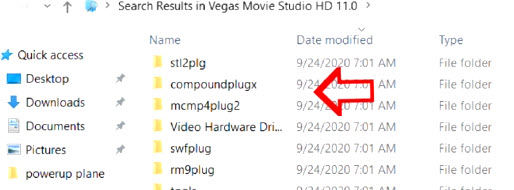
Rename the folder from compoundplug to compoundplugx. This small change can resolve the audio issue.
Step 4: Restart Sony Vegas
Close and restart Sony Vegas to apply the changes. If the audio track still doesn't appear, try removing the video from the timeline and re-adding it.
Caution: Renaming folders can sometimes lead to errors, such as license prompts or missing plugins. Use this method only as a last resort and always back up your data beforehand.
Conclusion
Issues like Vegas Pro not adding audio to video can be frustrating, but with the right tools and techniques, they are easy to fix. By using HitPaw Univd to convert files into compatible formats or correct frame rate inconsistencies, you'll streamline your editing process and avoid further disruptions.
Additionally, troubleshooting tips like adjusting installation folders provide alternative solutions for stubborn glitches. Remember to back up your projects and follow these steps carefully for the best results. Solving Vegas audio issues has never been this simple-get back to creating amazing content today!




 HitPaw VoicePea
  HitPaw VikPea (Video Enhancer)
 HitPaw FotorPea



Share this article:
Select the product rating:
Daniel Walker
Editor-in-Chief
My passion lies in bridging the gap between cutting-edge technology and everyday creativity. With years of hands-on experience, I create content that not only informs but inspires our audience to embrace digital tools confidently.
View all ArticlesLeave a Comment
Create your review for HitPaw articles