How to Reverse a Video On Snapchat
Reversing videos on Snapchat is a simple yet impactful way to engage your audience and make your content stand out. Whether you want to emphasize a specific moment, add a playful effect, or create something original, learning this feature can elevate your snaps.
In this guide, we will walk you through the process how to reverse videos on Snapchat.
Part 1. Why Do You Reverse a Video on Snapchat
Reversing a video on Snapchat is not just a playful feature; it's a creative way to improve your content. Here are some reasons why mastering how to reverse a snap video can benefit you:
- Add Creativity: Turn simple actions into unique visual expressions. A reversed video can make pouring a drink or jumping into a pool look extraordinary.
- Make Content Unique: Reversing your videos offers a distinct edge and makes your content more recognizable.
- Impress Your Audience: A reversed snap surprises viewers and catches their attention, increasing engagement.
- Highlight Key Moments: Emphasize specific actions or details that might otherwise be overlooked. This is ideal for drawing attention to impactful parts of your story.
- Create Fun Effects: Experiment with effects like backward splashes or reversed movements.
In addition to these benefits, reversing videos motivates your audience to rewatch your content to better understand the sequence. It also builds curiosity and interest, boosting visibility and interaction rates on Snapchat.
Part 2. How to Reverse Snapchat Videos with Built-In Filter
Snapchat makes reversing videos simple with its built-in reverse filter. You don't need any third-party apps; just follow these straightforward steps to get started.
Step 1: Record the Video
Open Snapchat and press the white record button to capture your video. Hold it down until you've recorded the desired footage, then release it to stop.
Step 2: Add the Reverse Filter
Swipe left on the screen to browse filters until you find the reverse filter, represented by a curved back arrow. Tap it, and your video will instantly start playing backwards.
Step 3: Edit the Snapchat Video
After applying the reverse filter, customize your video by adding text, and stickers, or adjusting the audio with voice filters. This step enhances creativity and ensures your snap is distinctive.
Step 4: Export or Share
To share your reversed snap, tap "Story" to post publicly or "Send to" to share with specific friends. You can also save it to your device for future use.

Part 3. How to Reverse an Existing Video on Snapchat
If you have a video saved in your Memories or Camera Roll, you can still apply the reverse filter on Snapchat. Here's how to do it:
Step 1: Select the Existing Video
Tap the image icon next to the record button to access your Memories. Choose the video you want to reverse from "Snaps," "Camera Roll," or "Stories."
Step 2: Add the Reverse Filter
Tap the three dots in the top-right corner of the video and select "Edit Snap." Swipe left to browse filters and select the reverse filter (curved back arrow).
Step 3: Fix the Reverse Filter Missing Issue
If your video is longer than 10 seconds, the reverse filter won't appear. Trim your video to under 10 seconds by dragging the ends, saving the changes, and then reapplying the filter.
Step 4: Save or Post the Video
Once reversed, tap "Save" to keep the video on your device or "Send to" to share it with friends or post it as a story.

Part 4. Pro Tip: Use HitPaw Univd (HitPaw Video Converter) for Advanced Editing
While Snapchat's reverse filter is great for quick edits, tools like the HitPaw Univd allow you to explore advanced editing features. Although it doesn't reverse videos directly, it offers options to trim, merge, crop, rotate and add filters to enhance your clips for a professional finish. This tool is especially helpful for those who want to create polished content for various platforms beyond Snapchat.
Features of HitPaw Univd
HitPaw Univd - All-in-one Video Solutions for Win & Mac
Secure Verified. 254,145 people have downloaded it.
- Crop, cut, and merge videos with precision.
- Add watermarks and filters for refined visuals.
- Adjust video speed from 0.25x to 4x effortlessly.
- Stabilize shaky footage for improved smoothness.
- Apply text or image watermarks without hassle.
- Batch edit videos with a simple click
Secure Verified. 254,145 people have downloaded it.
Step By Step Guide to Edit Videos with HitPaw Univd
HitPaw Univd provides an all-in-one solution for editing videos efficiently and effectively. Here's how you can use its key features to enhance your videos:
1: How to Cut a Video
Open the HitPaw Univd and navigate to the Edit section. Choose the Cut feature and add the source video.
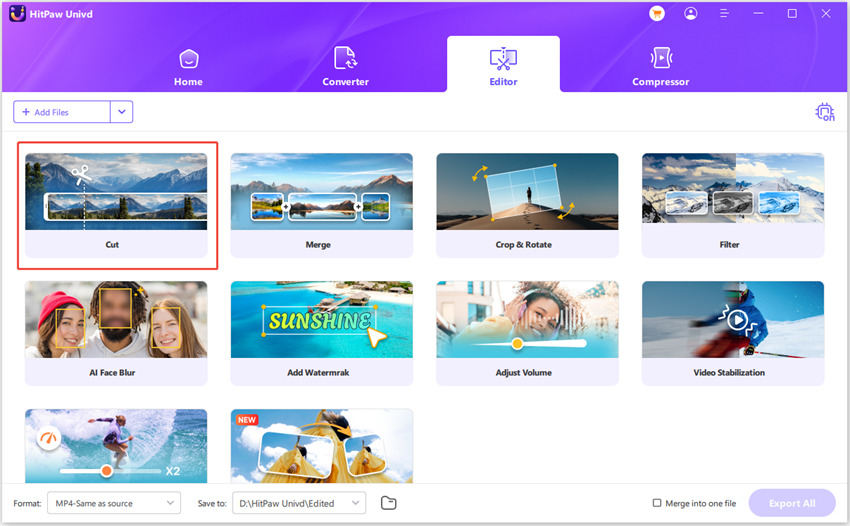
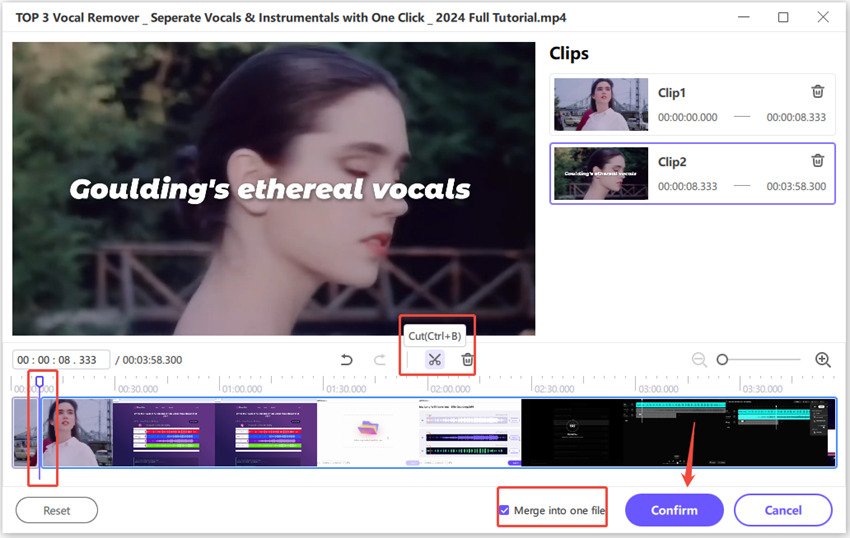
Once the video is added, preview it in the timeline. Drag the play head to the point where you want to cut, then click the scissor icon to split the video. Repeat this process to create more clips if needed.
After cutting the video, you can merge the clips into one file by selecting "Merge into one file." Click Confirm to finalize the cuts and prepare the clips for export.
2: How to Merge Videos Into One
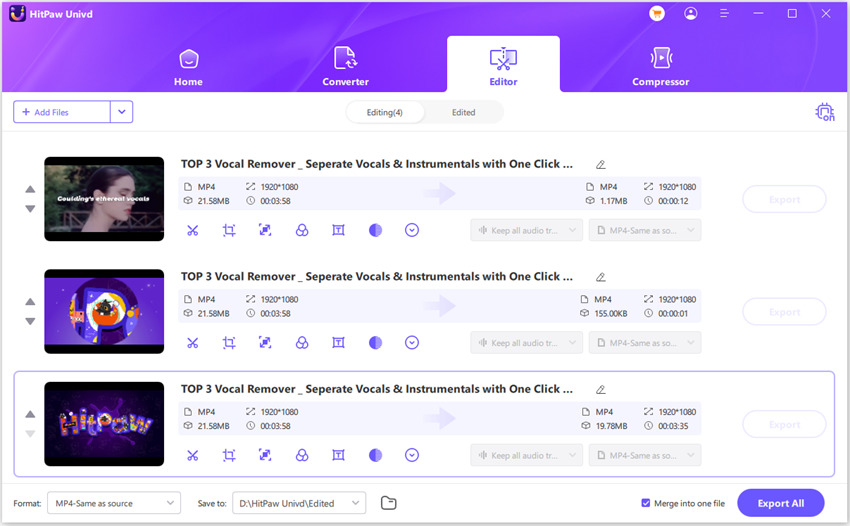
In the Edit section, upload all the videos you want to combine. Select the output format and check the "Merge into one file" option. Click the Export All button to combine all imported videos into a single file.
3: How to Crop and Rotate a Video
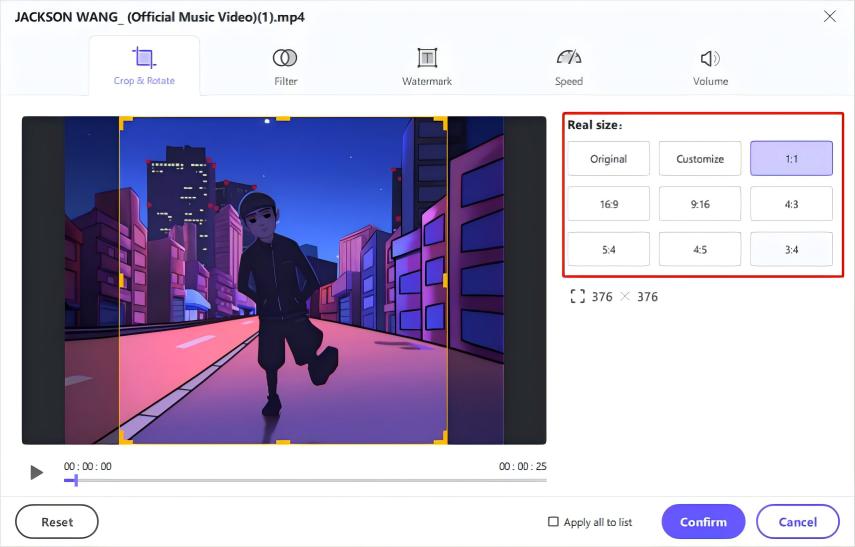
In the Crop & Rotate section, rotate the video 90 degrees clockwise or counterclockwise, or flip it upside down.
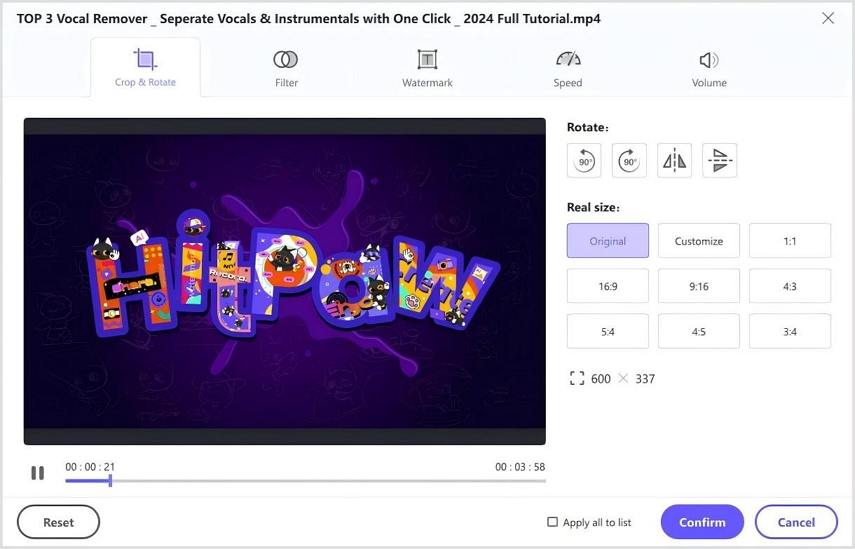
Drag the edges of the matrix in the playback window to crop the video or select a pre-defined ratio from the provided options.
Click the play button to preview the cropped video. After confirming, choose the output format and click Export.
4: How to Add Filters to a Video
HitPaw Univd offers dozens of filters, including black and white, daily, scenery, and landscape options.

Adjust brightness, contrast, saturation, shadow, and sharpness to fine-tune the video.
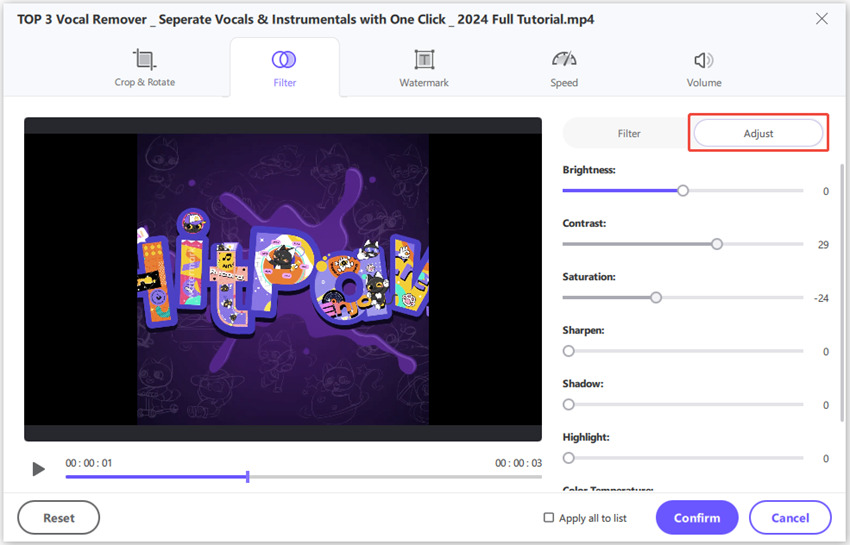
To apply the filter to all files in your list, check the "Apply all to list" option.
5: How to Change Video Speed
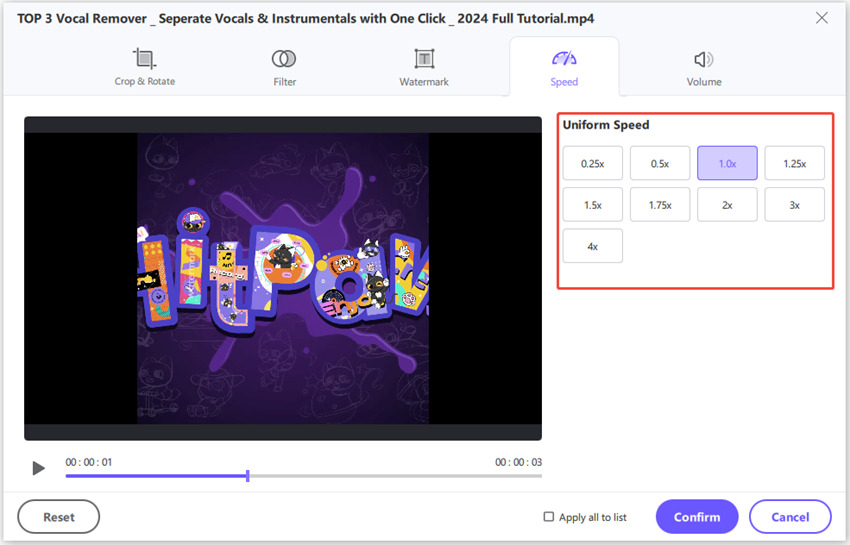
Select a playback speed between 0.25x and 4x from the right panel. Click the play button to preview the adjusted speed in real-time. Check "Apply all to list" to apply the same speed setting to multiple files.
6: How to Add Watermarks to a Video
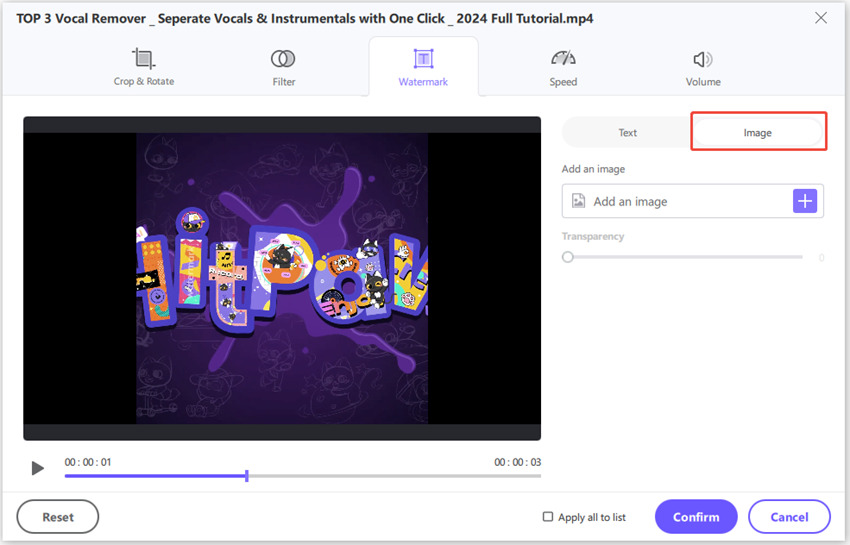
Customize text fonts, colours, sizes, transparency, and styles. Drag the text to the desired position in the playback window.
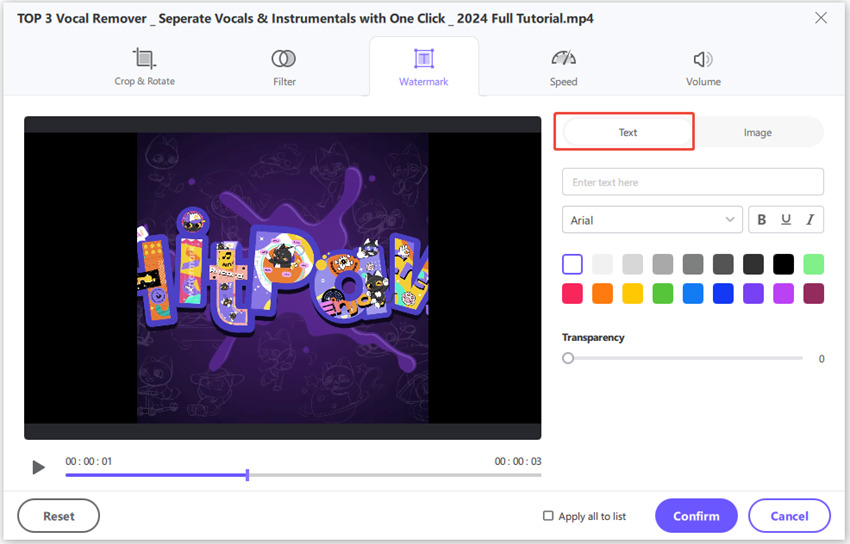
Click the Add button to insert an image watermark. Adjust its position and transparency as needed.
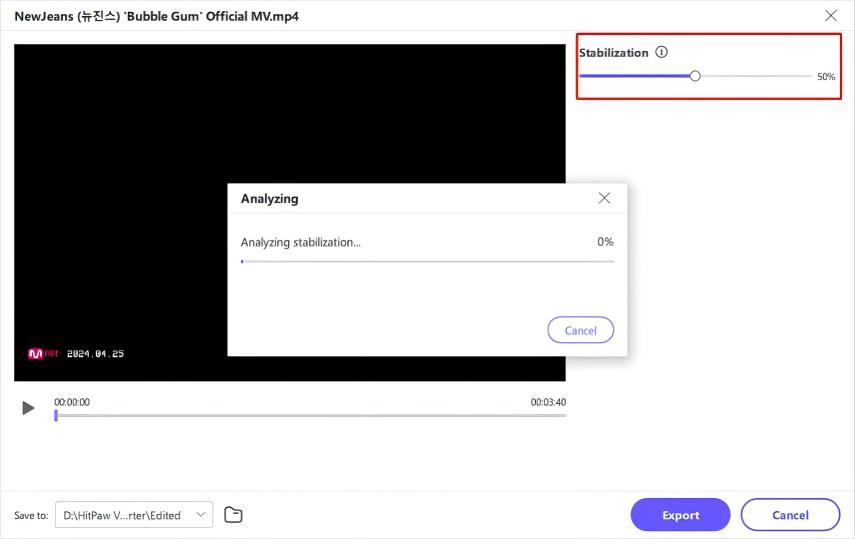
7: How to Stabilize Shaky Video (Windows Version Only)
In the Edit section, select the Video Stabilization feature and import the video that needs stabilization.
The program will analyze and stabilize the video automatically, starting with a default stabilization ratio of 50%.
HitPaw Univd combines efficiency and versatility, making it an ideal choice for video editing and conversion needs.
Conclusion
Reversing a video on Snapchat is a straightforward yet effective way to improve your content. By mastering how to reverse videos on Snapchat, you can impress your audience and create unique, eye-catching snaps.
For those looking to go beyond Snapchat's built-in features, tools like HitPaw Univd offer advanced editing options to make your videos truly stand out.


 HitPaw VoicePea
  HitPaw VikPea (Video Enhancer)
 HitPaw FotorPea


Share this article:
Select the product rating:
Daniel Walker
Editor-in-Chief
My passion lies in bridging the gap between cutting-edge technology and everyday creativity. With years of hands-on experience, I create content that not only informs but inspires our audience to embrace digital tools confidently.
View all ArticlesLeave a Comment
Create your review for HitPaw articles