How to Take A Screenshot on Zoom with Zoom Meeting Screenshot Tool
After the arrival of unwanted Covid-19, almost everyone was forced to shift online for business or other activities. Hence, the demand for online calling or streaming platforms, including Zoom, has increased unbelievably. Zoom is a fantastic platform that helps you conduct business meetings, school classes, etc. However, sometimes you may need to capture Zoom screenshots to preserve the key points of the meeting. Can you take screenshots on Zoom, and if yes, where does Zoom save screenshots? These are the questions we'll be answering in this article.
Part 1: How to Screenshot on Zoom Using Zoom Meeting Screenshot Tool
You'd have heard people asking the question "how to record a Zoom meeting on Mac"? But, have you ever seen a person asking to know how to use Zoom screen capture mode?
Zoom comes with a built-in tool that helps you take screenshots during Zoom meetings. Apart from a built-in tool, many operating systems also offer you an opportunity to take the Zoom screenshot without the built-in Zoom tool. Whether you use a Zoom-built tool or an operating system built-in tool, taking the screenshot is pretty easy, and you don't need to do anything extraordinary to serve your purpose. Instead, you can get your job done by following a couple of simple steps.
Let us talk about capturing a Zoom screen using Zoom's native tool. Remember, you'll need to enable the built-in Zoom tool to take a screenshot, as the tool is disabled by default.
1. Via Zoom built-in tool
Step 01First of all, you'll need to launch the Zoom app after installing it from the official website. Next up, you'll need to create the account by entering your credentials.
Step 02After navigating to the "Home tab", you'll need to hit the cogwheel button icon under your profile photo.
Step 03In this phase, you'll only need to hit the Keyboard Shortcuts tab and then tap "Expand Chat". After expanding the chat, you need to enable the ''Screenshot shortcut'' option.
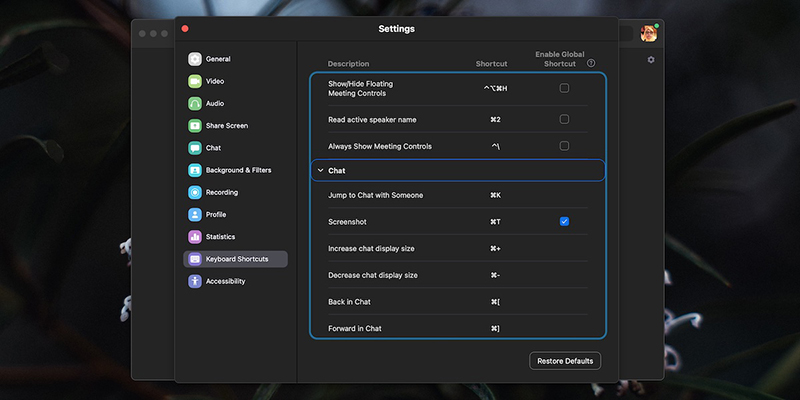
Step 04If you're a macOS user, you'll be asked to give Zoom additional permissions before taking the screenshot. After enabling the screenshot feature, you'll need to tap the Command+ T keyboard. This process will help you capture the screen on macOS.
Step 05If you're using Windows 10, you'll need to click the Ctrl+ keyboard shortcut, and you'll be able to take a screenshot afterward.
2. Zoom meeting screenshot - Operating built-in system tool
As we've discussed that many operating systems come with built-in tools that help you capture the screenshot of anything happening on your screen.
Here's how to do it on Windows 10 and macOS.
Windows 10
Step 01Launch Zoom and start a meeting with your friend. Next up, you'll need to share the screen on Zoom.
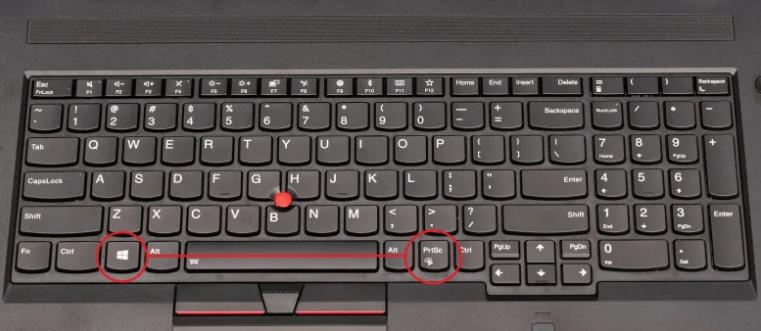
Step 02Now, you need to use the Win+ PrntScrn keyboard shortcut to take the Zoom meeting's screenshot.
macOS
macOS enables you to capture full screen while attending a Zoom meeting. So, how to record Zoom meeting on Mac? Here's how to use Zoom screen capture mode on macOS.
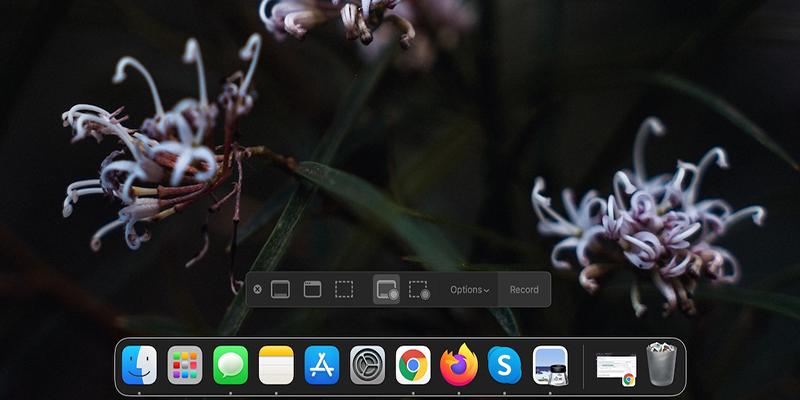
Step 01Open Zoom and start a meeting there. Next up, you'll need to use the ''Command+Shift+3 shortcut". If you want to capture the active window screen, you'll need to hit ''Command+Shift+4 Shortcut".
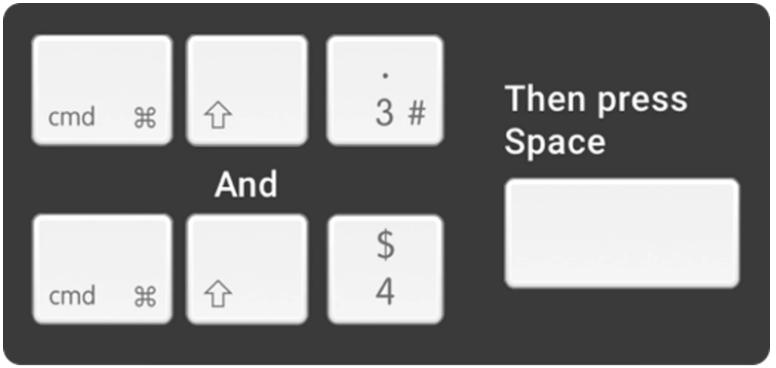
Step 02Next up, you'll need to click the Space bar when you see the cursor changing into a crosshair. Now, you can select the window you'd want to capture.
Part 2: Where Does Zoom Save Screenshots
After doing a Zoom screen capture, you wondered, "where does Zoom save screenshots?" Many people ask this question, and interestingly there is no rocket science behind this question. When you take a screenshot on Zoom via a Zoom built-in or operating system built-in tool, you can easily access the screenshot.
Follow the guide below to know where you can find the captured Zoom screenshot.
1. Via Zoom built-in tool
Step 01After capturing the screenshot on Zoom, you'll be able to see the download icon there. It helps your screenshot to get saved on the photo gallery on your PC.
Step 02Luckily, you can alter the location where you'd want to preserve the Zoom screenshot by visiting the Zoom setting. Moreover, you can also share the screenshot with your meeting participants.
2. On Windows and Mac
When you capture a screenshot on your Mac or Windows 10, your picture library accepts that screenshot. You can open the screenshot by visiting the Picture library.
Another Easy Way: How to Screenshot on Zoom Windows
If you're looking to screen record your Zoom meeting, HitPaw Screen Recorder can be your mind-blowing option to easily screenshot Zoom meeting.
Using this outstanding tool, you can easily record games, webcam, or record screens with minimal effort. On top of that, it also comes with some additional features, including real-time monitoring and segment recording.
Importantly, HitPaw Screen Recorder doesn't make your job difficult as it comes with a fairly simple user interface.
1. Key Features of HitPaw Screen Recorder:
-
1
HitPaw Screen Recorder helps you capture webcam and screen simultaneously courtesy of the Picture in Picture recording feature.
-
2
You can also record your game using this spectacular tool.
-
3
HitPaw Screen Recorder also comes with Hardware Acceleration to make your system function pretty fast.
-
4
Using HitPaw Screen Recorder, you can also take a screenshot in Zoom meeting.
-
5
You can also use the free trial version as HitPaw Screen Recorder comes up with a free trial.
2. Steps to Take Screenshot of Zoom in HitPaw Screen Recorder:
Step 01Install HitPaw Screen Recorder.
After getting HitPaw Screen Recorder installed from the official website, you'll need to launch the software without wasting time.
Step 02Start Zoom Meeting
Launch Zoom and then start a Zoom meeting to begin the proceedings.
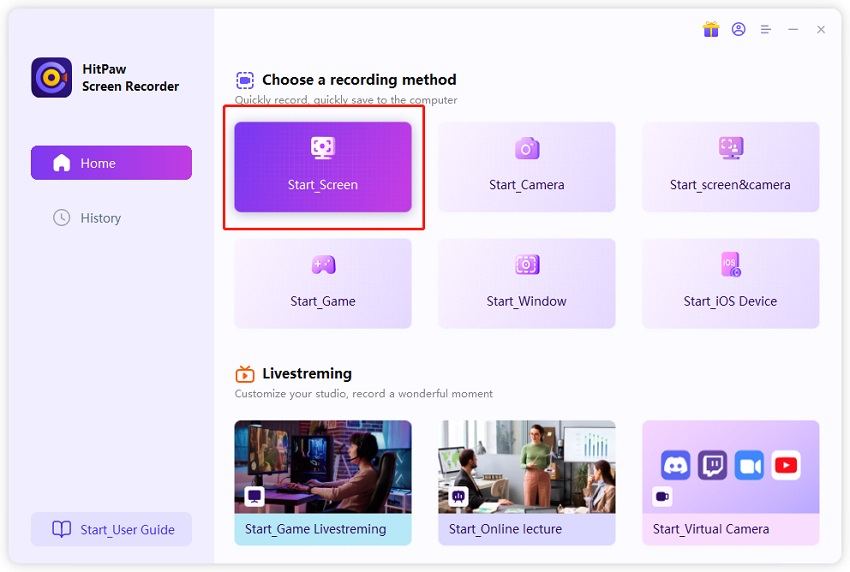
Step 03Hit "Screen"
You'll need to enter into HitPaw Screen Recorder's interface and select the "Screen" option from there. Then select the area that you want to take a screenshot of.
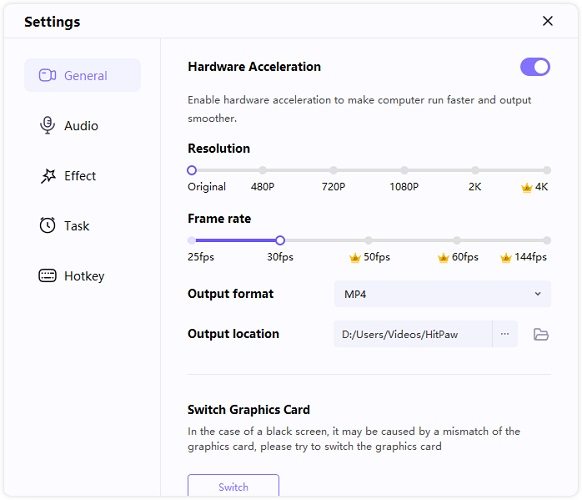
Step 04Adjust the Setting
In this phase, you'll only need to navigate to "Settings" and select the video format you'd like to record the Zoom meeting. Hit the Device option to choose microphone and speaker. Next up, all you need to do is hit "Start" to begin the recording process.
Step 05Take A Screenshot
Hit the camera icon to take a screenshot. Moreover, you can stop the recording whenever the Zoom meeting finishes.

Conclusion
Taking a screenshot on Zoom is pretty straightforward, as you can read this guide to know how to use Zoom screen capture mode. Zoom comes with a built-in tool to allow you to take screenshots during Zoom meetings. Although you can take a screenshot on various operating systems, some computers don't enable you to take a screenshot on Zoom.
On the other hand, you can use HitPaw Screen Recorder to record Zoom meetings. Luckily, HitPaw Screen Recorder allows you to take a screenshot by following a couple of simple steps.


 HitPaw Univd (Video Converter)
  HitPaw Watermark Remover

Share this article:
Select the product rating:
Daniel Walker
Editor-in-Chief
My passion lies in bridging the gap between cutting-edge technology and everyday creativity. With years of hands-on experience, I create content that not only informs but inspires our audience to embrace digital tools confidently.
View all ArticlesLeave a Comment
Create your review for HitPaw articles