What Is Mac Screenshot Shortcut
Looking for information on different Mac screenshot shortcut methods. What are the odds that this article provides details on the same topic. All you have to do is read the article below to know more about different screenshot shortcut Mac methods. In addition to this, we also have a special bonus for you that can make your screenshot capturing experience exceptional. Have a look.
Part 1. Common Shortcut for Screenshot on Mac
Below is the list of shortcut for screenshot on Mac. Read below to know more.
1. Command + Shift + 3
Command + Shift + 3 short cut is the most basic Mac shortcut for screenshot. This is used to capture a screenshot of your whole screen. Follow the below steps to know more.
-
1
To snap the whole screen, press Command + Shift + 3.
-

-
2
The screen shot will be saved automatically as a PNG file on your desktop.
-
3
The filename will start with “Picture” followed by a number.
-
4
To copy the whole screen, press Command + Control + Shift + 3.
-
5
The screen shot will be copied on your clipboard for you to paste into different applications such as Word, PowerPoint, and Photoshop.
2. Shift-Command-4
This screenshot Mac shortcut is the most helpful shortcut that users can have. Read below to know more about this shortcut.
-
1
To snap a part of the screen, use the macOS screenshot shortcut Command-Shift-4. A cross-hair cursor will be shown to the users and they can click and drag to choose the region they wish to snap. When users release the mouse, the screen shot will be saved automatically on the desktop as a PNG file following the naming convention as explained for the earlier MacBook screenshot shortcut.
-

-
2
To store a part of the screen on the clipboard, click Command-Control-Shift-4 screenshot shortcut on Mac. A cross-hair cursor will be shown to the users and they can click and drag to choose the region they wish to snap. When users release the mouse, they can paste the screen shot to a different application.
-

-
3
To capture a particular app window, click and hold Command-Shift-4 MacBook pro screenshot shortcut then click on the Spacebar. The cursor will turn into a camera, and users can move it around the screen. As users move the cursor over an app window, the window will be highlighted. The complete window does not require to be visible for you to snap it. When users have the cursor over a window they wish to take screenshot of, just click the mouse button and the screenshot will be saved on the desktop as a PNG file.
-

3. Shift-Command-5
A screenshot keyboard shortcut Mac command was earlier launched by Apple in MacOS Mojave (2018). Using the Shift-Command-5 Mac screenshot shortcut keys shows a tiny panel with your screen capture options at the bottom of your display. There are three screenshot options that allow users to capture a window, the entire screen, or a selection of your screen, while using this keyboard shortcut for screenshot Mac.

4. Command-Shift-6
Users with 16-inch MacBook Pro or another model can use a different Mac screenshot command. Users can use this shortcut to capture the Touch Bar. All they have to do is use the Command-Shift-6 screenshot command Mac to take a very skinny and wide screenshot of the Touch Bar.
Part 2. How to Custom You Own Mac Shortcut for Screenshot with HitPaw
All the above mentioned command for screenshot Mac can be used to capture screenshots but not as per users need. For that purpose, HitPaw Screen Recorder is the best option that users can use. Below is the list of top features that this tool offers. Have a look.
- Offer customized MacBook screenshot command to capture screenshots
- Capture full screen or any part of the screen based on your needs
- Capture your screen on Mac and yourself at the same time
- Edit the screenshot like add a shape, input text, draw a line, spray, and more
- Easy to use and user-friendly for beginners
Follow the below steps to know how to screenshot on Mac without using any of the command to screenshot on Mac and using this tool.
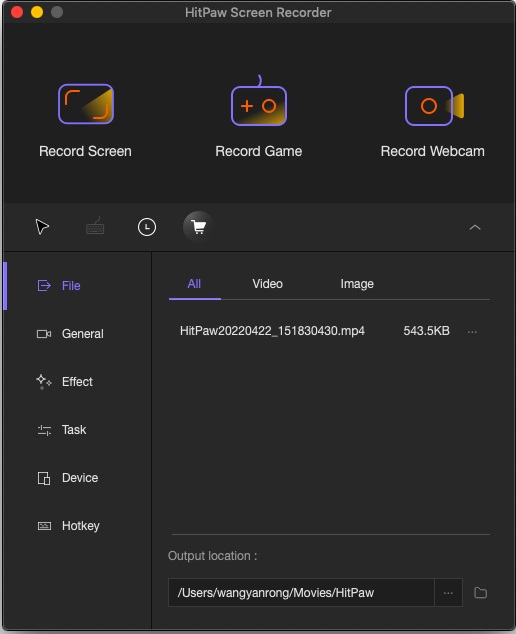
Step 01Download and launch the tool on your PC. On the main interface, click Record Screen option to record your screen.

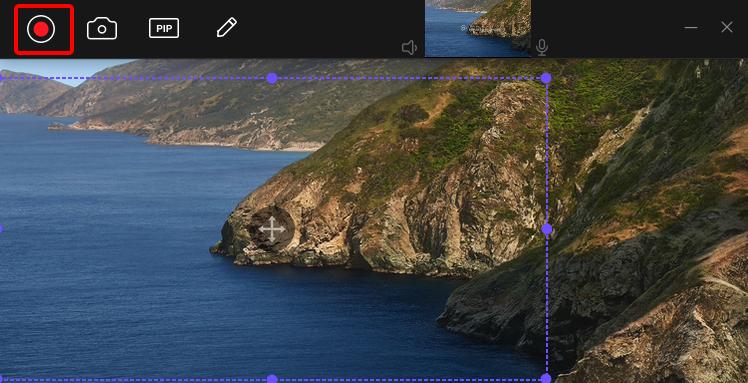
Step 02Users can select full screen or select a desired area, as per their requirement, to record the screen. Click the recording option to begin recording.

Step 03You can click the camera icon to take a screenshot while recording. Click the stop option to end the recording.
Part 3. Frequently Asked Questions on Mac Screenshots
1. Where to Find Screenshots on a Mac
The screenshots are saved by default on desktop and users can see them.
2. How Do You Take a Screenshot of a Whole Web Page on a Mac?
You can use the Shift-Command-5 shortcut to grab screenshot of while web page.
3. Does Mac Have a Snipping tool?
Mac earlier used to provide a utility tool named Grab. However, from Mohave, the company replaced this utility with Screenshot. Users can now access this tool by using the Command + Shift + 5 shortcut.
Conclusion
In a nutshell, you just had a look at different methods that can be used as to access Mac screenshot shortcut. In addition to this, we also had a look at HitPaw Screen Recorder that is the best tool to capture screenshots on Mac devices.


 HitPaw Watermark Remover
  HitPaw Univd (Video Converter)


Share this article:
Select the product rating:
Daniel Walker
Editor-in-Chief
My passion lies in bridging the gap between cutting-edge technology and everyday creativity. With years of hands-on experience, I create content that not only informs but inspires our audience to embrace digital tools confidently.
View all ArticlesLeave a Comment
Create your review for HitPaw articles