2024 New: How to Share Zoom Recordings
Nowadays, everyone is conducting online meeting to save their time and energy. In this digital era, conducting online meeting has become a powerful source of communication and it lets you to communicate to people at a distance. Zoom is one of the best video platforms for online meeting.
Zoom is a videotelephony platform where you can give tutorials, conduct interviews, demonstrate a product, illustrate a software, etc. Zoom provides you access to record your screen while you are in a meeting, which you can view later on and even share with others. There are many people who didn’t know how to share a Zoom recording.
If you don’t know how to share a recorded Zoom meeting, then we are here with the best methods to share zoom meeting recording with you. Read this article till the end to get the best ways on how to share Zoom recordings.
Part 1. How to Share a Local Recording
If you have conducted a meeting via Zoom with recording option ON, saved the recorded video on local storage and now you are looking for options on how to share Zoom recording from computer, then here we are to help you. Sharing a local Zoom recording is an easy process, and to do so you can follow the steps given below.
-
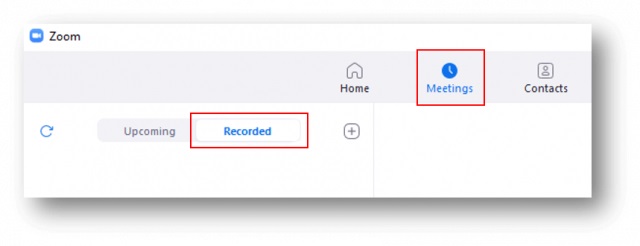
1. To access the meeting recordings in your Zoom Client, you should open the Meetings and tap on the Recorded tab.
-
2.Select the meeting you’d like to save and click Open to open the folder where your recording files (in .mp4 format) are stored. You can easily post this .mp4 file to a cloud storage or video streaming platform, like, YouTube, Facebook, etc.
-
3. Share the URL with your group, who will either download the MP4 file or stream the video depending on the provider you chose to host it. Make sure the movie is not shared or placed in a public folder. If necessary, think about adding password protection.
Part 2. How to Send a Zoom Cloud Recording
Zoom has multiple subscription packages with which you can save the recorded video of screen on cloud storage. If you have a subscription with cloud recording option, you can easily record and share the video of your screen. It saves your time of uploading the video and direct sharing of videos from the Zoom cloud is possible.
To know how to share recorded zoom meeting via cloud storage, you can go through these steps.
- Open the Zoom app and sing in to your account. To send the recording, click on the Recordings option given on the right-hand side of the screen.
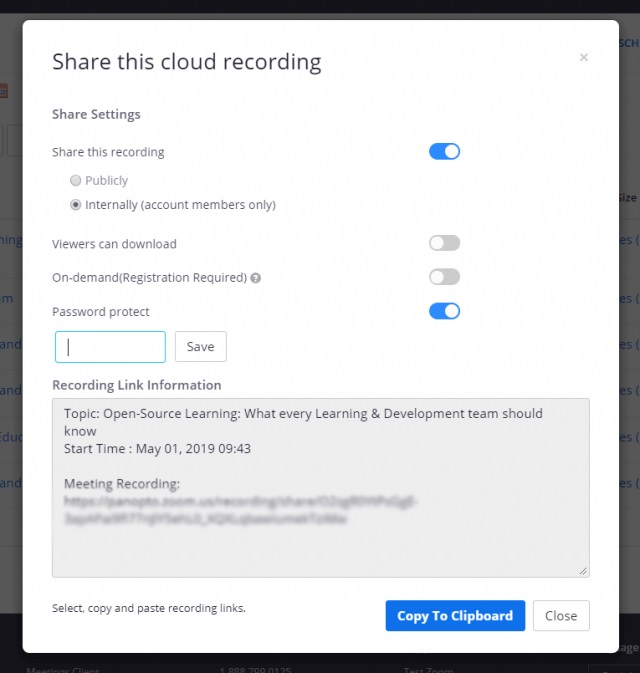
- To avoid the video from being made publicly available, click the button next to “Internally” after clicking Share... next to the clip you want to share. You can include a password as well for more security.
- When you want to send a colleague a recording from Zoom, copy the URL and paste it into an email or business messaging program.
Part 3. FAQs about Sharing a Recorded Zoom
1. How to Send a Zoom Recording via Email?
It is easy to share a zoom recording via email. You can send a zoom recording on email using a link. To know how to send a zoom recording via email, go along with these steps:
- Track down the cloud recording.
- The recording you want to share will have a Share button next to it.
- Once you have clicked Copy Sharing Information, click Done.
- Now, you can easily share the information that you want to.
2. How Do You Securely Share Zoom Recordings?
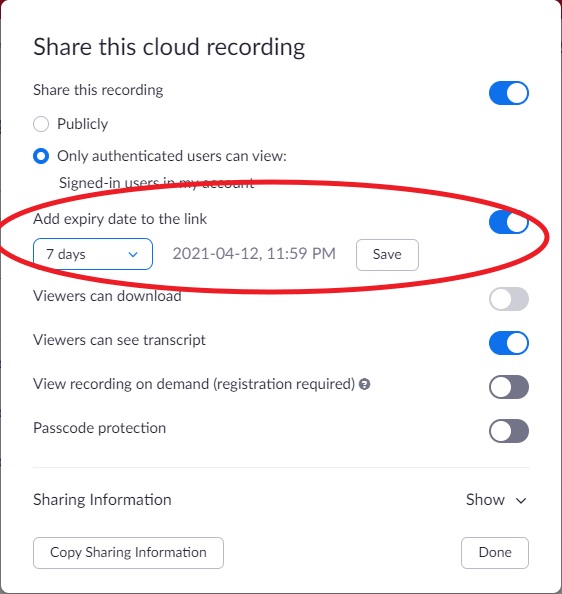
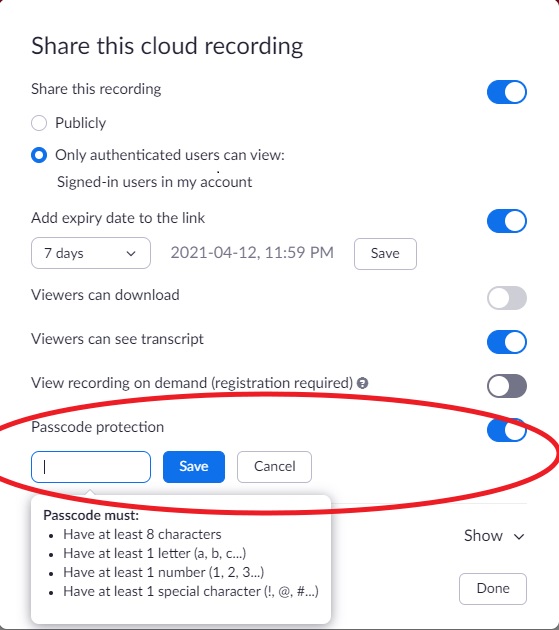
To share a Zoom recording securely, you should take some measures before sharing the recording. You can make some changes which are illustrated below to securely share Zoom recording.
-
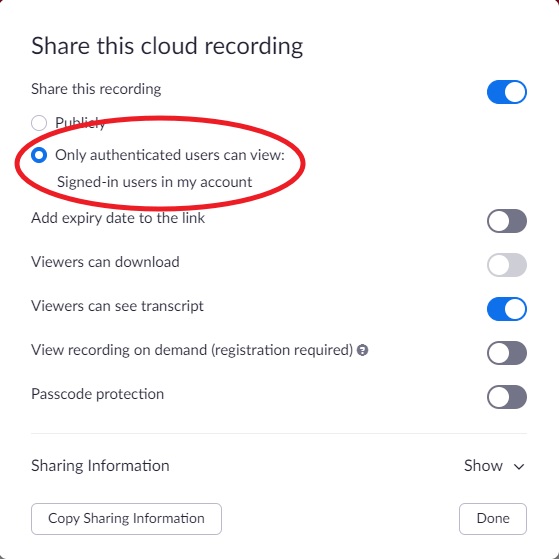
1.Before sharing a video, you must authenticate it for the number of users who can view it. Change the settings for the users that have been signed-in to your account. Enable “Only authenticated users can view“ option.

-
2.You must check-in for the option ‘Add expiry date to the link’. By doing this, you can be guaranteed that others can only access your recording up until a particular date.

-
3.You can also add ‘Passcode protection’ to the file, so that only those users can access the file who have authentic passcode.

3. Zoom Recording File Formats and Size?
If you have recorded a Zoom video, you must have noticed that it appeared in different formats from time-to-time. These different formats are according to the type of file in which you have recorded the video. Some common file formats are MP4, M4A, M3U, TXT, CC.VTT, VTT. The amount of storage needed to record a screen share is roughly 20MB per hour, compared to 200MB for video recording.
Part 4. Extra tips: Stream and Record Zoom Meetings with HitPaw Screen Recorder
If you are unable to record and share the video via Zoom or you finding it a little difficult to do so and looking for some other option for how to send Zoom recording, you should use HitPaw Screen Recorder for that purpose. HitPaw Screen Recorder is one of the best recording and streaming software that users can use to stream on Zoom. It can record your screen and webcam simultaneously, so that you can record and do live stream together at any time.
This software provides you many editing tools that you can use to enhance the recorded video. After recording the video, you can add templates, stickers, annotations, etc. to the video to make it more professional. Additionally, you can share it to various streaming platforms via a sharable link in just a click.
Follow these steps to know how to send a zoom recording using HitPaw Screen Recorder.
-
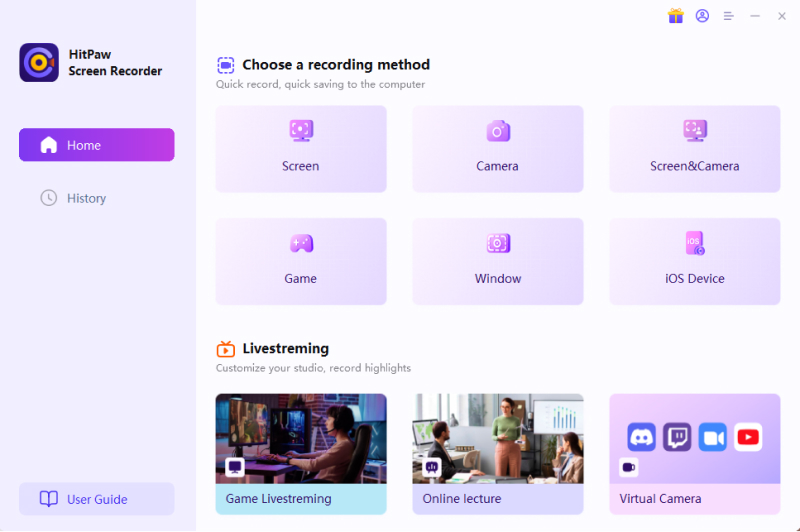
Step 1.Download and install HitPaw Screen Recorder on your computer, and run it.
-
Step 2.On the home screen thus appeared, click on ‘Live’ and choose ‘Live Streaming’.

-
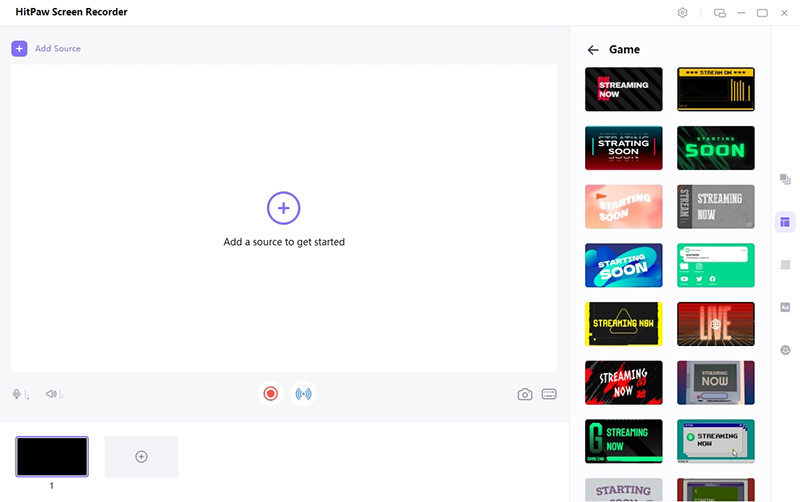
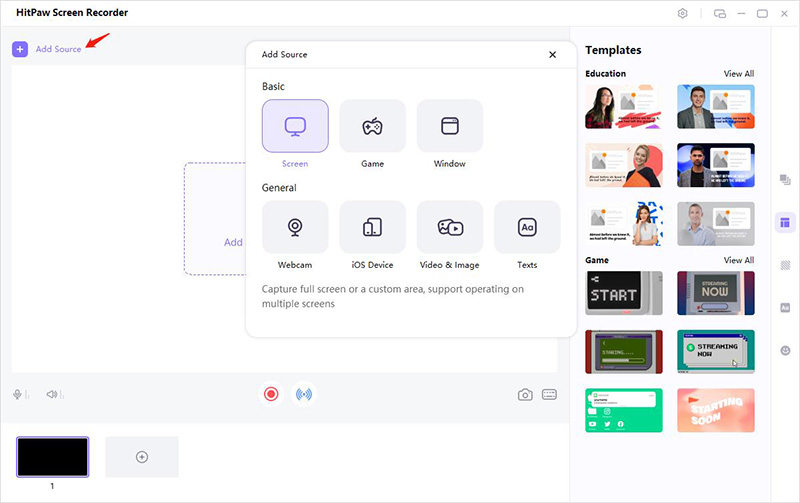
Step 3.You can live stream games, screens, windows, webcams, images, and texts by clicking the ‘Add Source’ button.

Tips
There are numerous wonderful and beautiful templates available on HitPaw. To make your live broadcast more engaging, click Templates on the right side of the screen and choose your preferred template.
-
Step 4.After clicking on ‘Add Source’, tap on ‘Screen’. By long clicking or by hitting the Space bar, select full screen or custom screen area.

-
Step 5.Once you have opened your live streaming platform, you should select the ‘HitPaw Virtual Camera’ to record and/or live stream in HD quality. HitPaw Screen Recorder can then be used to start a live stream on Zoom.
-
Step 6.After selecting the Zoom option, click on the ‘Live’ button to start streaming live.
The Bottom Line
Here, we have discussed some of the best ways of how to share a Zoom recording whether you have stored it locally or on cloud storage. We recommend you to use HitPaw Screen Recorder for recording and/or live streaming on Zoom or various other platforms. With HitPaw Screen Recorder, you can use templates, stickers, etc. to make your streaming more attractive.



 HitPaw Univd (Video Converter)
  HitPaw VikPea (Video Enhancer)

Share this article:
Select the product rating:
Daniel Walker
Editor-in-Chief
My passion lies in bridging the gap between cutting-edge technology and everyday creativity. With years of hands-on experience, I create content that not only informs but inspires our audience to embrace digital tools confidently.
View all ArticlesLeave a Comment
Create your review for HitPaw articles