How to Record PowerPoint Presentation with Audio and Video on Mac?
Before we move on to discussing how to video record yourself presenting a PowerPoint on Mac, let’s address some queries that you might have. First and foremost, let’s talk about why it’s important or necessary to record your PowerPoint presentations. Nowadays, most professional entities make use of PowerPoint presentations for the purpose of proposing ideas, sharing data, and comparing analytics that is relevant to the business. Apart from the professional scale, PowerPoint presentations also prove to be vital for personal scenarios and purposes.
With the increasing popularity of PowerPoint presentations in the professional as well as personal sector, there also arises a need to record certain presentations to share them with friends, families, or employees. In other circumstances, you might also feel the need to share your PowerPoint presentation on certain video-sharing platforms, such as YouTube. To do so, you must store your presentation in the form of a video file, which is only possible by recording your presentation.
Now that you know the importance of recording PowerPoint, let’s not waste any more time and get straight into the guide.
Way 1. Official Way to Record On PowerPoint on Mac
When discussing the topic of screen recording PowerPoint on Mac, it’s important to note that PowerPoint does officially allow the feature of recording presentations. The screen recorder is integrated into the PowerPoint software and can be directly accessed without any hassle.
The PowerPoint built-in screen recorder is easy-to-use for beginners with little to no knowledge of screen recording; however, there are several limitations to using this tool to record your PowerPoint presentations, including it doesn’t allow you to edit your recordings for the purpose of making them more engaging and its recording features are pretty basic and don’t compare with other popular screen recorders in the market.
The steps below illustrate how you can implement this official method to record PowerPoint presentation with audio and video on Mac.
-
1
Open the PowerPoint slides that you want to record and select the “Record Slide Show” option under the “Slide Show” tab.
-

-
2
Set the desired video and audio options in options dropdown in the recording toolbar. Here you can select the input settings and devices for video and audio.
-

-
3
Once you’re ready to begin recording your presentation, simply hit the Record button from the recording toolbar. You may use buttons like Pause and Resume to assist you during the recording.
-

-
4
Once your presentation is complete, press the Stop button to end your recording. Press Play on a certain slide to preview what you’ve recorded on that particular slide.
-
5
If you want to re-record your presentation, simply tap the “Clear recording” button to delete the previous recording. Hit Record to record your presentation again.
While this is the official method of screen recording PowerPoint Mac, it isn’t the most preferrable option since its usage is quite limited. If you need more professional PowerPoint screen recording solutions, read on.
Way 2. Use Easy Screen Recorder Software to Record PowerPoint Presentation with Audio and Video on Mac
If you want to know how to record on PowerPoint Mac effortlessly and without much trouble, then you are highly recommended to try using third-party software for this purpose. In that regard, we believe that the best tool for you is the HitPaw Screen Recorder. This software continues to top the list of the best screen recordering tools to record keynote presentation on Mac, primarily because of its huge collection of recording features.
Main Features of HitPaw Screen Recorder
Some of the most prominent recording features offered by the HitPaw Screen Recorder are listed below.
- Simple operation with rich features: · Capture screen or webcam from computer or iOS devices, record screen and webcam simultaneously
- Capture the full screen or part of screen flexibly
- Simultaneously stream live to over 30 popular platforms
- Easily record and live stream at the same time
- It supports Hardware Acceleration to make the software run smoothly on your Mac
- It supports scheduled recording segment recording
- Offers free templates, virtual backgrounds, stickers, and texts to make your videos, live streaming or presentation stand out
- Keyboard and mouse actions can also be captured while recording your screen
How to Screen Record PowerPoint on Mac
Now that you know why the HitPaw Screen Recorder is the right tool for you, let’s talk about how to video record yourself presenting a PowerPoint on Mac using the HitPaw Screen Recorder.
Step 01 Download and install the HitPaw Screen Recorder on your Mac.
Step 02 After installation, launch the software and select the “Record Screen” option from the home page.
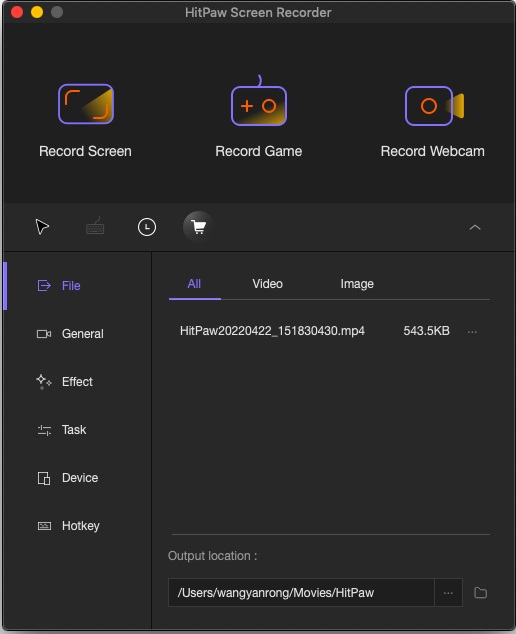
Step 03 Next, you need to select the part of your screen that you want to record. Single-click to select the entire screen or long-click to define a certain area of your screen.

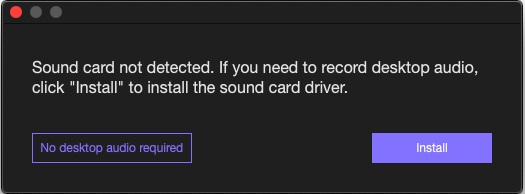
Step 04 If you’d like record PowerPoint presentation with audio and video on Mac, please follow the onscreen instructions to install the sound card driver.
Step 05 Hit the Record button to begin recording your presentation. You may use the Pause and Resume buttons from the recording toolbar to assist you during the recording. And you can take screen shot, add annotation, highlight, arrow the area you need.
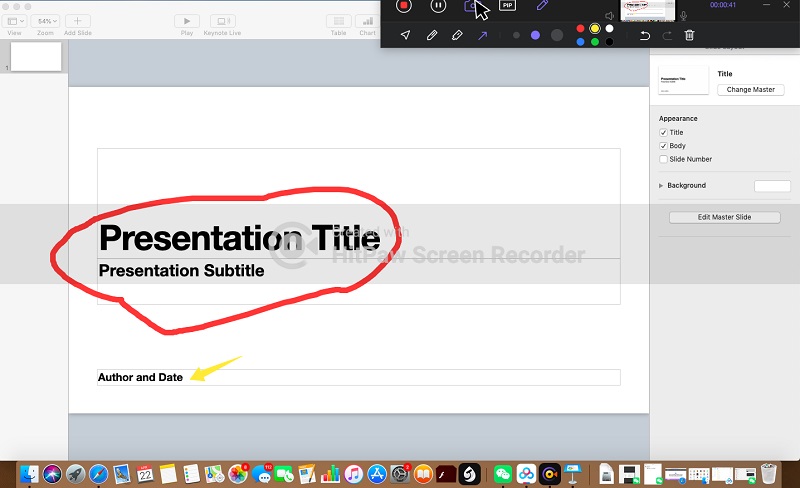
Step 06 Once your presentation is complete, hit the Stop button to end your recording. Afterward, you’ll be able to trim your recording according to your preferences. Select “Open output folder” to open the destination folder on your recording.
Way 3. Screen Record PowerPoint on Mac with QuickTime
The QuickTime Player is a built-in tool that comes with almost all MacOS versions. Apart from a screen recorder, the QuickTime Player performs other functions including recording webcam, playing and editing videos, and more!
Follow the steps below to understand how you can use the QuickTime Player to record your PowerPoint presentations on Mac.
-
1
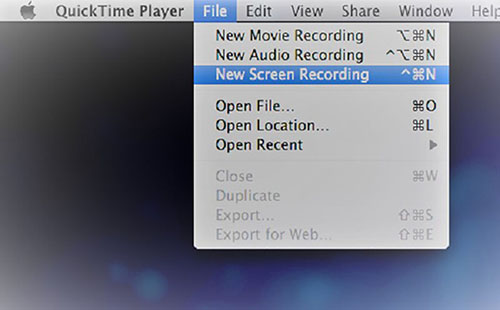
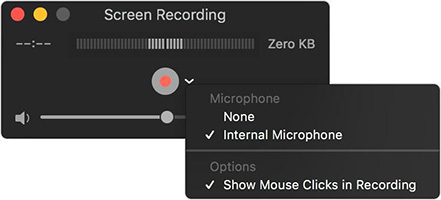
Launch the QuickTime Player on your Mac device. Select “File” from the top-left menu and choose “New Screen Recording”.
-

-
2
Inside the “Screen Recording” window, tap on the down-arrow and select your desired microphone device.
-

-
3
Select the Record button to begin recording your presentation. Once done, hit the Stop button to end your recording. Following this, you can choose the desired file location for your recording.
It’s important to note that there are certain limitations associated with using QuickTime Player to record your PowerPoint presentations. This tool offers a moderate quality of recordings, which can not be adjusted according to the requirements of the user. It offers only one output format for the recordings, which is .mov. Moreover, its recording features are fairly basic when compared to other popular screen recorders.
The Bottom Line
With this article, we took a look at the three most suitable and effective ways to record PowerPoint presentation with audio and video on Mac. While each of these methods has its own list of pros and cons, it's important for you to test them out for yourself in order to make a solid judgment regarding which tool is the best screen recorder for you.
While the QuickTime Player and the PowerPoint built-in screen recorder are pretty basic tools, the HitPaw Screen Recorder exceeds both of them in terms of features and overall functionality. You will certainly not be disappointed at the quality of screen recording service that HitPaw Screen Recorder provides for users.


 HitPaw Univd (Video Converter)
  HitPaw Compressor


Share this article:
Select the product rating:
Daniel Walker
Editor-in-Chief
My passion lies in bridging the gap between cutting-edge technology and everyday creativity. With years of hands-on experience, I create content that not only informs but inspires our audience to embrace digital tools confidently.
View all ArticlesLeave a Comment
Create your review for HitPaw articles