How to Download Zoom Video Recordings [Detailed Guide] 2024
Downloading Zoom videos is essential for students and remote workers who rely on this video conferencing tool. Whether you've missed an online class or a meeting, it is a common need to download Zoom recordings. You can view, share, or swap Zoom video recordings with anyone after downloading.
This article will teach you how to download Zoom recordings from shared links and your Zoom Cloud easily. We will also talk about 2 efficient screen recorders to make your life easy. Let's check out the prerequisites and how-to guide in detail.
Part 1. Basic Requirements to Find and Download Zoom Recordings
Before downloading Zoom video recordings, it's crucial to know the recording's source and location. Here are three scenarios to consider:
1. If You Are the Host: Local Recordings
As the host, you can first save your Zoom recordings to your device. With automatic local Zoom recordings setup, there’s no need to download the recording as it will be automatically saved to your local device. We’ve explained where to find these recordings in Part 4.
2. If You Are the Host: Downloading Cloud Recordings
You can also save the recordings to the Zoom cloud on your mobile or desktop if you have a paid account. In this way, you will need to download these recordings from your account on the Zoom website or app. We’ve explained it in Part 3.
3. If You Are the Participant: Downloading Zoom Recording locally or from Shared Links
Participants are able to download Zoom recordings to their computer's local storage as long as the host gives their permission to record locally. Besides, they can download the recording via shared links with the correct URL and passcode after the link sharing is enabled for the download. Check out the next part.

Part 2. How to Download Zoom Video from Shared Links
From students to officials, most people like to download videos from Zoom and watch them later. Downloading Zoom videos from shared links is possible and you can do it without using any plugins or additional help. So, if you have missed your online meeting, ask your classmates or colleagues to send you the link, then download Zoom recording from the link and learn the missing part by yourself.
You can download Zoom recording from shared link with the following steps:
- 1. Download Zoom recording from the link: Click the obtained link to open it.
- 2. Right-click on the video and, from the menu, select Save Video As. You can save and rename the file in the folder of your choice.
- 3. The video will start downloading on the taskbar.
Part 3. How to Download Zoom Recordings from Zoom Cloud
Zoom Cloud lets you record meetings automatically if you have a paid subscription. Cloud recordings are accessible to iOS, Android, and desktop users with different recording layouts, shared screen, and cloud storage options. You can share recordings with a link or download them to your device. Now to download a Zoom recording from Zoom Cloud, follow these steps.
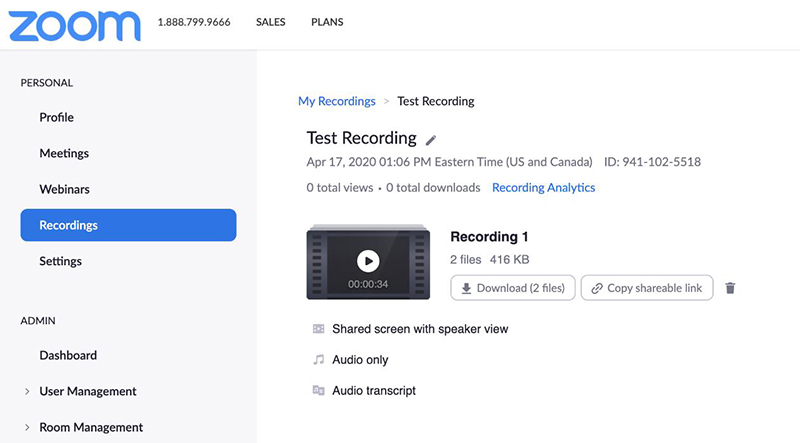
1. The first step is to find the cloud recordings. Sign into the Zoom web portal and go to Account > Recordings.
2. Find the video recording you want and open it. There is a download button at the top; click it. You can also download the audio file only.

3. The video will be downloaded after an approximate time.
Part 4. How to Find Zoom Recordings on Your Windows/Mac
As we mentioned before, you can automatically save Zoom recordings locally. And finding your Zoom recordings is quite straightforward whether you have a Windows or Mac computer. Here is the walkthrough of the process to locate Zoom recordings:
For Mac Zoom Recordings
Step 1: Launch the Zoom application on your Mac by pressing the Zoom icon in the Dock. You might have to access Zoom from the Launchpad if it is not on the Dock.
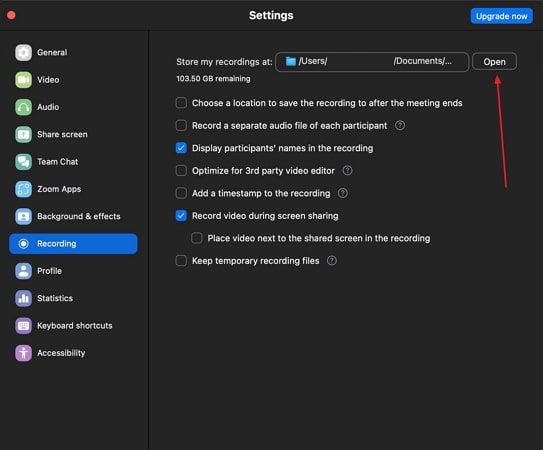
Step 2: Now click your Profile icon and select Settings from the drop-down menu. Choose Recording from the left panel in the new window. The location of the folder containing your recordings will appear in the right section. Click Open, and you will find your desired file.
For Windows Zoom Recordings
Step 1: Double click the Zoom icon on your desktop screen or search for Zoom from the Windows search bar.
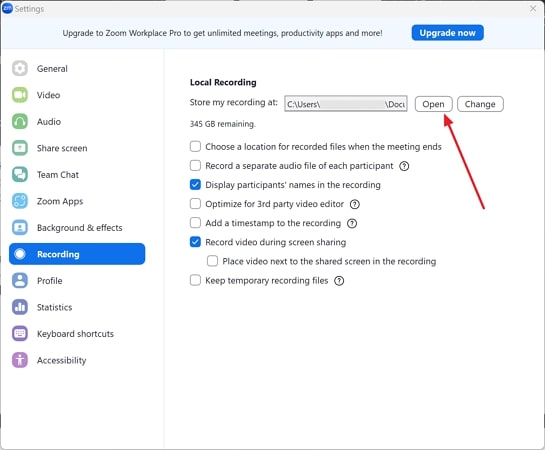
Step 2: Navigate to the Profile icon in the top right of the interface, and from the drop-down menu, select Settings. Click the option labeled Recording on the left panel. On the right side, look for the default location where your Zoom recordings are saved and hit the Open button next to the path.
Part 5. Ultra Tip: Start and Record A Zoom Meeting with Edimakor Screen Recorder
We have learned how to download Zoom recordings in different ways. If you want to make your Zoom meeting more colorful, consider Edimakor Screen Recorder. It supports Zoom meeting streaming and can also record the Zoom meeting locally. It will be a stable and less time-consuming Zoom meeting recorder for you.
From live streaming to virtual background, the program efficiently records Zoom meetings. It has impressive templates to choose from. You can change or even remove the background of the videos.
HitPaw Recorder has been one of the top choices for users. It has received many good reviews, and people have found ways to make more entertaining videos and recordings using this software.
Features
- Record screen with audio and webcam. Support schedule recording.
- Live streaming to different platforms such as Zoom, Twitch, Instagram, and Facebook.
- Live streaming with many options like adding stickers and changing backgrounds.
- Record Zoom videos in high quality. It keeps and sorts your video history.
- You can change templates, add filters, and other default settings during the meetings.
Tips
You can only record the Zoom videos if you get the permission and access to the videos.
Steps to Record Zoom Meetings with HitPaw Screen Recorder
Whether it's an educational video or a video conference, HitPaw Screen Recorder is the most convenient way to download and record a Zoom video.
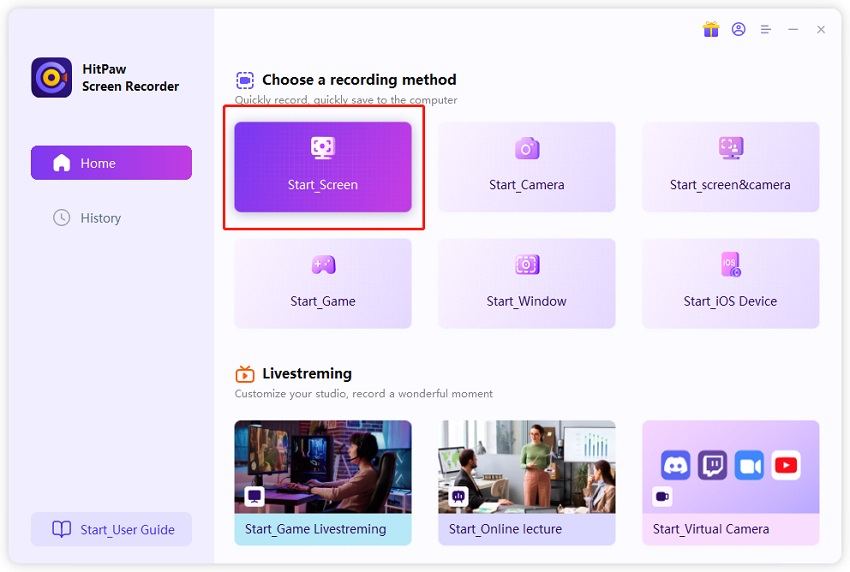
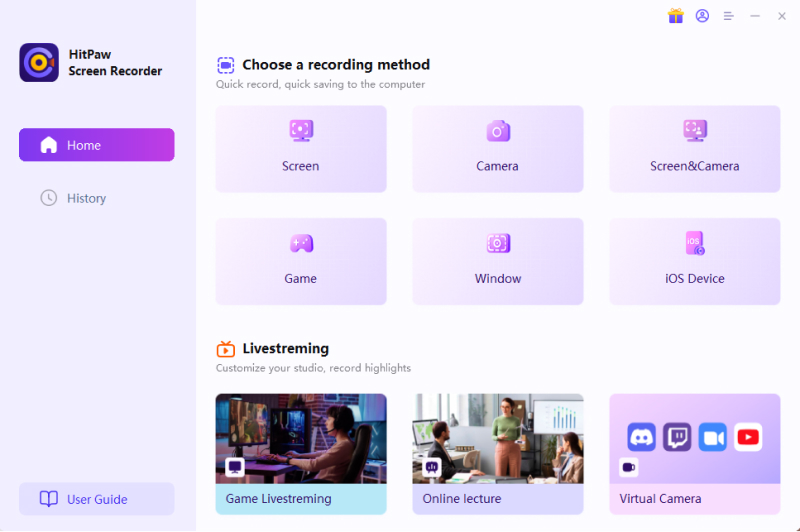
Step 01. Download and launch the HitPaw Screen Recorder. Click on Start_Screen to record a Zoom meeting.

-
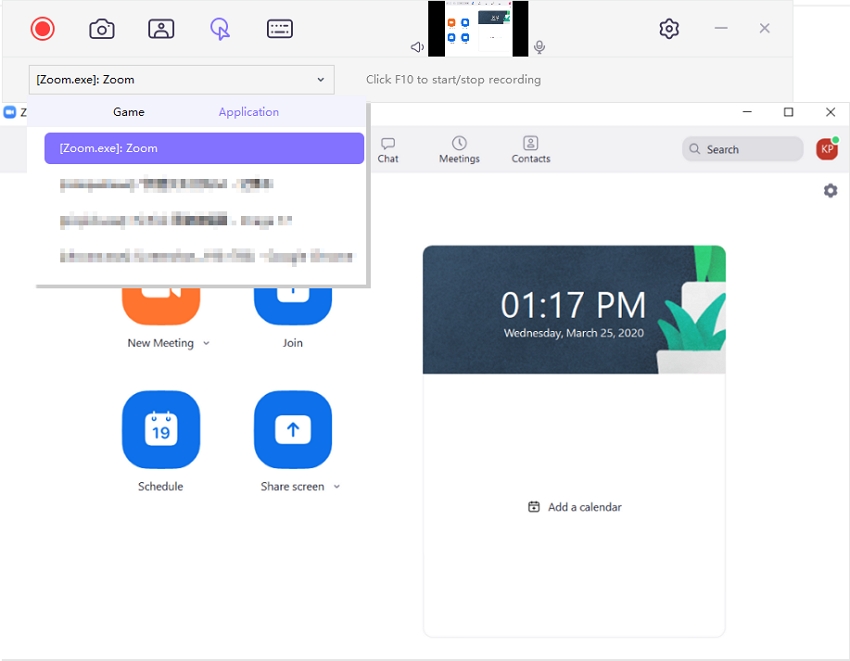
Step 02. Select the recorded screen that includes your Zoom meeting and click on the red button to start recording.

-
Step 03. After the meeting, click on the Stop button and you will find the Zoom recording is automatically downloaded and saved to your computer.
Steps to Start Zoom Meetings with HitPaw Screen Recorder
In addition to simple Zoom recording, you can also choose to set up meetings with templates and custom backgrounds, then stream to your Zoom meeting using HitPaw Screen Recorder, making your meetings more professional.
-
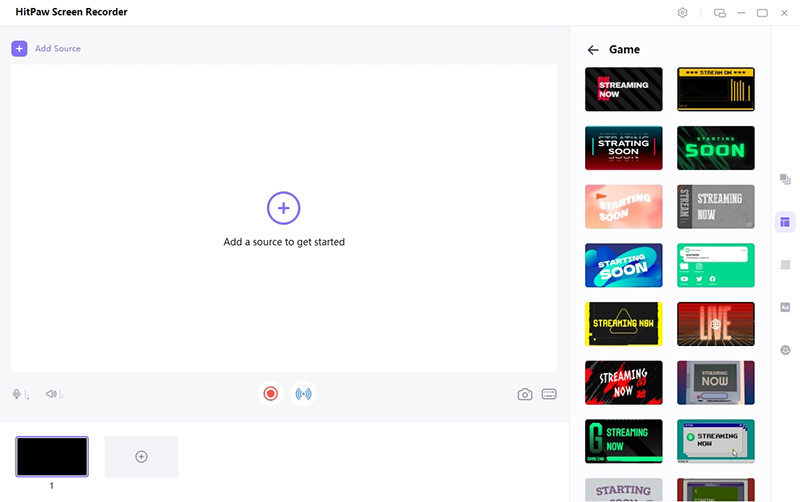
Step 01. After you launch the HitPaw Screen Recorder. Choose the option under Livestreaming.

-
Step 02. Choose a template and add source such as screen and webcam. Then start a New Zoom Meeting and open the Zoom app on your system.

-
Step 03. Choose "HitPaw Camera" from the camera list in Zoom meeting. Finally, click the small “red” button in the middle, and it’ll start the recording.

Part 6. Bonus Tip: How to Record and Edit Zoom Meeting with Edimakor
Do you struggle for hours to create a perfectly edited video or find it challenging to capture your Zoom meetings? HitPaw Edimakor can be your creative assistant for creating professional videos and capturing high-quality screen recordings. This powerful AI-powered video editor lets you trim, cut, and add text to your videos seamlessly.
Furthermore, HitPaw Edimakor utilizes smart AI algorithms to streamline your video editing process like AI audio editor, screen recorder, AI script generator, text-to-speech converter, and etc.
Tips
You can only record the Zoom videos if you get the permission and access to the videos.
1. Record Screen and Zoom Meeting With Precision
HitPaw Edimakor offers a robust screen recording feature to capture computer screens or Zoom recordings with ease. With customizable settings, users can effortlessly record any area, whether it's a specific application, a full screen, or a selected region.
Step 1: Choose the Record Tool of Edimakor
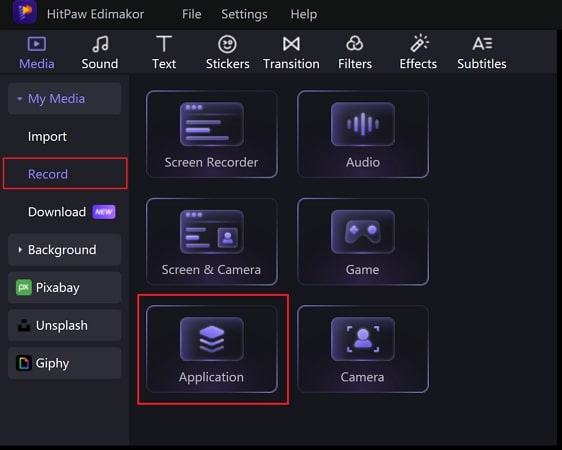
Launch Edimakor on your computer and join your Zoom meeting. Now, on the Edimakor window, press Create a Video and choose Record from the left panel. Here, choose the Application option and select the Zoom web or desktop app to record.
Step 2: Start Recording your Zoom Meeting
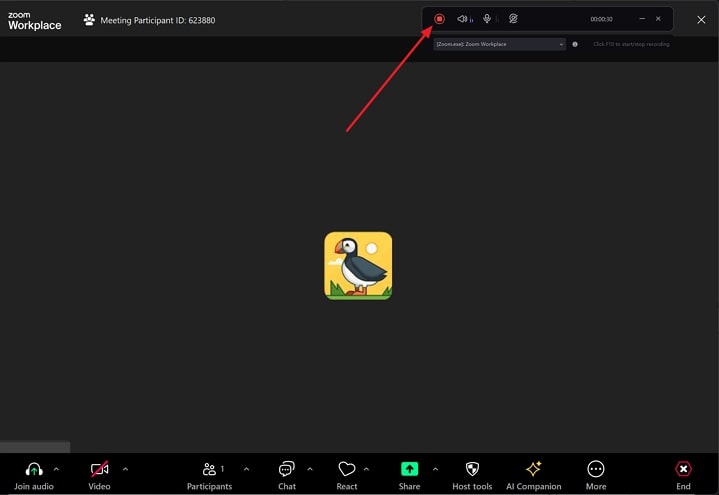
Click on the Record button to start recording the Zoom meeting. Once the meeting is finished, press the Stop button in Edimakor to end the screen recording process. Afterward, make any necessary edits and save the recorded file.
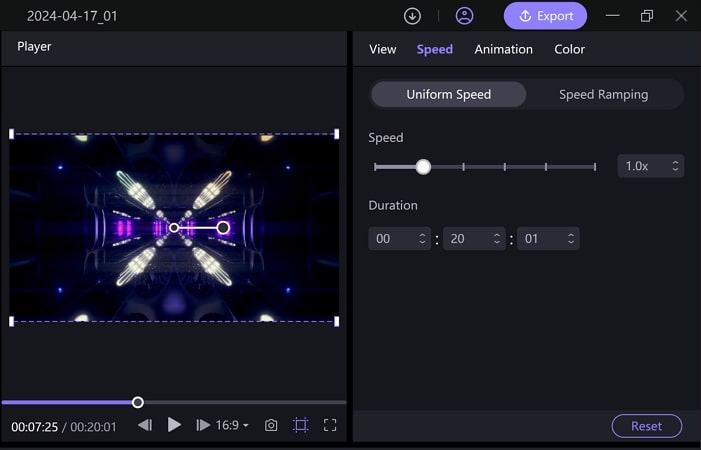
2. Master the Recording Speed Modification
This AI-powered video editing tool provides an intuitive speed-ramping feature that empowers users to create engaging and dynamic videos. With powerful controls, users can adjust the speed of their video recordings, gradually increasing or decreasing the speed.
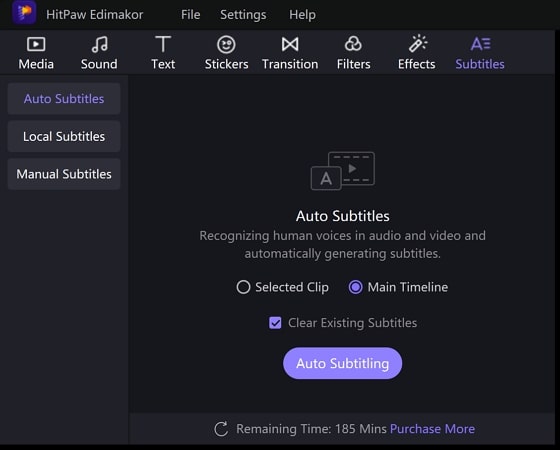
3. Effortless AI Subtitle Generator for Video Recording
This incredible AI feature automatically generates accurate subtitles for your Zoom video recordings, letting you save effort and time in manual transcription. With advanced AI technology, it efficiently detects speech to generate synchronized subtitles that enhance audience engagement.
Part 7. FAQs about Zoom Recording Downloading
Last but not least, we have gathered some frequently asked questions about downloading Zoom video recordings and answered them briefly for you.
Q1. How to Share Your Zoom Recording Videos?
A1. Sharing a Zoom recording directly is possible. If the recording is saved locally, find the file on your computer, upload it to a cloud service like Google Drive, and share the link. If it's saved to the Zoom cloud, log in to your Zoom account, go to Recordings, click Share, and copy the shareable link to share with others.
Q2. How to Download Zoom Video Backgrounds and Filters?
A2. To download Zoom video backgrounds and filters, go to Zoom Settings and click on Backgrounds & Effects. There, you can choose from default options or upload your own backgrounds. For filters, select one under Video Filters.
Q3. What are the File Formats of Downloaded Zoom Recordings?
A3. Downloaded Zoom videos with audio: MP4 file and M3U Playlist file; Downloaded Zoom audio: M4A file.; Downloaded Zoom Recording transcripts: VTT file.
Q4. Why Can't I Download Zoom Recordings from Shared Links?
A4. First check that the host has enabled sharing and downloading permissions. The recording might be password protected or the link might have expired, so make sure you entered the correct password and that the link still works. You might also see a "Page Not Found" error if the recording has been deleted.
Conclusion
Recording Zoom meetings are available when you want to save your meeting to local. Now you are equipped with all the knowledge to download Zoom recordings from shared links, Zoom Cloud and third-party apps. It is recommended to use HitPaw Screen Recorder or HitPaw Edimakor, which work as Zoom recording video downloaders and let you have fun with lots of templates, backgrounds, and stickers. Follow the steps in the article above according to your requirements and be a pro at Zoom recording download.




 HitPaw Edimakor
 HitPaw Univd (Video Converter)
  HitPaw VikPea (Video Enhancer)
Share this article:
Select the product rating:
Daniel Walker
Editor-in-Chief
My passion lies in bridging the gap between cutting-edge technology and everyday creativity. With years of hands-on experience, I create content that not only informs but inspires our audience to embrace digital tools confidently.
View all ArticlesLeave a Comment
Create your review for HitPaw articles