Full Guide on How to Record Voice in FL Studio (2024)
You must learn how to record voice in FL Studio if you are a professional sound technician and manage and modify acoustics meant for commercialization, i.e., movies, concerts, music albums, etc. The range of options and features and the versatility FL Studio offers are unparalleled, and help you produce high-quality outputs identical to what you hear in monetized songs and sometimes even for famous artists.
For FL Studio voice recording, many beginners might find the interface too intimidating for such a simple task. Consequently, they may close the app immediately after opening it, only to never return. If you are one of them, this guide could be a boon for you. In the next section, you will learn how to record voice on FL Studio.
Part 1: How to Record Voice in FL Studio Step-by-Step
As explained earlier, FL Studio has a complex interface that might confuse beginners. On the brighter side, the available buttons and sliders give you full control over the sound files, allowing granular modifications to produce industry-standard outcomes.
With that, the following steps explain how to record vocals with FL Studio:
Note: Before proceeding, connect a microphone to the computer. If your laptop has an integrated mic, you are good to go.
Step 1: Choose Correct Options and Hardware for Voice Recording
After launching FL Studio, go to OPTIONS and click Audio settings. On the Settings box, ensure that you are on the Audio tab. Pick the correct hardware device from the Input/Output list.
Note: The options in the list vary depending on the audio hardware of your PC. Therefore, choose FL Studio ASIO when not using a significantly different device.
Click Show ASIO panel, choose your microphone from the Input list on the FL Studio ASIO box, and close the panel.
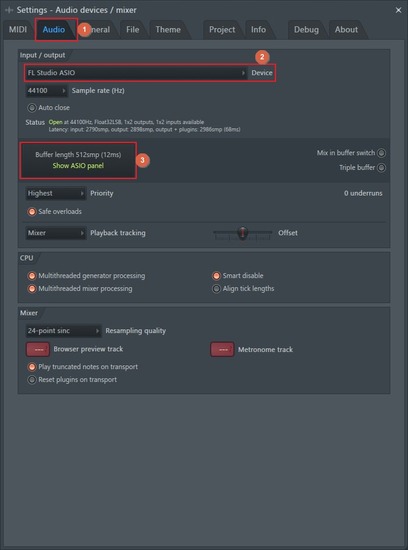
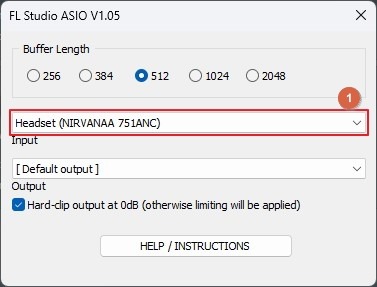
Note: If the Buffer length slider appears instead of Show ASIO panel, set it to 128smp (3ms).
Step 2: Prepare FL Studio for Audio Recording
Right-click any Insert track in the Mixer panel from the lower part of the interface and click Assign to new Audio track(s) from the context menu.
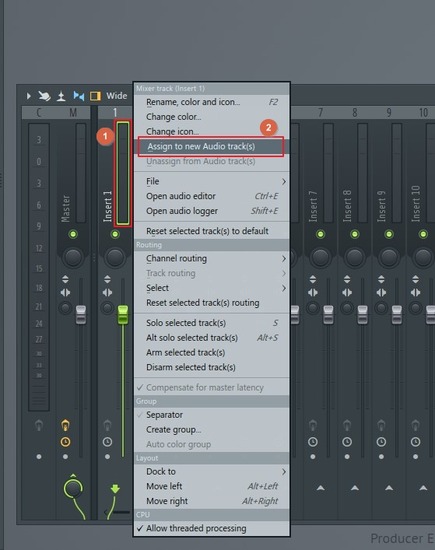
Click the Speaker icon on the active track in the Playlist and choose the line you connected the microphone to.
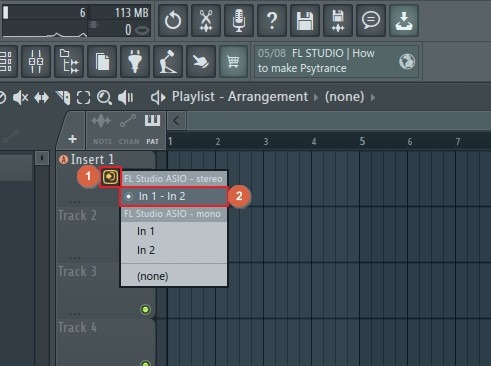
Note: If the Playlist doesn’t appear automatically, go to the VIEW menu and click the Playlist option.
Next, right-click the Record button and choose Recording starts playback. Right-click the button again and select Disarm on stop.
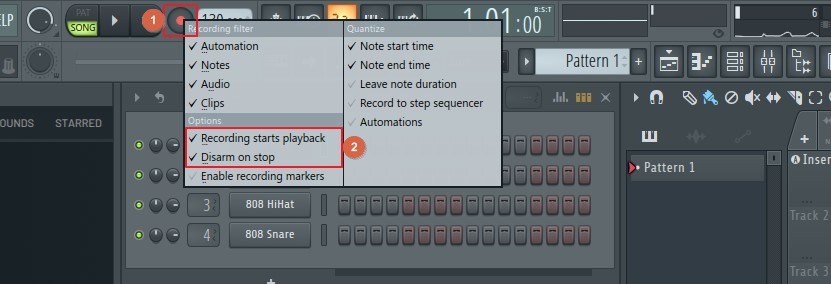
Step 3: Record the Vocals and Export the Audio
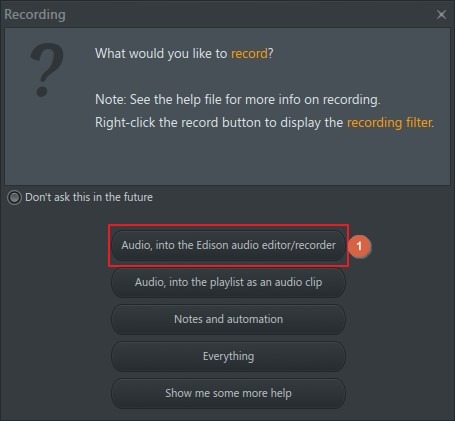
Press R on the keyboard and click Audio, into the Edison audio editor/recorder on the Recording box.
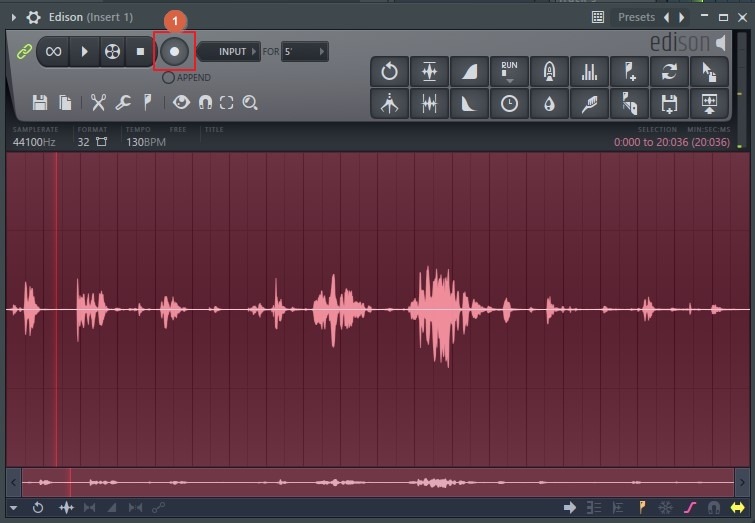
Click the Record button on the Edison interface (or press R), and start recording your voice. Click the Stop button to stop the FL Studio recording.
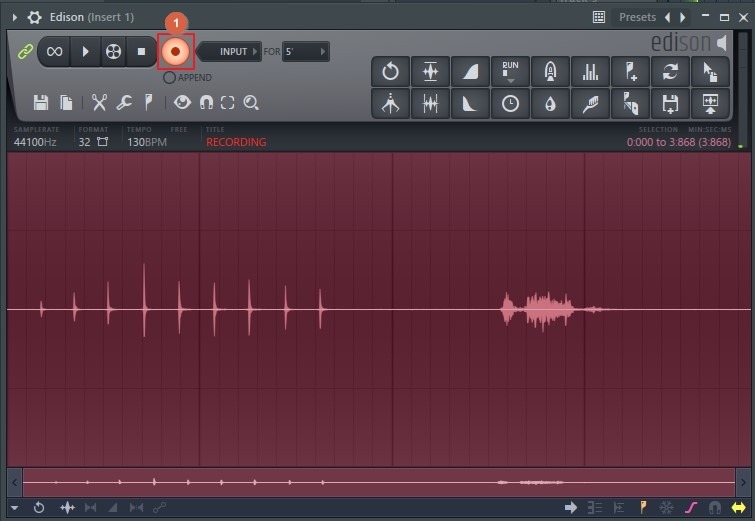
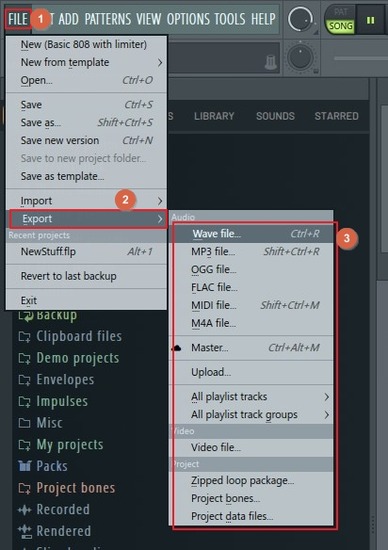
Now, go to FILE > Export and choose your preferred format from the submenu to export the recorded vocals.
Part 2: How to Record Vocals with the Best FL Studio Alternative
After learning how to record voice in FL Studio, many of you might find the process tedious and hard to memorize. Some may also think that the app is pretty daunting, and there’s nothing wrong with that. FL Studio is an expanded tool designed for audio engineers and professionals.
If you are a beginner or want to record your voice for narrations or social media posts, using FL Studio would be like underutilizing its efficiency and over-spending your time. This is where one of the best alternatives to the program with a much simpler interface called HitPaw Edimakor comes in.
Unlike FL Studio, HitPaw Edimakor is not merely an audio-oriented app but an all-in-one toolkit for production and post-production tasks. The best thing about HitPaw Edimakor is that it uses advanced AI algorithms to automate the most time-intensive processes and completes them within a few minutes if not seconds.The program’s built-in screen recorder with integrated microphone and system recording options makes it a big competitor of FL Studio and all other audio-centric apps.
The following steps explain how to record vocals with HitPaw Edimakor on your Windows or Mac computer:
Step 1: Prepare HitPaw Edimakor for Audio Recording
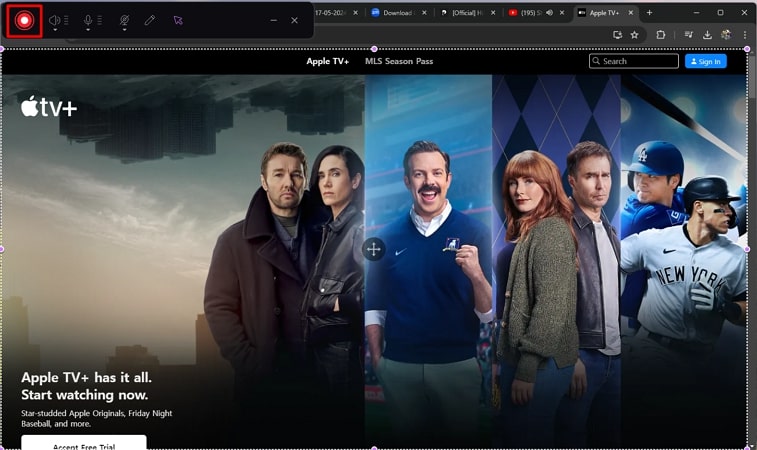
Connect an external microphone to the computer (recommended) or use the integrated one in case of a laptop. Launch HitPaw Edimakor, click Screen Recorder, and press the Spacebar to set the entire screen as a recording region.
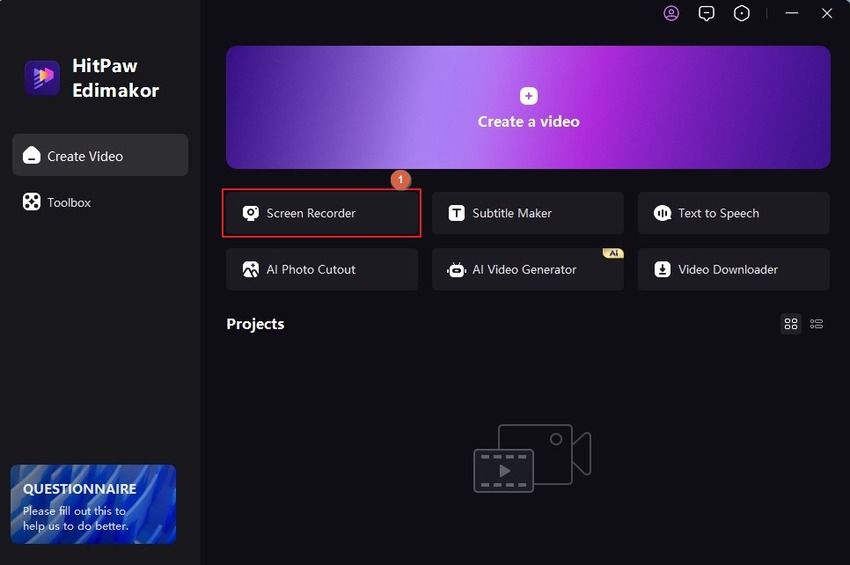
Note: Although you may not want the screen recording, Edimakor made this step mandatory so everyone can use the app equally and without any challenges. You will learn how to remove visuals and keep only the audio later in this guide.
Click to turn off the Speaker, Mouse, and Camera options on the Recording panel. This leaves only the Microphone capture enabled.

Step 2: Record Your Voice
Click the Record button to start recording and begin speaking into the microphone. Press F10 when you want to stop.

Step 3: Extract and Export the Audio
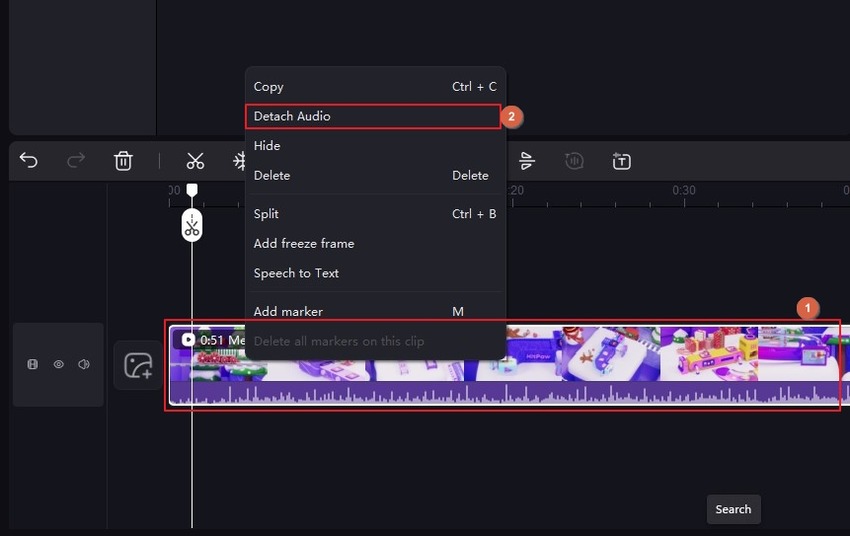
When the media file automatically opens in Edimakor’s built-in video editor, drag the clip to the Timeline if it is not already there. Right-click the footage in the Timeline and click Detach Audio from the context menu. Click to select the video track and press Delete to get rid of it.
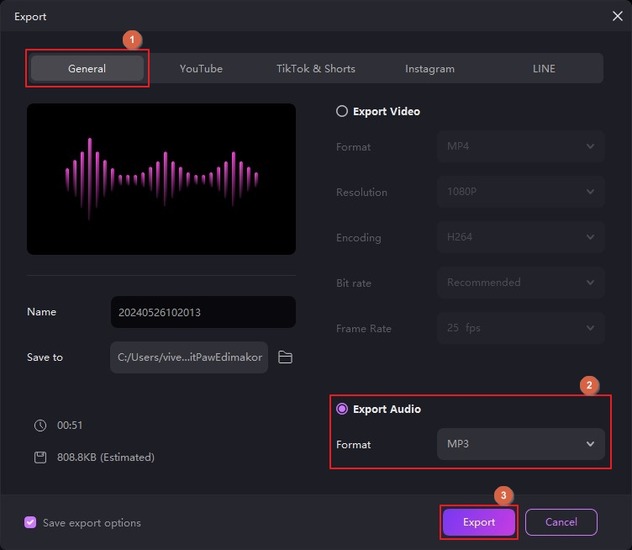
With only the audio track in the Timeline, click Export from the top-right corner. Use the Export Audio list on the General tab of the Export box to pick an audio format, and click Export to export the audio.
Part 3: FAQs on How to Record Voice in FL Studio
Q1. Is FL Studio good for voice recording?
A1. Yes, it is. However, the application is for advanced users, preferably audio engineers, to produce industry-standard acoustics. For casual uses, beginners and voiceover artists can try HitPaw Edimakor because it offers a comparatively less steep learning curve.
Q2. How to use a microphone in FL Studio?
A2. You can connect a decent-quality microphone to your computer and follow the instructions explained in Part 1 of this guide to learn how to record vocals with FL Studio.
Q3. How do you record computer audio in FL Studio?
A3. The best way to record computer audio with FL Studio is by choosing the system audio as the input source in any of the tracks in the Playlist.
Q4. How do I record keyboard audio in FL Studio?
A4. For this, connect the Keyboard to your computer with FL Studio. Next, follow the steps explained in Part 1, but choose the Keyboard instead of the Microphone.
Q4. How to record audio from YouTube in FL Studio?
A4. You can record YouTube audio in FL Studio by turning on the system audio recording, as explained in the answer to one of the previous questions.
Conclusion
Recording vocals in FL Studio 20 or any other version could be simple for audio technicians but not amateurs. In any case, FL Studio is a resource-intensive application designed for professionals to create outputs for commercial gains, typically for globally distributable movies and albums. If you are a voiceover artist or YouTuber, you probably won’t need such a heavy tool for your creations. Therefore, using a program like HitPaw Edimakor would be more convenient when compared to learning how to record voice in FL Studio.


 HitPaw Univd (Video Converter)
  HitPaw Screen Recorder
 HitPaw VikPea (Video Enhancer)

Share this article:
Select the product rating:
Daniel Walker
Editor-in-Chief
My passion lies in bridging the gap between cutting-edge technology and everyday creativity. With years of hands-on experience, I create content that not only informs but inspires our audience to embrace digital tools confidently.
View all ArticlesLeave a Comment
Create your review for HitPaw articles