How to Use Photoshop to Edit Photos (Detailed Steps)
Photoshop is the king of the editing world. It is not only powerful but also versatile, capable of transforming your ordinary images into captivating masterpieces. No matter what your need is—whether you want to enhance the colors of photos, remove unwanted objects, add filters, or adjust the exposure—Photoshop can do it all.
However, for newcomers who don’t know how to use its extensive list of features and functions, Photoshop can be intimidating. That’s where this guide comes in handy. In this article, we will show you how to edit photography in Photoshop. Besides this, you will learn some tips to take better photography pictures and a bonus tip to enhance your photos with the power of AI in one click.

Part 1: How to Edit Photographs in Photoshop
Before diving deep into editing your photos in Photoshop, it’s important to first understand what kinds of photos are considered photography pictures. Usually, photography pictures are images that capture the beauty, emotion, and story of a subject or a scene. These images can be of landscapes, portraits, wildlife, architecture, or anything else that appeals to your artistic vision.
In short, photography pictures are not just snapshots or selfies; they are carefully composed and exposed images that reflect the style and creativity of an artist.

- 1.Launch the software and open your photo in Photoshop, either using the drag-and-drop feature or by uploading your image.
- 2.Begin by framing your image to focus on the main subject and eliminate distracting elements. To do this, select the Crop tool from the toolbar or press C on your keyboard. A crop box will appear around your image, and you can drag the corners or the edges to resize it.
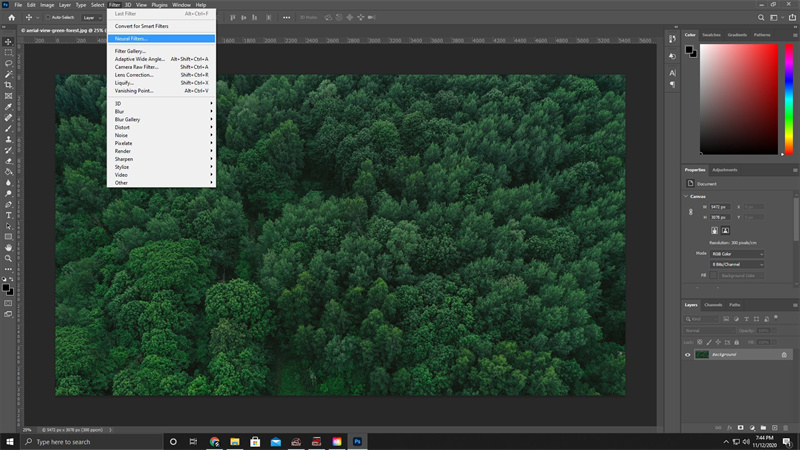
- 3.Next, control the brightness and contrast to balance the overall tone and highlight essential details. (Go to Filter and click on Camera Raw Filter.) It will open a new window. Now, on the right panel, there are several sliders that you can use to adjust the exposure, shadows, contrast, highlights, and clarity of your image. Click on the Auto button and let Photoshop make the adjustments for you.
- 4.Once it is done, you can add filters, text, animation, or anything else to enhance your image and make it more creative and unique. (To do this, go to Filter > Filter Gallery, or by pressing Ctrl+Alt+F (Command+Option+F on Mac). Now add text, shapes, gradients, patterns, and more to your image from the toolbar. You can also create animations with your image by using the Timeline panel, which you can open by going to Window > Timeline.

These are the basic steps to editing photos in Photoshop. However, Photoshop’s arsenal of tools offers unlimited features and functions that you can explore and experiment with later.
Part 2: 3 Tips to Take Photography Pictures
Although Photoshop is a great tool that improves the appearance and quality of photos, it cannot fix a bad photo. Therefore, to take better photography pictures that are even capable of being edited later, you need to pay attention to the basic elements of the photography that affect the outcome of your images.
Here are three tips for taking professional photography pictures that look stunning.
1. Use a Professional Device
When taking photographs, the quality of the device matters a lot. It is because a professional device such as a DSLR or a mirrorless camera gives you more control and flexibility over the settings and features. Besides this, a professional device allows you to capture more details and colors, and the images it produces are sharper and clearer. In addition, when using such a device, you can further adjust the aperture, shutter speed, ISO, white balance, and focus to suit the lighting and subject of your photo, which is crucial for post-production editing.

2. Use Ideal Lighting
Lighting is no doubt one of the most important elements of photography, as it affects the mood, tone, and contrast of your photos. The best lighting for photography is natural light, especially during the golden hour, which creates a warm and soft light. You can also use artificial light, such as flash, lamps, or candles, to create different effects and atmospheres. However, you need to be careful with the direction, intensity, and color of the light, as they can create unwanted shadows, glare, or color casts on your photos. To control and shape the light to your advantage, you can use reflectors, diffusers, or modifiers, and you will see some impeccable shots.

3. Frame Your Shots
Framing your shorts is crucial, as it can affect the balance, harmony, and focus of your photo. That’s why professional photographers always suggest composing and arranging the elements of your photo according to the rule of thirds, or leading lines.
The rule of thirds is a guideline that divides your image into nine equal parts with two horizontal and two vertical lines. You can place the most important elements of your photo along these lines or at their intersections to create a more dynamic and interesting composition. On the other hand, the leading lines are lines that guide the viewer’s eye to the main subject or point of interest of your photo. They can be roads, fences, bridges, or any other linear elements. So, if you compose the elements of your photos within the boundaries of your device, you will surely get photos that are visually appealing.

These are some cool tips to elevate your photography game. However, there’s no general rule of thumb or formula for photography, as photography is a creative and subjective art form. Therefore, when clicking photos, make sure to use your own intuitions, imaginations, and expressions, and it will help you create your own style and vision.
But imagine that you have taken a photo with all your effort, used the right framing technique, and taken care of the light as well. But if the photo turns out blurry, what will be your reaction? It’s frustrating, right? Well, it surely is, but don’t worry about this, as we have the solution. To ease your problem, robust photo enhancer software can help you a lot.
Part 3: Bonus Tip to Enhance Photography Photos
For instances where you have captured a photograph with great potential but it falls short due to blurriness, HitPaw FotorPea emerges as a lifesaver. Unlike Photoshop, which is complex and difficult for newbies, the AI photo editor is simple and easy-to-use and enhances your photos with just a few clicks.
Besides this, it allows you to upscale, sharpen, and colorize your photos. Using HitPaw photo AI, you can also denoise or restore old and damaged photos and convert low-quality photos to high-quality ones. Isn’t it insane?

- AI-powered Enhancement
- Easy-to-use interface
- Can upscale your photos up to 4X
- One-click adjustment
Step 1:Download and install HitPaw FotorPea from its official website.
Step 2:Launch the software and upload the photo that you want to edit.

Step 3:Once uploaded, now choose the function that you want to use, such as Upscale, Sharpen, Denoise, Colorize, Restore, or Convert.

Step 4:Click on Preview and let the AI do its work.

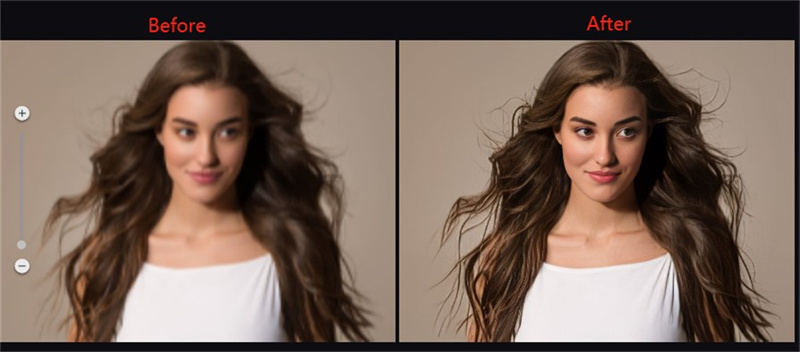
Step 5:The software will now show you before and after versions of your photo to see the difference. Click on the Export button to save your photo.
That’s it! You have successfully enhanced your photo with the HitPaw FotorPea. You can compare the before and after versions of your photo and see the difference.
Part 4: FAQs about How to Edit Photos Professionally in Photoshop
Q1. How do you make a photo look professional?
A1. To make a photo look professional, it involves adjusting various factors, including exposure, contrast, color, and sharpness. Besides this, removing any distractions or imperfections is also important for clarity.
Q2. Is Photoshop better than Lightroom?
A2. Photoshop and Lightroom are both powerful and popular photo editing software, but they cater to different aspects of image editing. While Photoshop is more suitable for complex and creative editing, such as adding layers, masks, filters, text, etc., Lightroom excels in basic and quick editing, such as adjusting the exposure, white balance, tone curve, and more. You can also use Lightroom to organize, manage, and export your photos in bulk.
Final Thoughts
Photoshop has great potential, and mastering the art of using it empowers photographers to manifest their artistic vision. However, newcomers who are not aware of the complexities of Photoshop might find this tool difficult to handle. And if you are one of those newbies, you need a better tool that is quick and easy to use.
For that purpose, HitPaw FotorPea can be a great alternative, as not only is it simple and user-friendly, but it also provides seamless and efficient photo enhancement. So, what are you waiting for? Merge Hitpaw Photo AI into your workflow and witness your photography game reach new heights effortlessly.


 HitPaw VikPea
 HitPaw Univd (Video Converter)


Share this article:
Select the product rating:
Daniel Walker
Editor-in-Chief
My passion lies in bridging the gap between cutting-edge technology and everyday creativity. With years of hands-on experience, I create content that not only informs but inspires our audience to embrace digital tools confidently.
View all ArticlesLeave a Comment
Create your review for HitPaw articles