How to Crop Photos on Mac Easily with Several Methods
When clicking a photo, everyone intends to make it perfect, which can be acceptable to your target audience if you use the photos for your brand or commercial purposes. Like humans make many mistakes, it is almost impossible for your camera to click a perfect picture in one go. Hence, you might have to explore some editing abilities to make the photos look relevant.
Cropping a photo is one of the essential photo editing functions that help you to enhance the photo's composition, reduce the irrelevant parts from the photos, and to emphasize the focus of your image. Finding an appropriate way to know how to crop photos on Mac is still daunting, but we're about to make it effortless for you.
Tune into this guide to learn how to crop a picture on Mac.
Part 1. Tips to Remember While Cropping Photos on Mac
Before revealing how to crop photos on Mac, let us talk about some of the most valuable tips you should notice when cropping an image on Mac.
- Make a copy
- Adjust before Crop
- Make Small Changes
- Only confirm the actions once you're sure
You must create a copy of the image you'd like to crop. Doing so helps you have the photo in its original shape if you make mistakes when cropping a particular photo. Opting for multiple copies of a photo is also a good idea.
Sometimes, when you tend to crop a photo, you also intend to perform other editing techniques on your photo as well. This way, your photo might lose the resolution, which could be curtains for you. Hence, you should edit the photos before cropping a picture; otherwise, your photo becomes irrelevant.
It would help if you didn't jump into making significant changes to your photos in the first go. Instead, you need to adjust the crop area's borders slowly. Then, you can gradually start editing the photo that you intend to.
When editing a photo, the app will only save all the changes if you click the Save or crop icon in the Preview app. Thus, if you're looking to crop a photo, you'll need to think twice before saving the changes you make.
Part 2. [Top Choice] How to Crop Photos on Mac with the Best Result
Knowing how to crop photos on Mac is vital, but there are other things you should care about. Instead, you'll need to ensure that the software you're going to take services of is consistent with the resolution of the photo when cropping it.
Thankfully, HitPaw Univd (HitPaw Video Converter) lives up to your expectations, helping you to crop image on MacBook and maintain the original resolution of your photos. Apart from retaining the original shape of photos, HitPaw Univd allows you to crop multiple images simultaneously. Remember that you can also explore many other photo editing techniques on HitPaw Univd.
- Allows you to crop, trim, and adjust the size of your image
- Edit the photo without losing the resolution
- Supports the multiple photo formats
- It helps you edit multiple photos simultaneously
- 120x processing speed
- Terrific Technical Support
How to crop images on Mac via HitPaw Univd?
Step 1.Download and install HitPaw Univd on your Mac and start the program afterward Click on the '' Toolbox'' icon and select the ''Image Editor.''

Step 2.Tap on the + icon to import as many images you'd like to crop, as HitPaw Univd supports the batch processing of photos. Next, click on the Crop option and select the area of the photo you'd want to remove. You can drag the corner or image flipper to select the portion you want to eliminate.

Step 3.After confirming all the settings, click on the '' Export'' icon to download the photos on your Mac.
Part 3. How to Crop an Image on Mac with Preview
If you intend to crop image on Mac, the built-in Preview tool might help you serve your purpose. Follow the simple guide below to learn how to crop photos on Mac.
Step 1.Launch the Preview app on your Mac PC and open the photo you want to crop.
Step 2.Navigate to the right side of your image and hit the '' Editor Toolbar'' icon.

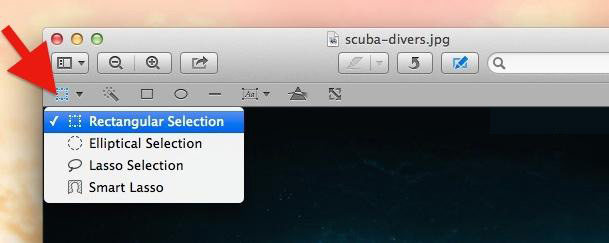
Step 3.The rectangle Selection tool is generally set as a default tool by Preview, but you can double-check it, and if it has not been set, you'll need to select it.

Step 4.Drag the rectangle to the photo area you want to crop.

Step 5.Now, you can crop the picture by pressing the '' Command+K keys. Alternatively, you can navigate the Tools menu and tap on'' Crop'' to crop the picture. Next, select the '' Save As'' icon after hitting the 'File'' option to save the photo to your desired place on Mac.
Part 4. How to Crop Pictures on Mac in the Photos App
Even with knowing how to crop a photo on Mac via Preview, if you aren't satisfied with the outcome of the photo, you could rely upon the Photo app to crop photo on Mac. However, to crop image on MacBook via Photos App, you'll need to ensure that the photo is present in the library.
Here's how to crop image on Mac courtesy of the Photos App.
Step 1.Launch the Photos App on the Mac PC and choose the photo you'd want to crop.
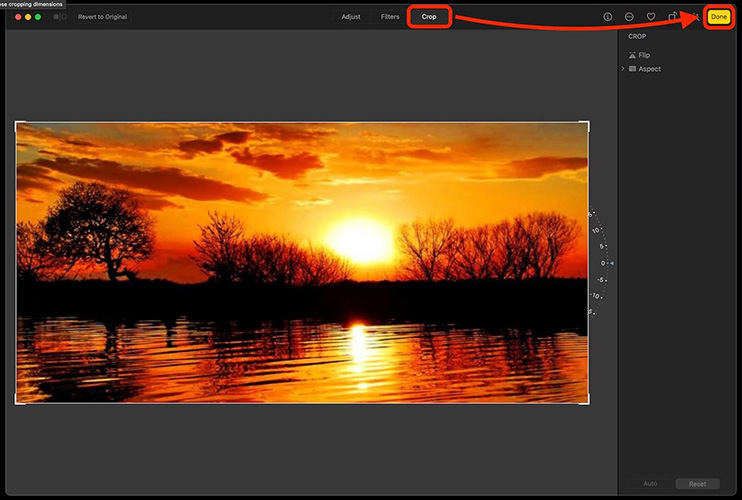
Step 2.Tap on the '' Edit'' icon on your Photo App window's right side.

Step 3.Select the crop icon and drag the edges or corners to select the part of your photo you've been looking to crop. Once you're done cropping on Mac, you need to click on Done. That's all you've had to do to know how to crop a picture on Mac.

Part 5. Resize Images to a Set Size With Automator
It is widespread to take screenshots and then crop them to make them relevant. Various things urge you to crop a screenshot. Here's how to take a cropped screenshot on Mac.
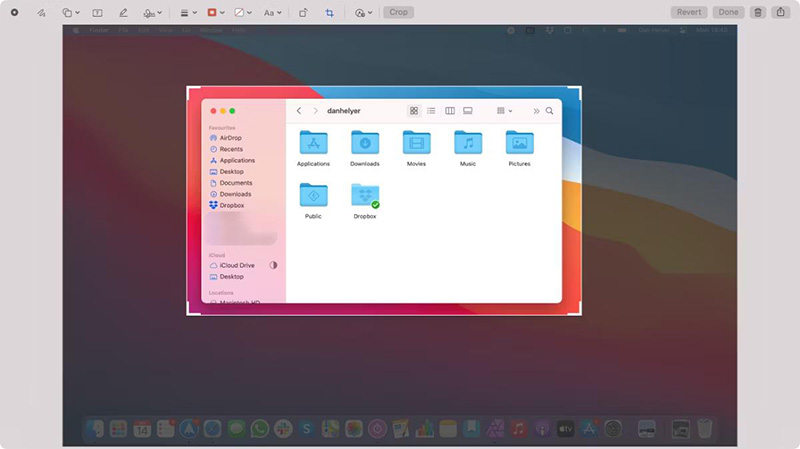
Step 1.When someone takes a screenshot on Mac PC, the Capture's Preview will appear, asking you to edit the screenshot. It would help if you tapped the ''Preview'' icon to access all the editing options.
Step 2.To crop the screenshot, tap on the Crop icon and then drag each corner of your picture to resize the cropped selection Next, drag and click in the middle of your selection to move it.
Step 3.You can finish cropping the screenshots by hitting the ''Crop'' icon. Save all your changes by hitting the '' Done'' icon.

Final Saying
In this post, you can watch out for mind-blowing ways to learn how to crop photos on Mac. Opting for Preview and Photos App to crop image on Mac might come in handy, but the chances of your photos losing the original shape are always there.
Hence, HitPaw Univd should be your go-to image editor as it stimulates breathtaking editing operations on the images without causing photo quality loss.


 HitPaw Univd (Video Converter)
  HitPaw Screen Recorder
 HitPaw VikPea (Video Enhancer)


Share this article:
Select the product rating:
Daniel Walker
Editor-in-Chief
My passion lies in bridging the gap between cutting-edge technology and everyday creativity. With years of hands-on experience, I create content that not only informs but inspires our audience to embrace digital tools confidently.
View all ArticlesLeave a Comment
Create your review for HitPaw articles