[2025] How to Change Color in Photoshop with High Quality
Changing the color of an object in Photoshop can be a simple and effective way to enhance your photos and designs. There are several ways how to change color in Photoshop, and the method you choose will depend on the complexity of the object you want to modify and the effect you want to achieve.
In general, you can change the color of an object in Photoshop by using adjustment layers, blending modes, or the Hue/Saturation tool. With a little practice, you can master these techniques and create stunning images that stand out. Here is how to change the color of something in Photoshop.
1. 3 Methods on How to Change a Color in Photoshop
Changing the color of an object or element in Photoshop can be accomplished in several ways. Each method for how to change colors in Photoshop offers different benefits depending on the specific task at hand, the level of precision required, and personal preferences. Here are three common methods on how to change a color in Photoshop.
Hue/Saturation Tool
- Firstly, here is how to use the Hue/Saturation tool and how to change the background color in Photoshop. So, without further ado, let's get started.
-
To begin changing the color of an object or area in your photo, you must first select it using a selection tool such as Quick Selection in Adobe Photoshop.
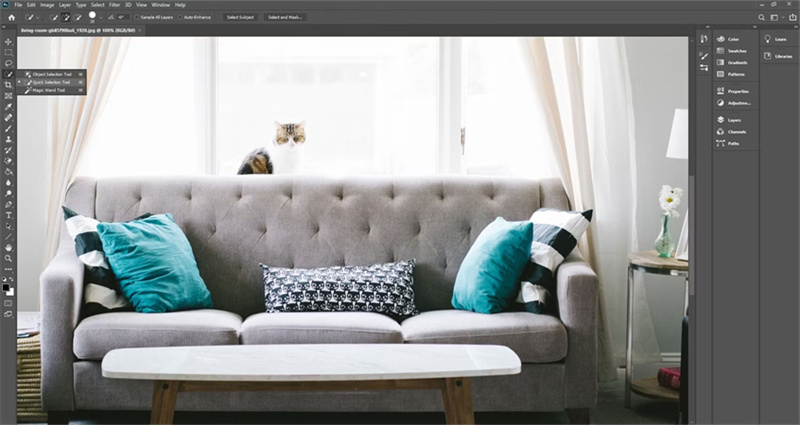
- After selecting the area, navigate to Image > Adjustments > Hue/Saturation or press Ctrl + U on your keyboard. This will open a new window with options to adjust Hue, Saturation, and Lightness.
- Hue changes the color of the selection, Saturation alters the intensity of the colors, and Lightness can make the selection brighter or darker.
-
Once you achieve the desired results, click OK to save your changes.

Replace Color Tool
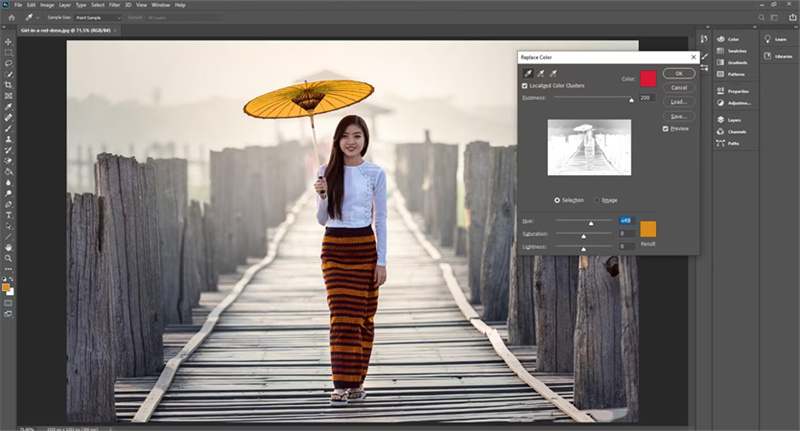
Next, we'll go over how to use the Replace Color tool in Photoshop and how to change the color of an object in Photoshop.
-
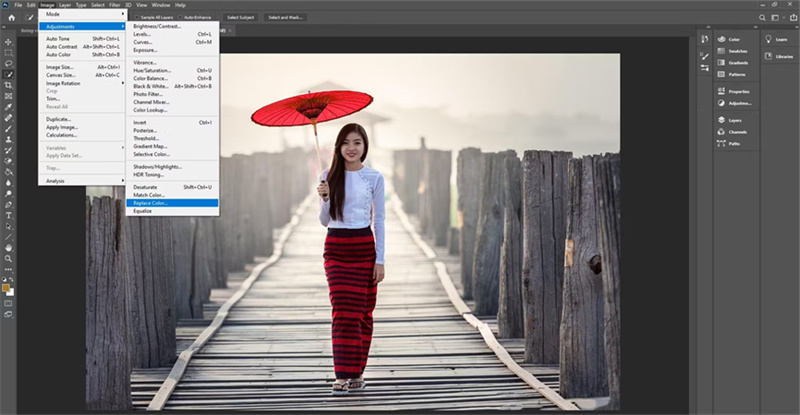
To begin, open your desired photo in Photoshop and go to Image > Adjustments > Replace Color.

-
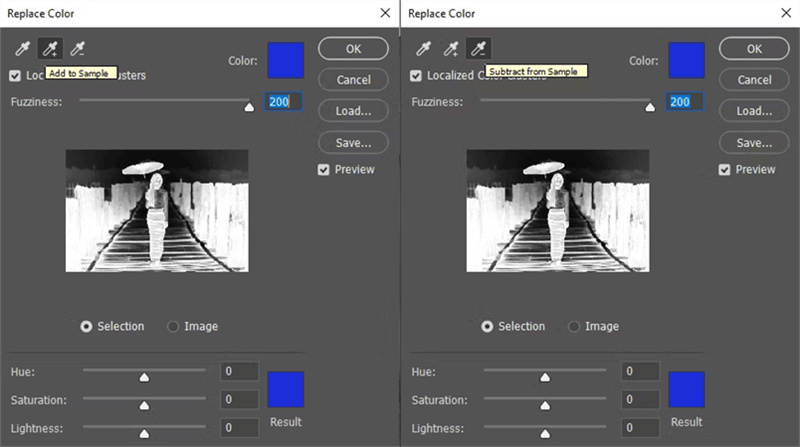
Use the eyedropper tool to select the color you want to modify. If you need to add more areas to the selection, click on the Add to Sample tool or hold down Shift and left-click on the desired areas. To remove areas, use the Subtract From Sample tool or Alt + left-click.

- Adjust the Hue, Saturation, and Lightness options until you achieve the desired results.
- Make sure to have Localized Color Clusters checked for more precise masks, and Preview checked to see changes as you make them.
-
When you're satisfied with the outcome, click OK.

- If you need to delete color from specific areas, use the History Brush tool.
Color Replacement Tool
Lastly, we'll cover the Color Replacement tool in Photoshop. Read on to find how to change color of object in Photoshop.
- To begin, open your photo in Photoshop and select the Color Replacement Tool. You will see additional options for this tool in the bar at the top of the program. Choose the Mode option that suits your needs. In this case, select Color.
- Next, there are three Eyedropper options to choose from. The Continuous option samples the color as you move the Brush tool, Sample Once replaces the color you first click on in areas that contain that color, and Background Color replace only the colors that match the selected background swatch.
- Then, select the Limit option. Contiguous replaces only colors that match the sampled color, are adjacent to it, or are touching it. Find Edges focuses on the edge of the photo while replacing the colors that Photoshop perceives are within those edges. Discontinuous replaces the sampled color regardless of where it appears within the cursor area.
- Adjust the Tolerance option to control how accurately the color needs to match the sampled color to be replaced. Set it to 100%.
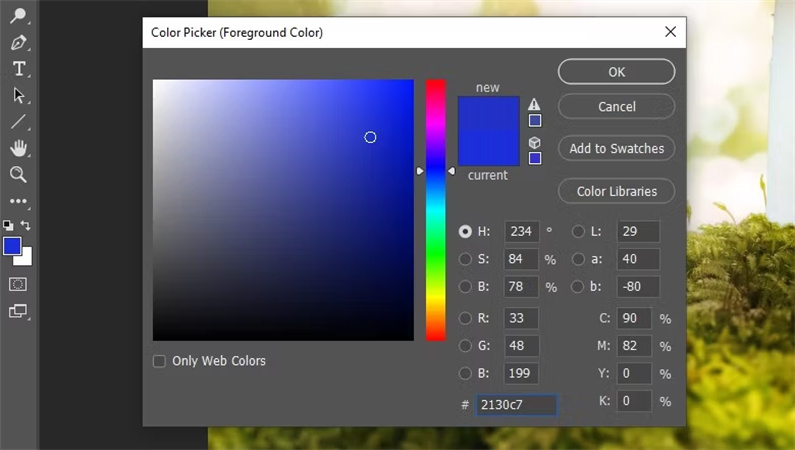
- Once you have chosen all your preferred options, click and drag over the area where you want to change the color. You can choose the new color by clicking on the front square at the bottom of the toolbar on the left.
2. How to Make Your Photoshop Processed Photo Outstanding?
Playing with Photoshop and learning how to change the color of an image in Photoshop comes in handy for those who are excellent in tech or know the basics of Photoshop. If you feel it’s laborious work doing everything on your own then you should opt for an AI-based photo enhancer.
Here we have got a perfect recommendation for you and that is HitPaw FotorPea. With just one click you will have your enhanced photo with color correction, noise removal, and everything in a balanced proportion.
- AI one-click enhance
- Support batch sharpening
- Customize your photo size
- Available for Windows and Mac
Here is how to use HitPaw FotorPea:
-
Step 1: Download and install this software on your desktop
-
Step 2: Upload your original photo which you want to enhance using this software

-
Step 3: There are four AI models available, choose the one most suitable to your photo and proceed

-
Step 4: You can preview the enhanced image before downloading
-
Step 5:If you want to explore then you should buy HitPaw FotorPea and have your enhanced image downloaded in good pixels.
Conclusion
In conclusion, there are three main methods on how to change color in Photosho. Overall, these three methods provide options for changing the color of something in Photoshop, allowing you to achieve the desired result for your project or image. However, if you want to avoid the hassle of Photoshop and editing manually, then go ahead with HitPaw FotorPea. It can definitely be the best try.




 HitPaw Watermark Remover
  HitPaw VikPea (Video Enhancer)

Share this article:
Select the product rating:
Daniel Walker
Editor-in-Chief
My passion lies in bridging the gap between cutting-edge technology and everyday creativity. With years of hands-on experience, I create content that not only informs but inspires our audience to embrace digital tools confidently.
View all ArticlesLeave a Comment
Create your review for HitPaw articles