How to Add Watermark in Photoshop: A Complete Guide
A watermark signifies who created a piece of media and where to license or view more of their work. While not foolproof, watermarks are an important aspect of safeguarding your creativity. Adding watermarks to photos and videos is crucial for protecting your work and establishing your brand.
We'll look at how to add watermark in Photoshop, HitPaw Univd (HitPaw Video Converter) for video watermarking, and HitPaw Add Watermark Online tool for quick online application. With the rise of digital content, it's increasingly important to stake your claim and deter theft.
I will break down straightforward techniques for incorporating watermarks seamlessly using the mentioned software tools.
Part 1. How to Add Watermark in Photoshop
Adding a watermark to your images is an effective way to protect your work and ensure you receive proper credit as the creator. With the rise in image theft online, watermarking has become an important practice for photographers and graphic designers alike. If you're wondering how do you add a watermark in Photoshop, this process can be quite straightforward.
Why Use Watermarks?
Watermarks serve two primary purposes:
- They prevent unauthorized use of your images by others. A visible watermark makes it difficult for someone to claim your work as their own.
- Watermarks reinforce your brand identity. Using a consistent watermark logo or text helps identify your images and associate them with your personal or business brand.
Watermarks allow you to share images online while retaining ownership. They discourage copyright infringement and make it clear the image belongs to you.
A Step-by-Step Guide to Add Watermark in Photoshop
Step 1: Create a New Layer
Open the image you want to add a watermark in Photoshop. Then create a new layer by going to Layer > New > Layer. Name it "Watermark" and click OK.
The watermark will be applied to this new transparent layer that sits above your base image. Adding it on a separate layer allows you to edit it independently later.
Step 2: Add Watermark Text
With the "Watermark" layer selected, choose the Text tool and set your desired font and size. Click within the image canvas and type out your watermark text. You can include your name, website, copyright, or social media handle.
Feel free to experiment with different fonts, sizing, and positioning at this stage. The text can easily be tweaked later on.
Step 3: Adjust Text Format
Double-click your text layer in the Layers panel to bring up text formatting options. Here you can change the font, color, size, alignment, and other text properties to suit your branding.
A clean sans-serif font in black or white tends to work best for watermarks. But the choice is entirely up to you.
Step 4: Resize and Position
Now move your watermark text into the desired position on the image canvas. It's common to place it in one of the corners or along the bottom edge.
You can use the Move tool or Free Transform (Ctrl/Cmd + T) to relocate and resize the text overlay. Right-click the text layer and select "Rasterize Type" if you need to rotate or distort the text.
Step 5: Adjust Opacity
Lower the opacity of the text overlay to make it faint and unobtrusive. This ensures the watermark doesn't detract from the image itself. 30-50% opacity is recommended, but experiment to find the right balance.
Go to Layer > Layer Style > Blending Options and lower the text Fill Opacity. You can also add effects like Drop Shadow here.
Step 6: Flatten and Save
With your watermark looking exactly as intended, flatten the image to merge the layers. Go to Layer > Flatten Image.
Finally, save your finished watermarked image as a JPG, PNG, or other standard image format. The watermark text will remain intact even when flattened.
And that's it! The watermark is now applied and ready to protect your images.
Tips for Effective Watermarking
Here are some best practices to ensure your watermarks are discreet yet still effective:
- Use sparse text like your name, brand name, or website. Avoid lengthy URLs or copyright statements.
- Keep the font size fairly small and use minimal formatting.
- Place the watermark in one of the corner areas rather than centrally overlaying your subject.
- Reduce the opacity to faintly blend the watermark into the image background.
- For logo watermarks, desaturate the logo color first so it doesn't clash.
With Photoshop's layering and text tools, you have endless options for customizing your image watermarks. Try different text, positions, and opacity levels to find the right balance of visible ownership and unobtrusive branding.
Part 2. How to Add Watermark to Photo without Photoshop
Photoshop is usually known for professional image editing. The complexity of its operation is often prohibitive to some laymen. Fortunately HitPaw provides a tool that can be easily achieved to add watermarks without Photoshop. HitPaw Univd is a versatile tool that goes beyond just video conversion. It also includes powerful photo editing capabilities, including the ability to easily add watermarks to photos.
Step-by-Step Instructions to Add Watermark to Photo
Follow these steps to add a watermark to photo using the Image Editor in HitPaw Univd:
Step 1: Launch Image Editor
First, launch the HitPaw Univd on your computer and choose the Image Editor feature from the Toolbox.

Step 2: Import Photos
Import the photos you want to watermark into the Image Editor. All added photos will display in a list. Click the + icon to add more photos or x icon to remove photos.

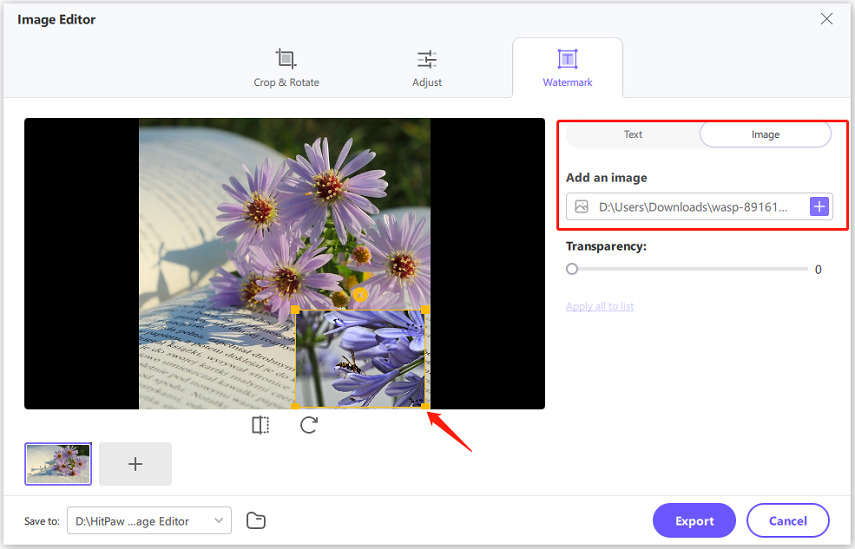
Step 3: Add Image Watermark
To add an image watermark, import the image file. Adjust the transparency and drag the image to position it on the photo.

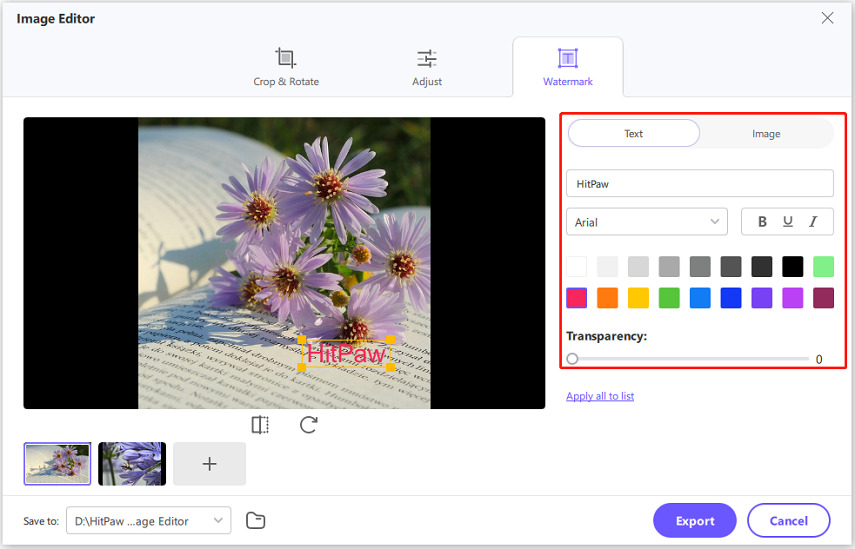
Step 4: Add Text Watermark
Add a text watermark by entering your desired text. Customize the font, color, size, transparency and style. Drag the text to position it on the photo.

Step 5: Export Watermarked Photos
When finished, export the watermarked photos.
Benefits of Using HitPaw Univd for Adding Watermarks
There are several advantages to using HitPaw Univd for watermarking photos:
- Batch processing - You can watermark multiple photos at once, saving time.
- Flexible watermark options - Choose between text or image watermarks.
- Easy positioning - Just drag the watermark to place it exactly where you want on the photo.
- Customization - Tweak the font, size, color, and transparency of text watermarks.
- Maintains quality - Your original photo quality is preserved.
- User-friendly interface - The tool is intuitive and easy to master.
In summary, HitPaw Univd provides a fast, customizable way to add watermarks to your photos in bulk. The batch processing capabilities make it easy to quickly protect and brand your image collection.
Part 3. [Bonus Tips] How to Add Watermark to Video Online Quickly
HitPaw Add Watermark Online tool makes it easy to add watermarks to videos right from your browser. Follow these steps:
Step 1: Upload Video
Go to HitPaw Add Watermark Online and upload the video you want to watermark.

Step 2: Add Text Watermark
Add your desired text for the watermark. Customize the font, size, color, transparency and other text style options.

Step 3: Add Image Watermark
To use an image instead, upload your desired image file. Adjust the transparency as needed.

Step 4: Position Watermark
Drag the text or image watermark to position it on the video frame.

Step 5: Export Watermarked Video
Once finished adding your watermark, download the watermarked video.
The online tool makes it quick and easy to add customized watermarks to videos without needing to install any software.

Advantages of Using HitPaw Online Tool for Watermarking
HitPaw's online video watermarking tool provides several key benefits that make it an excellent choice for adding watermarks to your videos:
- 1. Convenience-Being an online tool, there is no software download or installation required. You can access it from any device and browser for quick watermarking on the go.
- 2. Customization-You have full control over the watermark text, font, size, color, transparency and positioning on the video.
- 3. Support for Multiple Formats-It works for common video formats like MP4, MOV and MKV so you can watermark videos from any source.
- 4. High-Quality Output-Your original video quality is maintained with no compression or degradation.
- 5. Batch Processing-You can watermark multiple videos in sequence without having to re-enter settings.
Part 4. FAQs about Add Watermark in Photoshop
Q1. How do I create a transparent watermark in Photoshop?
A1. To make a transparent watermark in Photoshop, add your text or logo on a new layer. Then reduce the layer opacity to make it see-through. Values between 30-50% opacity usually work well. You can also set the layer blending mode to Multiply which will allow the background to show through.
Q2. How do I create a pattern watermark in Photoshop?
A2. Make your text or logo watermark on a layer. Go to Edit > Define Pattern and name it. Then add a new layer and go to Edit > Fill and choose Pattern for the fill type. Pick your watermark pattern and click OK to fill. Lower opacity to overlay the pattern subtly.
Q3. How to remove watermark on image?
A3. Removing watermarks from images in Photoshop can be tedious. It's easier to use a dedicated watermark remover tool like HitPaw Watermark Remover. Just upload your image, erase the watermark with a few clicks, and download the clean result. Much simpler than manually editing in Photoshop.
Conclusion
In summary, watermarking is an important technique to protect and brand your creative work. We explored options to add watermarks to both photos and videos using Photoshop as well as convenient HitPaw tools. Photoshop provides full customization for text and logo watermarks applied directly to your files. HitPaw's Video Converter batch watermarks photos easily. The online tool quickly watermarks videos right from your browser. Whatever option you choose, be sure to utilize watermarks to secure your images and footage from unauthorized use. The tools covered here make it simple to customize and apply watermarks to your media.


 HitPaw VoicePea
  HitPaw VikPea (Video Enhancer)
 HitPaw FotorPea


Share this article:
Select the product rating:
Daniel Walker
Editor-in-Chief
My passion lies in bridging the gap between cutting-edge technology and everyday creativity. With years of hands-on experience, I create content that not only informs but inspires our audience to embrace digital tools confidently.
View all ArticlesLeave a Comment
Create your review for HitPaw articles