[Step-by-step] How to Use Gimp Smooth Edges with Two Methods
Making the edges of the objects smoother is probably the most hot topic going around. Unfortunately, you won't find many options which will assist you to make the edges of the image smoother and fascinating, but you've got the chance to look at the GIMP smooth edges.
It is a brilliant editor that can make the smoothing of the edges of images look simple and flawless. You can dive into this post to learn how to smooth edges in GIMP.
Part 1. How to Use Gimp Smooth Edges
1. Antialiased Lines And Edges
GIMP comes up with the Antialiased Lines and Edges, which will assist you to make the edges of the images look smooth and prolific. Although this process is quite difficult, you can look at the guide below to use the GIMP edge smoothing through Antialiased Lines and Edges.
1.Launch the GIMP tool on your computer and import the photo you'd like to edit.
2.When looking at the Selections and brushes, the Antialiasing ensures that every action creates smooth lines and edges. This method generates the appearance of the image's smooth edges when drawing angles through the display appear out of your square Pixels. You can see the clear difference between the Paintbrush and Pencil tools.
These two tools are similar except that the Pencil is drawing with sharp, jagged edges regardless of what type of brush hardness setting you're currently using. It would help to remember that you can't use the Anti Aliasing option in the Pencil toolbox.
3.If you look at the image above, you'll find that the Paintbrush is on the right side, followed by the Pencil stroke on the left side. The PaintBrush stroke's smooth edges are the outcome of the antialiasing applied to your stroke edges. The stroke edges show that some pixels are partially colored, suggesting the soft edges of the eyes.
Hence, you must remember to enable the Antialiasing. It is generally turned on by default so that you can turn it off from the settings, but disabling it won't be a good idea.
2. Smoothing Edges With Filters
Apart from using the Antialiased Lines and Edges, you can use the Filters method to use the GIMP smooth edges. Here's the step by step guide to use GIMP how to smooth edges via the Filters method.
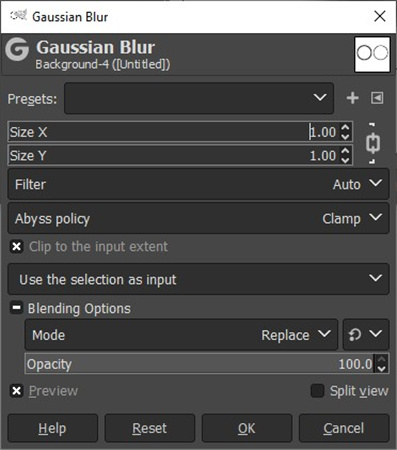
1.First, you must start the GIMP and launch the Filters menu. Tap on the Blue submenu before selecting the Gaussian Blur.

2.Looking at the image's resolution, you'll need to begin with the Size Y/X adjusting at the things' low end. You've got the luxury of seeing the effect of the blur by looking at the image's main menu.
You can also review your changes by hitting the Preview icon. Now, you can see that the pencil circle's lines have gotten smoother and that you've had to smooth edges in GIMP via the Filters method.
Part 2. The Best Tool to Enhance Photos with HitPaw FotorPea
After using the GIMP smooth edges, you might want to improve the overall quality of images. Luckily, you've got the HitPaw FotorPea in your ranks, which assists you in upscaling the image automatically courtesy of the 6 stunning AI models. There are various things to like about the HitPaw FotorPea. Apart from helping you upscale the images automatically, HitPaw FotorPea can also enhance multiple photos simultaneously.
Hence, regardless of whether you're dealing with the low resolution images of blurred photos, all you need to do is import the photo into the timeline of the HitPaw FotorPea and let it do the rest.
Features of Using HitPaw FotorPea
- Enables you to improve the image quality in no time
- Allows you to eliminate the blur and noise from the images
- Doesn't affect the quality of the images
- Enables you to process multiple images simultaneously
- Allows you to put fascinating colors into the images
- Helps you to resize the photos automatically
- Supports the Mac and Windows
Step by step guide to learn how to upscale image quality through HitPaw FotorPea.
Step 1:After visiting the official website of the HitPaw FotorPea, you'll need to get the latest version of the software installed on the computer. Next, you'll need to tap the Choose File button to upload the photo you want to upscale.

Step 2:HitPaw FotorPea prompts the 6 AI models, including the color calibration m, general model, face model, colorize mode, etc. Using the General Model helps you to enhance the images of real scenes, including the landscape, flowers, animals, etc. You can deal with the low light in high ISO images courtesy of the Denoise Model.
You can opt for the Face Model to eliminate the blur from the images, followed by the colorize method, allowing you to colorize the black and white images. The color Calibration method assists you in fixing the underexposed images without tinkering with the quality of the images.
Step 3:Tap on the Preview button to assess the changes you've made, and hit the Export icon to download the edited photos.

Part 3. FAQs of Gimp Edge Smoothing
Q1. How do you smooth the edges between layers in GIMP?
A1. Smoothing the edges between layers in GIMP is quite simple, as all you need to do is launch the GIMP and import the photo you'd like to edit. Next, you must launch the Filters menu and choose the Blue Submenu. Select the Gaussian Blur button to smooth the edges between layers in GIMP.
Q2. Does GIMP have line smoothing?
A2. GIMP has a Line smoothing feature to help you go for the smooth edges GIMP. The best thing about this feature is that it is enabled by default, and you don't have to enable it separately when it comes to smoothing the edges in GIMP.
Final Words
If you're struggling with the annoying edges of the objects in the images, you can use the GIMP smooth edges courtesy of this sensational guide. We've listed the two methods, including the Filters and Antialiased Lines and Edges to help smooth edges in GIMP.
We have also recommended the HitPaw FotorPea as the best way to upscale the image quality, provided you're struggling with low quality images. It lets you utilize the 6 stunning AI models to make the photos look mesmerizing.


 HitPaw Watermark Remover
  HitPaw VikPea (Video Enhancer)


Share this article:
Select the product rating:
Daniel Walker
Editor-in-Chief
This post was written by Editor Daniel Walker whose passion lies in bridging the gap between cutting-edge technology and everyday creativity. The content he created inspires audience to embrace digital tools confidently.
View all ArticlesLeave a Comment
Create your review for HitPaw articles