How to Change Photo to Black and Whites in Mac Photos & Previews
Even in 2024, black-and-white photos have their own charm. It is because it possesses timeless quality, stripping away color to emphasize light, shadow, and composition that captivate the audience. Although black-and-white pictures look elegant and classy, it's nearly impossible to find the camera to click these.
Luckily, Mac users have some built-in tools that can help you achieve the classic elegance of black and white portraits. Wondering how? Well, in this guide, we will explore two free methods to change photos to black and white in mac photos using Mac's Photo and Preview Application. Besides this, there would be a bonus tip for those who are looking to reverse the process and add color to black and white portraits.
Part 1. How to Change Photo to Black and White in Mac Photos
The Photos app on your Mac offers a user-friendly interface and powerful editing tools. Here's how you can use it to convert your color photos to stunning black and white images:
1. Selecting the photo to be edited

Open the Photo app on Mac and find the photo you want to transform. After browsing the photo from the library, double-click the photo to open it in the editing window.
2. Applying the black-and-white filter
After opening the photo in the editing window, click on the “Edit” button in the top-right corner. This will reveal a toolbar with multiple editing options. Now look for a filter tab and click on it to expand the filter options. It will show you the list of filters.
There, on the right side of the window, you will see the filter “None”; that's your original. Below this, there are three black and white filters: mono, tonal, and noir. Click on each to see how they affect your photos.
You'll see that at the top is None; that's your original. Below that are three black-and-white filters: mono, tonal, and noir. The first is a straight conversion of your photo from color to levels of gray. Some photos look wise like this. Tonal is similar, but with less contrast. And Noir offers a higher contrast version of your original.
3. Exploring different black and white styles
Each of the above-mentioned black and white filters has its own unique characteristics. Mono offers a straightforward conversion from color to levels of gray, while Tonal comes with less contrast, and Noir increases the contrast version of your original photo to make it look more dramatic. Take your time to explore each filter and choose the one that best suits your photo.
4. Adjusting brightness and contrast for optimal results
After selecting the black and white filter, click done or press return. But if you want to fine-tune the image, click the “Adjust” button, and you will access the advance adjustment options. There you will have the slider to manually adjust different parameters such as brightness, exposure, highlights, shadow, brightness, contrast, and black point.
5. Saving the edited photo
Once you are satisfied with the outcome, click the "Done" button. Photos will save your edits automatically.
Part 2. How to Change Photos to Black and White With Preview Mac
In case you are wondering how to change color photos to black and white in a quick and convenient way, Mac's Preview can be a suitable option. Similar to the Photo app, Preview comes pre-installed and goes beyond just image viewing.
Here's how to use it:
1. Opening the photo in Preview
Find the image you want to edit and right-click on it. Select “Open with” and choose “Preview” from the menu.
2. Accessing the adjustment tools
After opening the image in the preview. Click on the “Tools” menu and choose adjust color from the drop-down menu. It will take you to the adjustment panel with various color adjustment options.
3. Converting the image to black and white
There, you will see the slider labeled “Saturation.” Slide “Saturation” all the way to the left to turn the photo in black and white.
In the "Adjust Color" window, you'll see a slider labeled "Saturation." To convert your photo to black and white, simply drag this slider all the way to the left, reducing the saturation to zero. You'll see your image transform into grayscale in real-time.
4. Adjusting exposure and color levels
While the saturation slider does the main job of turning the picture into gray in real time, if you want to further refine the photo, you can use the other tools such as contrast, highlight, shadow, and level.
5. Saving the changes
Once you are satisfied with the outcome, save the photo as a new file.
Part 3. Extra Tips to Change Black and White Photo Color on Mac
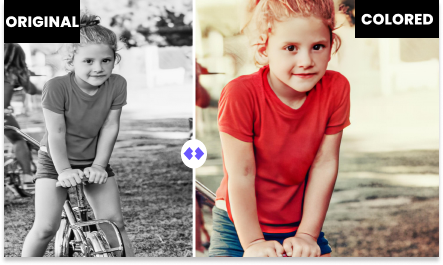
Now that you are aware of how to change photo to black and white using the pre-installed tools on Mac, However, if you already have a black and white photo and you want to add color to it, you require a third-party tool like HitPaw FotorPea for Mac.
HitPaw FotorPea is a powerful AI editing tool that goes beyond basic editing. Using this versatile tool, you can breathe new life into old photos.
Key features of HitPaw FotorPea include:

HitPaw FotorPea - All-in-one Photo Editing Tool for Win & Mac
Secure Verified. 212,820 people have downloaded it.
- AI-powered colorization for B&W photos
- Batch processing to enhance mac photos
- Advanced color adjustment
- User-friendly interface
Secure Verified. 212,820 people have downloaded it.
Wondering how to add colors to your black and white photos using HitPaw FotorPea?
Step 1: Download and Install HitPaw FotorPea
To download HitPaw FotorPea on your Mac, visit the official website. Simply click on “Try it Free” and then install it using on screen instructions.


Step 2: Launch the App, Select “AI Enhancer”
After Installing, open the software, select AI Enhancer from the main interface and click on “Choose File” to upload all the photos you want to enhance.
Step 3: Choose the desired AI Model
Now, Select the AI model (general, denoise, colorize, low light or scratch repair) from the given options and apply current settings to all.
Step 4: Start Processing and let the AI to colorize
Next, click on Preview and the AI will start enhancing the Images.
Step 5: Export the Image
Once it's done, Click on “Export” and select the destination folder to save the enhanced images.
Video Guide for You to Colorize Photo
Conclusion
As we all know, black and white photos give an aesthetic look. Although the cameras are now digital and give us colorized photos, turning them to black and white is not an uphill task. Thanks to the multiple pre-installed tools on your Mac, you can change photo to black and white on mac in no time.
However, if you want to add a touch of color to your black and white photo, consider using HitPaw FotorPea. This versatile tool offers an exciting way to reimagine classic images.

 HitPaw Univd (Video Converter)
 HitPaw VoicePea
  HitPaw VikPea (Video Enhancer)
Share this article:
Select the product rating:
Daniel Walker
Editor-in-Chief
My passion lies in bridging the gap between cutting-edge technology and everyday creativity. With years of hands-on experience, I create content that not only informs but inspires our audience to embrace digital tools confidently.
View all ArticlesLeave a Comment
Create your review for HitPaw articles