Latest Guide on How to Add Text in Photos on Mac in 2025
These days on social media, you see every other photo with a witty or informative text on it. This not only looks good but also makes the photo captivating. But do you know adding text to an image is a pretty straightforward process? Wondering how to add text to a photo on mac?
Well, in this article, we'll explore three straightforward methods to add text to your photos using your Mac, including some built-in and popular third-party tools. Besides this, we will introduce you with a secret weapon to take your photo editing to the next level.
Part 1. How to Add Text to an Image on Mac
1. Using Preview to Add Text
If you are using a Mac, you would be aware that Preview comes pre-installed on your Mac. However, let me tell you that it's not just for viewing files; in fact, it's a great tool for basic photo editing, such as editing text.
Here's how to use Preview to add text to an image:
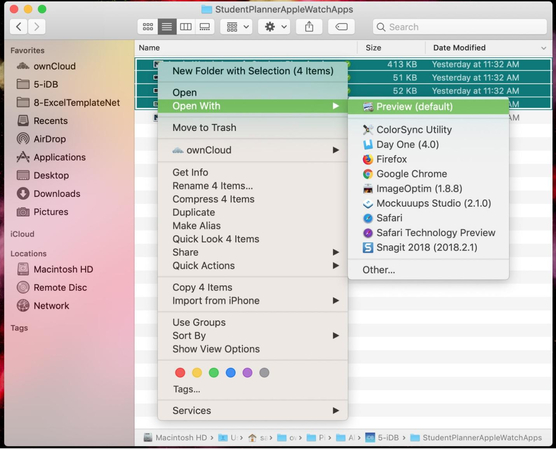
- Select the image you want to edit. Then right-click on it and select “Open With" > "Preview". You can also open the image in preview by double-clicking it.

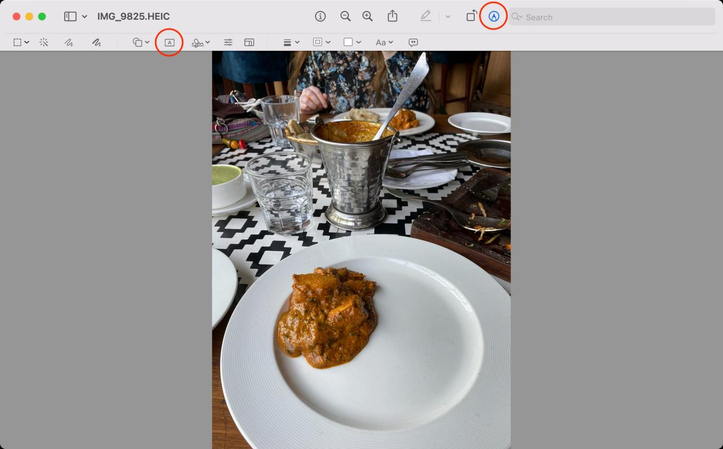
- Now find the “Show Markup Toolbar” button (it looks like a toolbox) and click in it to see the range of editing tools.

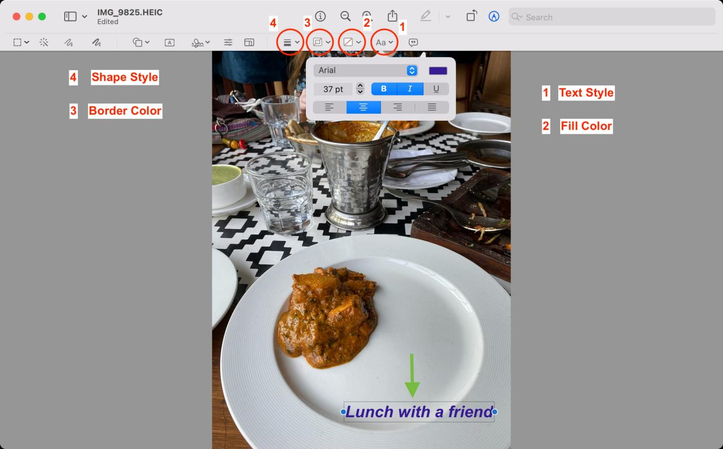
- Next, click the "Text" button (it's the "T" icon) in the toolbar and click on the desired area of your image where you want to place the text. You will see a text box in the selected area. Adjust the position of the text box and start writing. You can also play around with text style, font, and size.

- Once you are satisfied with the outcome, save your image by either pressing Command + S on the keyboard or by going to "File" > "Save".
2. Using the Photos App
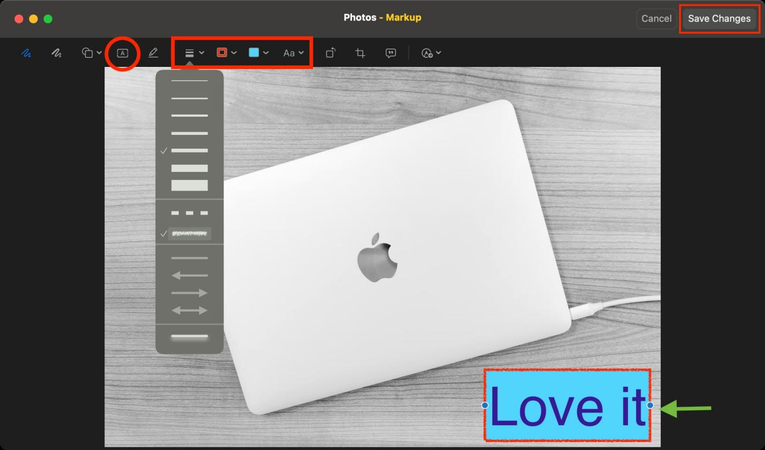
You can also add text to an image using the Photos app on your Mac. Although it is not as robust as Preview, it can still help the cause.
Here is how you can do it with Photos:
- Open the Photos app and select the image you want to add text to.
- In the top right corner, locate the “Edit” button and click on it.

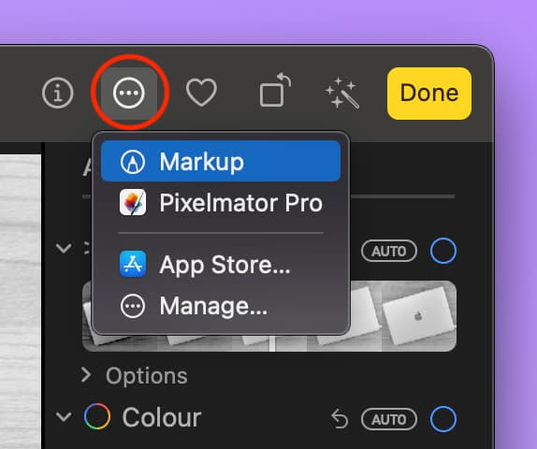
- Now Tap the more button and select “Markup” from the dropdown menu.

- Select the "Text Tool" from the dropdown menu. Type your text in the box that appears by double tapping it. You can also use the text options that appear to change the font, size, color, and alignment.

- Drag the text box to position it on your image and once satisfied with the rest, click "Done" to save your changes. The text is now added to your photo.
3. Trying a third-party tool like Canva
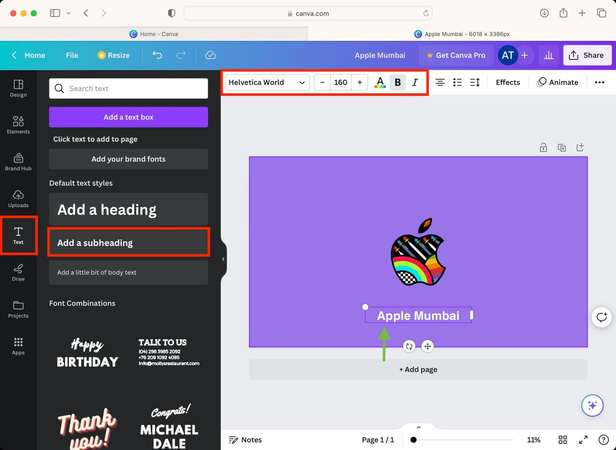
These built-in apps might have limited options compared to other third-party tools. Therefore, if you are looking for more creative options, consider using Canva. This online tool offers plethora of editing features and design elements. But to use Canva, you first need to visit canva.com and sign up for a free account.
Then follow these steps to add text:
- After signing up for a free account, either choose a template or simply click on "Create a design" and Import the file you want to edit.

- Next, click on “use in a new design” but make sure not to change the dimensions. Now select “create a new design” and you'll see a photo opening in new tab.

- Select the "Text" tool from the left sidebar and choose from various text styles. Click on the style you like, and it will appear on your image. You can type your text, and then move and resize the text box as needed.

- Once satisfied with the outcome, click "Download" to save the image to your Mac.

Part 2. Further Steps to Take Mac Photos to the Next Level
Now that you know how you can add text to your photos, But before adding the text, you first need to make sure that the images are crisp and sharp and have the best quality. That's where HitPaw FotorPea for Mac comes in.
This tool is designed to enhance your photos and take them to the next level. Powered by an advanced AI algorithm, this robust editing tool offers features that go beyond basic editing. So whether you want to adjust brightness, contrast, or add filters, this tool has it all.
Key Features of HitPaw FotorPea:
HitPaw FotorPea - All-in-one Photo Editing Tool for Win & Mac
Secure Verified. 212,820 people have downloaded it.
- Image enhancement software for Mac
- Creative filters to make photo stunning
- Batch processing to enhance photos fast
- Artistic effects to create art in one seconds
Secure Verified. 212,820 people have downloaded it.
Wondering how to use HitPaw FotorPea to enhance photos?
Step 1: Download and Install HitPaw FotorPea
Visit the official website of HitPaw FotorPea and download and Install the software on your Desktop.
Step 2: Enter AI Enhancer
Now, launch the Software and in the main interface, select “AI Enhancer”. Then click on “Choose File” to upload the photo you want to restore.

Step 3: Choose AI model
Now, Select the AI model from the given options (General, Denoise, Colorize, Low Light Model or Scratch Repair).

Step 4: Let the AI to enhance images
Now click on Preview and let the AI do its magic.

Step 5: Export the image
Once it's done, Click on “Export” and select the destination folder to save the enhanced images.

Video Tutorial of HitPaw FotorPea
Part 3. FAQs about How to Add Captions to Photos on Mac
Q1. How to add text to a photo on an iPhone or iPad?
A1. To add the text to a photo on an iPhone or iPad, use the Photos app's Markup feature.
Q2. Can I add text to a slideshow in Mac Photos?
A2. Yes, you can by editing the individual photos before creating the slideshow.
Conclusion
For Mac users who were curious to know how to add text to a photo on mac, this guide provided a comprehensive overview. Using the built-in Mac apps like Preview and Photos, you can simply add the text in few steps and make your pictures standout.
Nevertheless, always remember that it is the quality that makes the picture stand out. So, to truly elevate your photos, consider using HitPaw FotorPea. Give this tool a try and take your photo editing skills to the next level today.







 HitPaw Univd (Video Converter)
 HitPaw VoicePea
  HitPaw VikPea (Video Enhancer)
Share this article:
Select the product rating:
Daniel Walker
Editor-in-Chief
This post was written by Editor Daniel Walker whose passion lies in bridging the gap between cutting-edge technology and everyday creativity. The content he created inspires the audience to embrace digital tools confidently.
View all ArticlesLeave a Comment
Create your review for HitPaw articles