How To Restore Water-Damaged Photographs - Essential Tips And Tools
As we know, water can disrupt the pictures due to a natural disaster or an accidental spill, causing them to lose clarity. This can be heartbreaking, especially when precious memories are at risk. For this, many people search for ways to restore their water-damaged photographs.
In this regard, some attempt to fix them manually, but achieving the desired results with traditional methods is often challenging. Therefore, digital solutions come into play and bring your photos back to life with amazing detail through the right tools and techniques. This article will guide you through the best practices and tools available for restoring damaged photographs.
Part 1. Understanding the Impact of Water Damage on Photographs
Before moving on to the solutions, you must know what damage water does to photographs. This section explores the most common types of water damage to help you recognize the real problem and choose an appropriate water-damaged photo restoration solution:
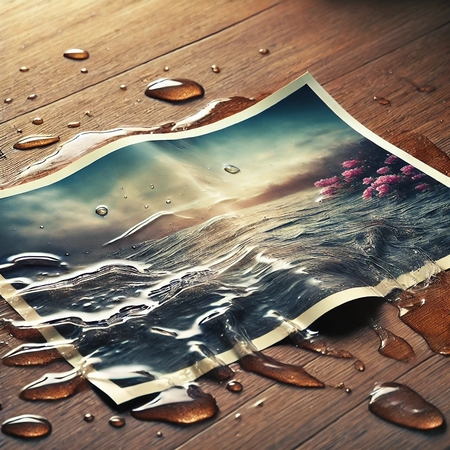
1. Fading: The chemical compounds in the pigments that create the image can break down due to water exposure. This process causes the vibrant colors to lose their intensity, leaving the photo pale and dull.
2. Color Bleeding: Water can cause the dyes in photographs to dissolve and spread across the surface. Due to this color bleeding, the sharp edges of objects in the image become blurred, and the original colors mix, creating smudges that distort the photo details.
3. Emulsion Peeling: Prolonged water exposure softens the layer that binds the image to the paper. As the layer deteriorates, sections of the photograph may lift or flake off, resulting in a significant loss of detail.
4. Warping and Sticking: Water-damaged photos often absorb moisture unevenly, causing the paper to expand and contract irregularly. This results in wrinkling, distorting the paper's original flat shape.
Part 2. Tips And Solutions For Physical Restoration of Water-Damaged Photos
Now that you understand the basic causes of water damage to photos, it's time to explore the practical tips and solutions for physically restoring them:
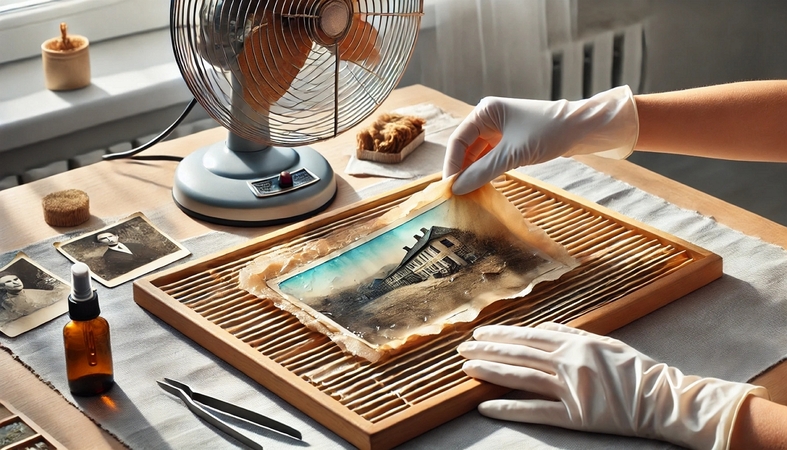
1. Use a Soft Brush for Light Dirt Removal: When looking at pictures of water damage, it is helpful to employ a soft brush to clear out the fine particles that are present. If brushing is necessary, do it in a sweeping motion to protect the surface from damage.
2. Photos Should Be Air Dried: When the photograph has been in contact with water, the first thing that must be done is to allow the picture to air dry. It is preferable to do this away from the sun or any source of heat since they lead to the warping of the photograph.
3. Employ a Dehumidifier: At times, the photos get spoiled and absorb a huge amount of humidity from the surrounding environment. To protect such images, keep them in a room with a dehumidifier, which will assist in removing excess moisture in the air.
4. Don't Use Paper or Cloth Towels: To eliminate water, using paper or cloth towels is ineffective since they may leave fibers or lint on the photograph's surface. These materials can also create pressure, leading to unwanted scratches.
Part 3. Digital Restoration Techniques for Water-Damaged Photos
After exploring the manual methods for water-damaged photo restoration, digital restoration tools can offer a highly effective solution for recovering photos with visible damage. These tools allow for precise corrections and can often save images that are beyond repair through physical methods.
1. PhotoGlory
This is a powerful photo restoration software designed to fix damaged or old photos without any hassle. If your water-damaged photo has lost its original vibrancy, PhotoGlory can revive the colors with its automatic colorization tools. Refer to the following step guide to restore your water-damaged photographs with this tool:
Step 1. After launching PhotoGlory on your PC, click the “Open Photo” button on its homepage and import the water-damaged photo to the tool for restoration.
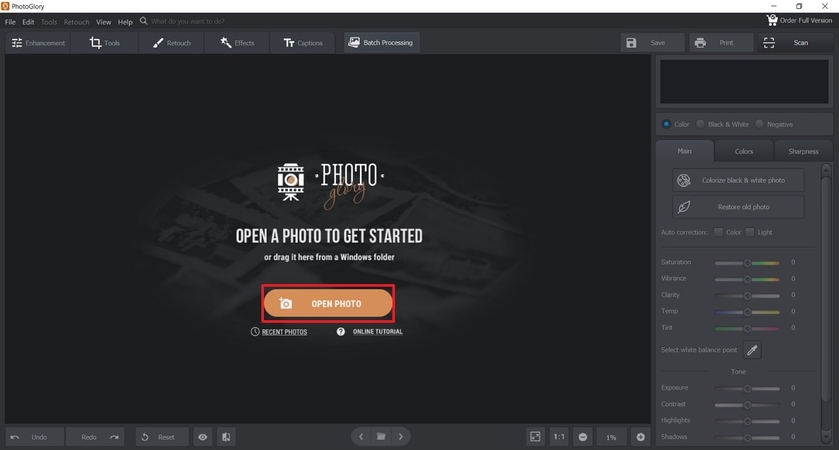
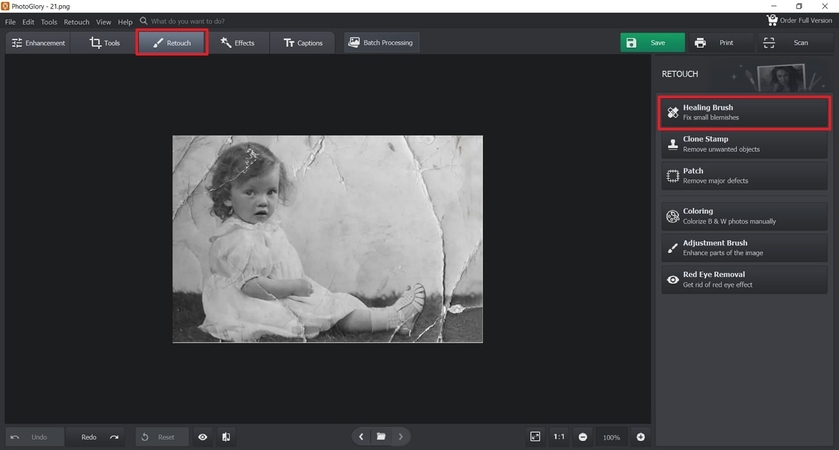
Step 2. Once you’re within the restoration interface, navigate to the “Retouch” tab on the top toolbar. From the panel, choose “Healing Brush” to remove blemishes from the damaged photo.
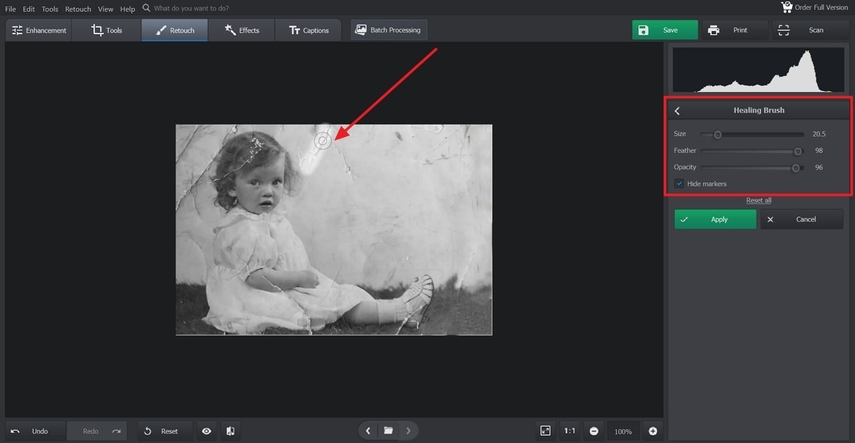
Step 3. Next, adjust the brush size and opacity using the sliders, place the brush over the blemish, and drag it over the affected area. The software will automatically remove the imperfections to restore the photo's smooth appearance.
2. insMind
This powerful online tool offers multiple features to repair damaged or old photos. For example, it offers an AI Magic Eraser tool that lets you easily remove scratches or dye stains from the photos impacted by moisture. Walkthrough the given instructions to perform a water-damaged photo restoration process with this tool:
Step 1. Access the AI Magic Eraser tool from the official website of insMind. After reaching the page, add the damaged photograph to the tool using the “Upload a photo” button.

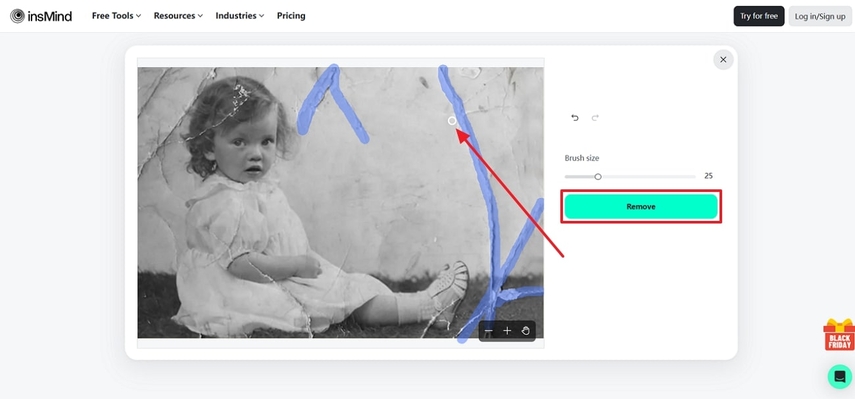
Step 2. When your image uploads, adjust the brush size according to the area you want to restore. Once you've adjusted the size, drag the brush over the area and tap "Remove" to erase the imperfection.
3. Fotor
With this innovative online tool, you can conveniently restore and repair water-damaged photographs. Using AI, Fotor scans your image pixel by pixel, detecting and fixing issues like scratches, tears, and water stains. Simply follow these steps to bring your water-damaged photos to life with Fotor:
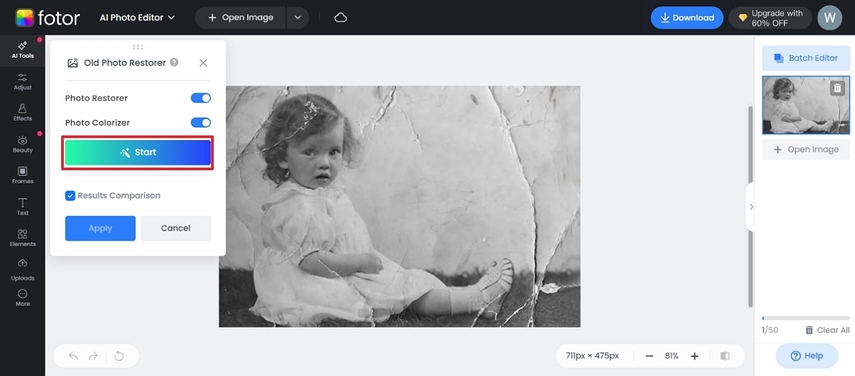
Step 1. Open this tool on your browser and access the “Old Photo Restorer” tool. On the main interface of this feature, press “Open Image” to add the damaged photo for recovery.
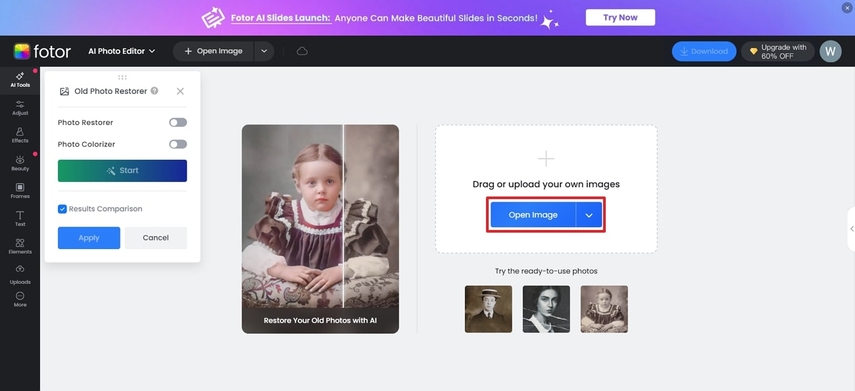
Step 2. After uploading the image, tap “Start” to begin the recovery process. The tool will automatically analyze the image to remove blurriness and stains caused by water damage.
Part 4. All-in-One Solution For Water-Damaged Photos: HitPaw FotorPea
As discussed earlier, water can cause damage to the photographs in several ways, such as through stains, tears, and warping. Very few tools can effectively cater to all types of water damage. Thankfully, HitPaw FotorPea is such an advanced tool that offers a comprehensive solution for restoring water-damaged photos. This powerful platform offers 7 AI-based models designed to enhance and repair your damaged images precisely.
Guide to Achieve Perfection in Water-Damaged Photo Restoration Process
Now that you know about the amazing restoration techniques HitPaw FotorPea offers, let's learn how to utilize this tool for seamless photo restoration:
Step 1. Access the AI Enhancer Tool
After opening the recent version of HitPaw FotorPea on your PC, access the "AI Enhancer" tool from the left side. Next, import the photo of the water damage by clicking the "Choose Files" button.

Step 2. Apply Combination of Models For Restoring Clarity
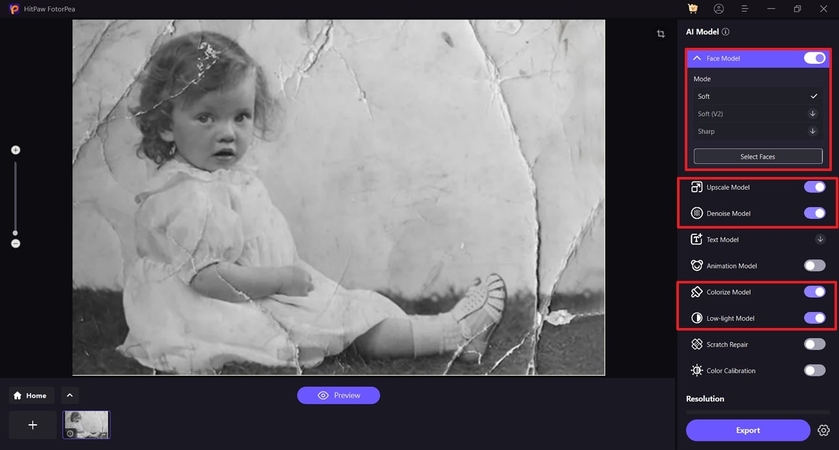
Upon importing the image, head to the right side of the interface and toggle on the "Face Model" option. Click the "Select Faces" button, allowing the tool to automatically enhance the faces within the photo. Next, enable the "Upscale Model” and "Denoise Model” to restore image clarity. Next, toggle on "Colorize Model," and "Low-Light Model" to improve the color contrast of the image.
Step 3. Export the Restored Image
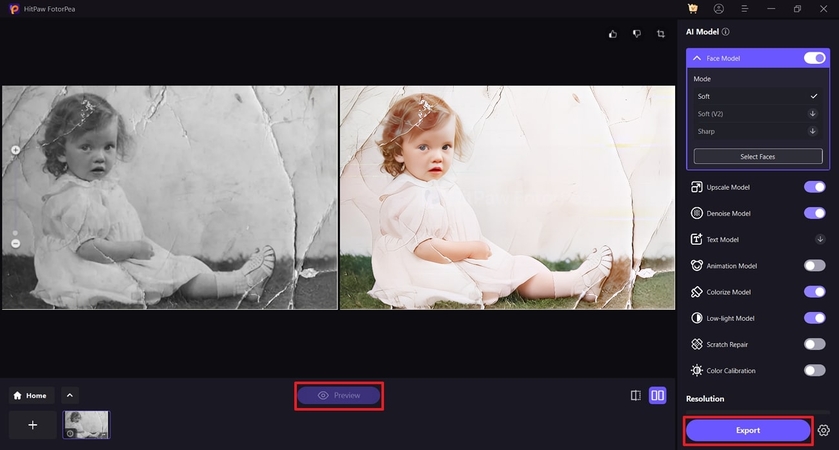
After the water-damaged photo restoration is complete, press the "Preview" button to preview the restored image. Hit the "Export" button at the bottom right when satisfied with the output to save the restored image to your device.
Step 4. Open the Enhanced Image With Retouch Tool
Head back to the software homepage and open the "Retouch Tool" on the left side panel. Next, tap the "Start Remove" button to import the enhanced image for further improvement.

Step 5. Remove Blemishes Using the Brush
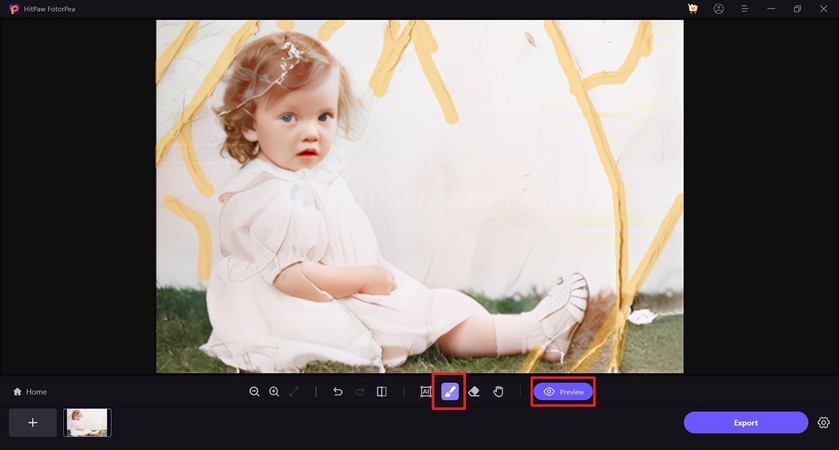
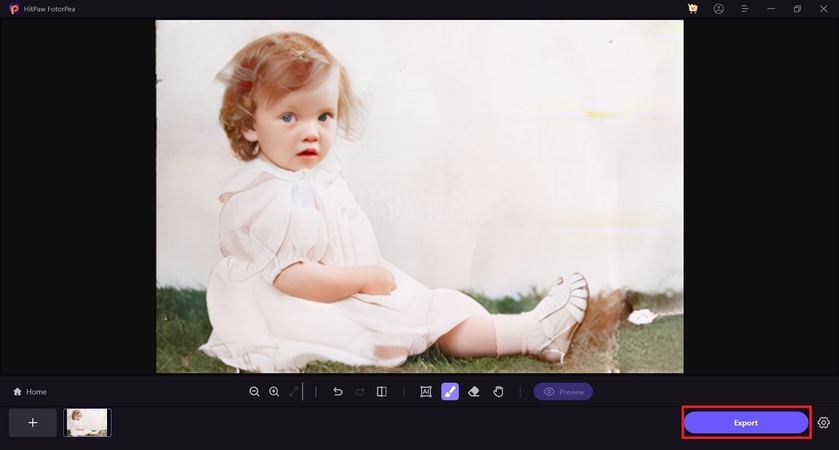
Once your image is imported, pick the "Brush" tool and drag it over the blemishes that need removal. After highlighting that area, click the "Preview" button to see the output.
Step 6. Export the Final Restored Image
Once you get the output, review the results and apply changes if you want to. If you're satisfied with the restoration, hit the "Export" button to save the final version of the photo to your device.
Conclusion
This article provided the best tips and methods for restoring water-damaged photographs. Among all the discussed methods, HitPaw FotorPea emerged as the best option due to its comprehensive AI-driven restoration tools. With models designed to enhance clarity and restore colors, it offers a one-stop solution for returning your cherished memories to life.


 HitPaw Edimakor
 HitPaw VikPea (Video Enhancer)
 HitPaw Univd (Video Converter)

Share this article:
Select the product rating:
Daniel Walker
Editor-in-Chief
My passion lies in bridging the gap between cutting-edge technology and everyday creativity. With years of hands-on experience, I create content that not only informs but inspires our audience to embrace digital tools confidently.
View all ArticlesLeave a Comment
Create your review for HitPaw articles