Remove a Person from Your Photos Seamlessly with Photoshop
We have all faced this situation where we capture a perfect shot only to notice someone unintentionally in the background. Similarly, professionals often face this situation when they want to focus their image on key subjects or achieve a cleaner composition. That’s why tools like Photoshop exist to help users remove unnecessary obstructions from pictures and edit them for professional reasons.
As a reputable editing tool, Photoshop is widely recognized for its powerful capabilities to refine and perfect photos. From minor touch-ups to major transformations, it offers users a wide range of options, including removing a person from your photos easily. Therefore, this article will guide you on how to remove a person using Photoshop with detailed steps.
Part 1. Essential Tools in Photoshop for Person Removal
The photo editing tool from Adobe offers a variety of features designed to make object removal effective and seamless. By following the given core features, you can learn how to remove a person using Photoshop:
1. Content-Aware Fill: This feature automatically fills in selected areas by analyzing surrounding pixels, which makes it ideal for large areas that need background replacement. For uniform background images, you can use this tool to blend the object with the background.
2. Clone Stamp Tool: In Photoshop, this feature allows for detailed touch-ups by copying pixels from one part of the image and pasting it into another. You can find it helpful, especially for more precise edits and areas where natural blending is important.
3. Object Selection Tool: The Object Selection Tool makes it easy to select specific parts of an image, such as a person, in one click. It’s efficient for quickly isolating the person you wish to remove and serves as the starting point for more complicated edits.
4. Patch Tool: Like other features mentioned above, this one also works by replacing one part of the image with another. As a result, it blends the obstruction in the photo with something natural out of the image.
While you can use these tools individually, it is recommended to use them in harmony to make sure you get clearer results. When used together, these tools create a high-quality editing workflow that keeps your images looking professional while also removing people from photos.
Part 2. Guide to Removing a Person Using Photoshop
As said above, these photo editing features make removing obstructions from photos easier. However, the variety of options and a complex interface can confuse most beginners and affect their experience. After installing the software on your PC, you can learn how to remove a person in Photoshop by following the given steps:
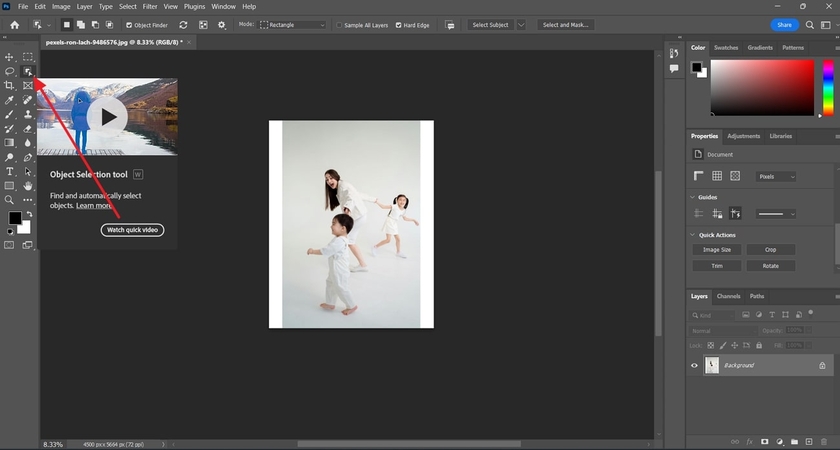
Step 1. After importing the image into the tool, navigate to the toolbar on the left side of your screen. Here, you need to find and click on the “Object Selection” tool icon. Now, click on the person that you want to remove, and the tool will automatically select it.
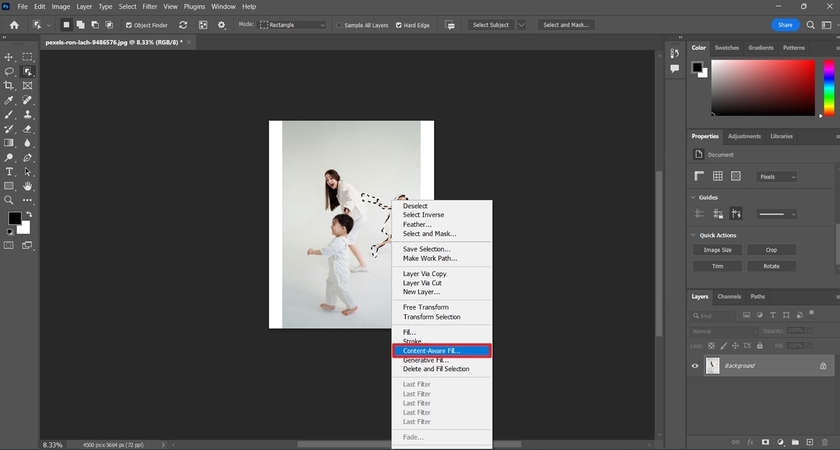
Step 2. Moving further, you need to right-click on the selected person in the image and select the “Content Aware Fill” icon from the popup menu.
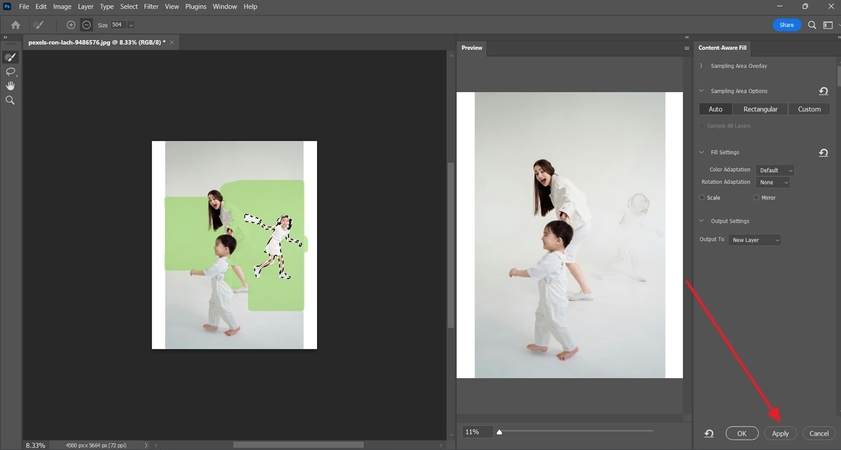
Step 3. Once the tool fills the selection in the photo, an aside window will appear on the screen with the final result. Here, you need to press the “Apply” button to save changes to the picture.
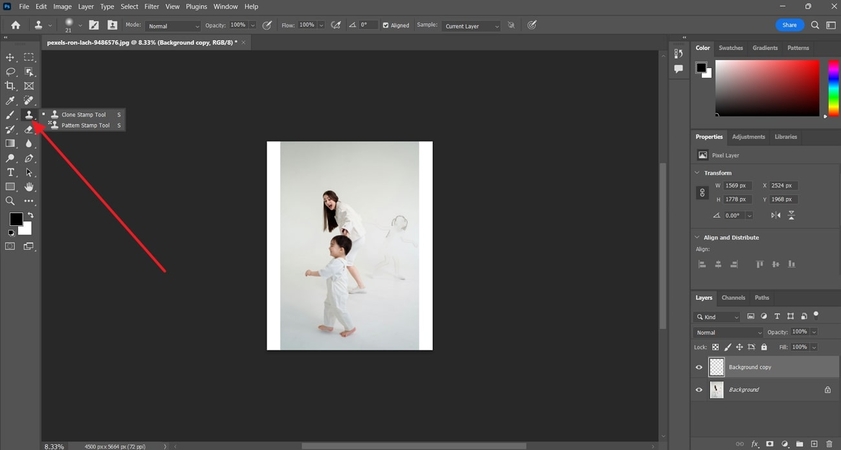
Step 4. To ensure a smooth finish, navigate to the toolbar and select the “Clone Stamp Tool” icon. After that, press the “ALT” key on your keyboard to select the area that you want to clone on the removed person. Finally, drag and drop the select area on the removed person to give the image a clean look.
Part 3. Advanced Techniques for Complex Edits
While the above-shared process works fine on pictures with plain backgrounds, you will have to use advanced techniques for pictures with detailed backgrounds. The following points will help you understand what advanced features you can use to remove a person in Photoshop:
1. Using Layers and Masks: Layering and masking offer control over each edit to allow for precise edits while ensuring you don't mess up an edit. The layering feature especially lets users refine adjustments without changing the original image.
2. Blending with Healing and Patch Tools: These features are ideal for complex areas as they use surrounding pixels to create subtle transitions. For pictures with detailed backgrounds, you can use these tools to blend in the objects without anyone noticing changes.
3. Using the Pen Tool for Precision: Users can take advantage of this feature to make exact selections on complex shapes, such as overlapping subjects or detailed edges. It comes in handy when you need to remove a person with precision while preserving the background's integrity.
4. Color Correction and Matching: After removing a person, slight color disruptions may appear in the edited area. By using tools like the Color Balance or Match Color feature, harmonize tones and ensure the replacement pixels align with the original background’s palette.
Part 4. Easy Alternative: HitPaw FotorPea for Quick Edits
Photoshop undoubtedly has lots of features for advanced picture editing for professional use. However, it is not beginner-friendly due to its complex interface and extensive set of features. For those who find it difficult to remove person Photoshop, HitPaw FotorPea acts as the best alternative due to its ease of use. Additionally, its advanced AI-powered object remover requires fewer steps than other tools.
While using the tool, you can choose to select the item that you want to remove manually or allow its AI to analyze and detect it. For professionals and e-commerce experts, it provides features to remove the background of product pictures to ensure it remains the center of attraction. After downloading HitPaw FotorPea, you can follow the detailed steps in the following section to remove person Photoshop:
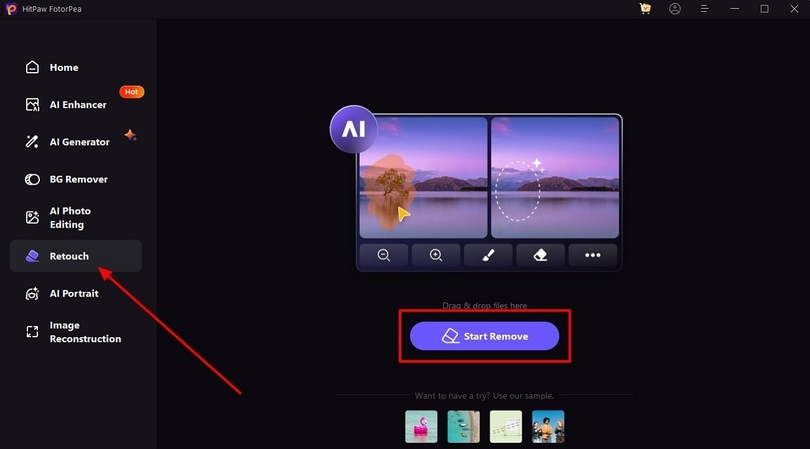
Step 1. Access Retouch Feature in HitPaw FotorPea
Launch the software on your PC and go to the “Retouch” tab from the main interface. Next, you need to click the “Start Remove” button and import the image from which you want to remove someone into the tool.
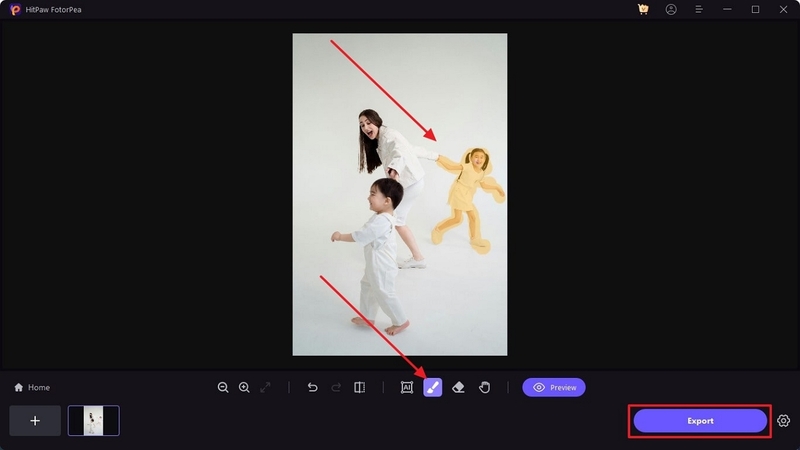
Step 2. Perform Person Removal and Export Results
Once the image is imported, use the “Brush” icon to select the individual that needs removal. When the selection is complete, click the “Export” button to complete the process and save the edited result on your computer.
Photoshop vs. HitPaw FotorPea: Which Provides Better Results?
You might be confused about what software to choose after learning about them both. We highly recommend HitPaw FotorPea as it is a simple solution for editing and removing objects from photos. To know why it is a better alternative, you can check the following points:
1. Ease of Use: Photoshop has a very complicated interface as it is cluttered with functions. On the contrary, HitPaw has a simple interface that is easier to navigate.
2. Badge Editing: You can select multiple elements to remove them simultaneously, which isn’t possible in Photoshop.
3. Quick Edits: As it involves only a few steps, HitPaw FotorPea is the ideal solution for quick edits of photos.
Part 5. Common Pitfalls and How to Avoid Them
While editing pictures, beginners can face many challenges before getting a polished result. Especially when you try to remove person Photoshop, you will face many errors. You can avoid these pitfalls by taking guidance from the following points:
1. Unnatural Edges: Sometimes, edges appear sharp or obvious after removing something from the picture. You can create a more natural look using feathered selections, which helps blend the edges with the background.
2. Incomplete Blending: For areas that don’t blend well, try experimenting with Content-Aware Fill and Clone Stamp Tool settings, or consider multiple attempts to find the best outcome.
3. Color Mismatches: Background colors may not match up after you remove a person from the photo, which causes an obvious patch. You can solve this issue by adjusting hues with the Clone Stamp or Healing Brush tool to better align the colors for a more seamless look.
4. Repeating Artifacts: Content-Aware Fill can sometimes create repeated areas, which makes the edit look unnatural. You can bypass this issue by manually selecting and adjusting these areas using the Clone Stamp tool to maintain a more authentic background.
Conclusion
In short, Adobe’s editing suite is still an advanced tool for high precision and professional edits. While you can remove person Photoshop, you will have to go through learning curve to navigate its complex interface. As an alternative, HitPaw FotorPea offers a faster and more accessible option for simpler edits. Similarly, its AI-powered advanced features cleanly remove any obstruction in the images in no time.


 HitPaw Edimakor
 HitPaw VikPea (Video Enhancer)
 HitPaw Univd (Video Converter)

Share this article:
Select the product rating:
Daniel Walker
Editor-in-Chief
My passion lies in bridging the gap between cutting-edge technology and everyday creativity. With years of hands-on experience, I create content that not only informs but inspires our audience to embrace digital tools confidently.
View all ArticlesLeave a Comment
Create your review for HitPaw articles